I’ve tested a lot of AI video enhancers to save you time and money.
In this post, I’ll share my favorite: Aiarty Video Enhancer.
It’s a downloadable software with an affordable pricing model, but it delivers great results.
Let me show you my results and explain how it works.

👉 Try Aiarty AI Video Enhancer Free
Disclaimer: This article has affiliate links at no cost to you.
My Results & Experience
Aiarty Video Enhancer is perfect for adding sharpness and removing noise from your videos.
Here’s a video I shot at midnight during a thunderstorm:
Please, pay attention to the sky.
In the first clip, it’s really grainy.
In the second one, it’s way less grainy.
Isn’t that handy? The AI did all this for me with just a couple of clicks.
Before I show you more results, let me quickly show you how to use Aiarty Video Enhancer to improve your videos.
How to Use Aiarty Video Enhancer
To start, download the Aiarty video enhancer software here. You can try it for free!
👉 Try Aiarty AI Video Enhancer Free

Once you’ve downloaded the software, open it up.
You’ll see a screen like this:

This is where all the magic happens.
Just drag and drop your videos into the view, then start enhancing them using the different models on the right.
For example, I dropped a video where I’m throwing a disc golf disc.

At this stage, the video enhancement hasn’t started yet!
Instead, it creates a preview of the current frame with the selected model, showing what the video will look like once you apply this setup.
This is really helpful because video enhancement takes a while. You don’t want to wait 30 minutes only to realize you used the wrong settings.
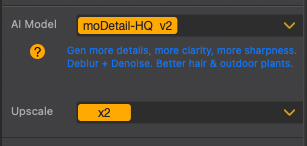
Speaking of enhancements, be sure to adjust the settings on the right-hand side.
For example, the default upscaling factor is set to 2X. This means it will double the size of the video while keeping the quality intact.

For example, with the settings above, the preview looks like this:

That’s handy! Now I can adjust the settings to see if it can improve even more.
For example, I selected a 4X upscaling factor, which means it will make the video much sharper and higher in quality.

But here’s what the preview looked like:

That’s just a bit too much in this example, so I’ll stick with 2X for now.
It really depends on the type of video you’re working with. For videos with people, the upscaling factor should probably stay low, like 1X or 2X. But for videos with scenery and no people, 4X might be just fine to get much sharper results.
However, the upscaling factor isn’t the only thing you should adjust.
Remember, there are three video enhancement models in this tool.
You’ll find them on the right-hand side as well.

Here are the explanations for these models:
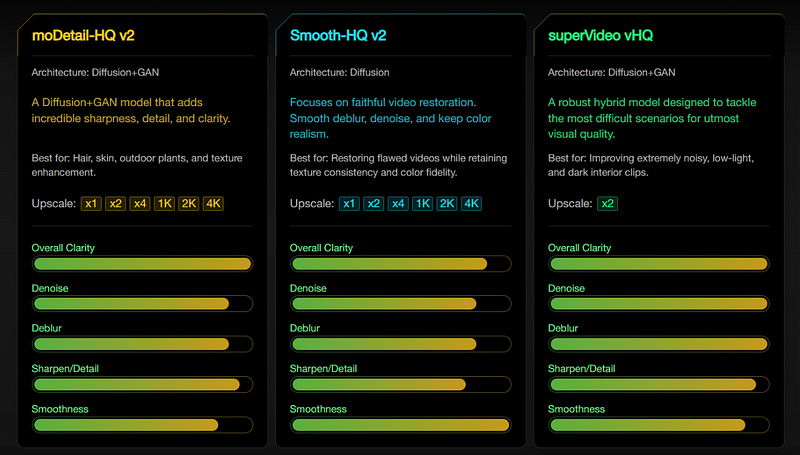
If you can’t see the image, here’s a table that summarizes the models:
| Model | Architecture | Description | Best For | Upscale Options |
|---|---|---|---|---|
| moDetail-HQ v2 | Diffusion + GAN | Adds incredible sharpness, detail, and clarity. | Hair, skin, outdoor plants, texture enhancement. | x1, x2, x4, 1K, 2K, 4K |
| Smooth-HQ v2 | Diffusion | Focuses on faithful video restoration. Smooth deblur, denoise, and keep color realism. | Restoring flawed videos while retaining texture consistency and color fidelity. | x1, x2, x4, 1K, 2K, 4K |
| superVideo vHQ | Diffusion + GAN | A robust hybrid model designed to tackle the most difficult scenarios for utmost visual quality. | Extremely noisy, low-light, and dark interior clips. | x2 |
However, these are just words and numbers to me.
Let me show you some before-and-after footage to demonstrate what they actually do.
👉 Try Aiarty AI Video Enhancer Free
Before vs. After Footage
First, I adjusted my settings on the right to look like this:
Here’s the moDetail-HQ v2 model:

Here’s the Smooth HQ v2 model with 2x upscaling:

And here’s the SuperVideo vHQ model with 2x upscaling:

Pretty cool, right?
(I’ll show you the video clips in just a second, don’t worry!)
In each shot, you can clearly see the difference in video quality—especially when you zoom in closer.
Once you’re happy with the preview, select the time range (unless you want to enhance the whole video).

Just drag the sliders to find the clip you want to enhance.
If you set the range, don’t forget to click the “Add Task” button.

Then click “Export Current.” This will start the actual video processing.

At first, I was a bit confused since nothing seemed to happen, but then I noticed the status bar at the bottom of the view—it’s small but there.

Keep in mind, this process takes some time. Even for my 4-second clip, I had to wait 10–15 minutes for the AI to create the enhanced version.
If you’re short on time, you can use Turbo mode to speed things up, though it sacrifices some quality.

So far, I’ve just shown you some screenshots. Let me now show you a quick clip of these different models in action on the actual video. This should give you a better idea of how it works:
In this video, you’ll see all three AI enhancer models in action with different zoom levels.
As you can tell, it’s not anything wild. But it definitely improves the video quality, especially when you zoom in.
This screenshot sums it up perfectly:

It’s better, but not perfect, as you’d expect.
In addition to this one video, I enhanced a few stock videos to showcase the capabilities in different shots.
For example, here’s a video of a fireworks display in its original format compared to the enhanced version using the Aiarty AI video enhancer models:
Since it’s a nighttime video, you can spot some graininess and noise in the original clip. But the enhanced version clears up most of that.
Here’s another clip where you can clearly see how much the AI improves the video quality:
In this clip, the original quality is about 7/10. After enhancement, I’d rate it around 8.5/10, so it definitely improved. I used the superVideo vHQ model on a clip I found online.
And just in case you missed it earlier, here’s the midnight thunderstorm clip too:
It’s still not perfect, but the improvement after AI enhancement is noticeable.
I really like it! The tool is easy to use, offers a variety of models for different video types, and the results are great.
👉 Try Aiarty AI Video Enhancer Free
Pros
- Great results! The tool significantly improved my video quality and sharpness.
- Different upscaling and enhancement models for various video types.
- Easy to use, even for beginners—just download, activate your key, and add your videos for enhancement.
- There’s a free trial version.
Cons
- After enhancing 3 videos, the tool crashed, and I had to reopen it to process more.
- Too much upscaling can mess up the quality, especially with faces.
- Slow! Enhancing a 10-second clip can take up to 15 minutes. This isn’t just an issue with Aiarty, but with the technology itself.
Pricing
This table summarizes the pricing for Aiarty AI Video Enhancer:
| Feature | Standard License | Lifetime License |
|---|---|---|
| Pricing | $79/year (was $99) | $165 one-time (was $235) |
| Billing | Billed yearly | One-time fee |
| Devices | 1 Mac | 3 Macs |
| Updates | Free unlimited updates for 1 year | Free unlimited updates for life |
| Money-Back Guarantee | 30-day | 30-day |
| Support | 24/7 dedicated email support | 24/7 dedicated email support |
| AI Noise Reduction & Deblurring | ✔️ | ✔️ |
| Restore & Enhance Details | ✔️ | ✔️ |
| Batch Upscale to 4K & Boost to 120 fps | ✔️ | ✔️ |
| Latest AI Models (Local Processing) | ✔️ | ✔️ |
| Continuous AI Updates | ✔️ | ✔️ |
| Built on Cutting-Edge AI Tech & Models | ✔️ | ✔️ |
| Optimized for NVIDIA, Intel & AMD GPUs | ✔️ | ✔️ |
| Free Gift | – | AI Image Enhancer 1-Year License |
👉 Try Aiarty AI Video Enhancer Free
To Take Home
Aiarty AI Video Enhancer can really boost the quality and clarity of your videos.
It’s my favorite tool because it’s easy to use, delivers solid results, and is reasonably priced.
Just keep in mind, though, that this technology has its limits.
If a video is bad from the start, no software can fully fix it.
Think of tools like this as the icing on the cake: if your video is already a 7 out of 10, Aiarty might bring it up to an 8 or even 8.5. But you won’t turn a 3 into a 9.
So, set your expectations accordingly!