This is a complete review of the best online course platforms for creators and teachers.
I’ve tested and used every platform on this list so you don’t have to.
I’ve also included tools for most common use cases, such as teahcers, business owners, and general course platforms.
I’ve included links to free trials.
Let’s go!
My Top 3 Picks
Here are my top 3 picks for the busy readers:
👉 1. Thinkific — Best Overall
👉 2. LearnWorlds — Best for Teams
👉 3. Teachable — Best Built-In Audience
Next, let’s get into the detailed reviews of each course platform on the list.
Disclaimer: This article has affiliate links at no cost to you.
1. Thinkific
Best Overall

Thinkific is the best platform for creating online courses. You can build, launch, market, and sell your courses all in one place.
Instead of sharing lessons through a Google Drive folder with a password, Thinkific gives you a full course site that anyone can access.
It handles all the technical parts for you and makes sure the courses are easy to use and enjoyable for students.
I’ve launched and sold 2 courses with it myself, and it’s my top pick out of all the platforms.
Key Features
Before I get into my own experience with Thinkific, here’s a quick look at its main features:
- Course creation tools — Build courses with videos, quizzes, and interactive lessons.
- Custom website — Create a branded site to host your courses.
- Marketing and sales — Run coupons, promotions, affiliates, and email campaigns to drive sales.
- Memberships and subscriptions — Sell courses with flexible payment options.
- Quizzes and surveys — Add quizzes and surveys for engagement and feedback.
- Drip content — Release lessons over time to keep students coming back.
- Analytics — Track performance, engagement, and revenue.
- Integrations — Connect with Zoom, Stripe, PayPal, email tools, and more.
- Student management — Enroll students, follow their progress, and support them with forums or direct messages.
My Experience
I’ve been using Thinkific for over a year and have launched and sold two courses on it. Now I’ll walk you through how Thinkific works from a course creator’s point of view.
Course Creation Tools
Thinkific has a generous free plan you can get started with. Use the above links to activate it.

After signing up, you can start creating your course.
Just click the “+ New Course” button:

Next, you’ll pick a course template. This is one of the things that makes Thinkific stand out. It gives you a range of clean, professional designs to choose from.
For now, I’ll go with the blank template.

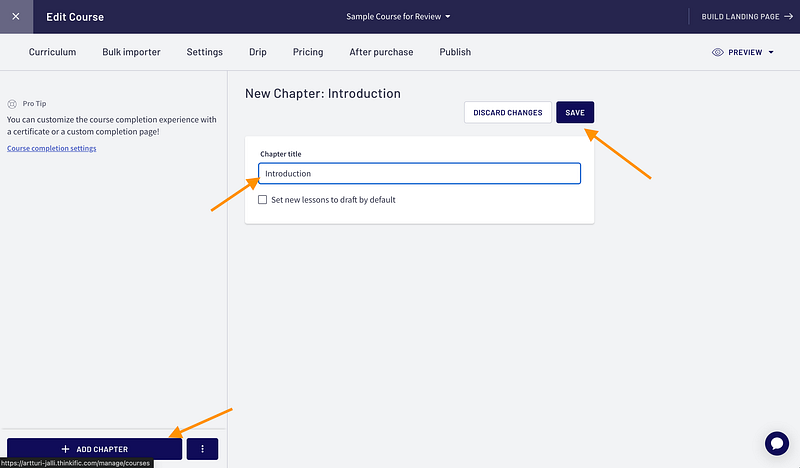
Now it’s time to create chapters.
On Thinkific, the structure is simple:
- Courses contain Chapters
- Chapters contain Lessons
For example, your first chapter could be an introduction. Inside it, you can add lessons like who you are, what to expect, and so on.
Here’s me setting that up:
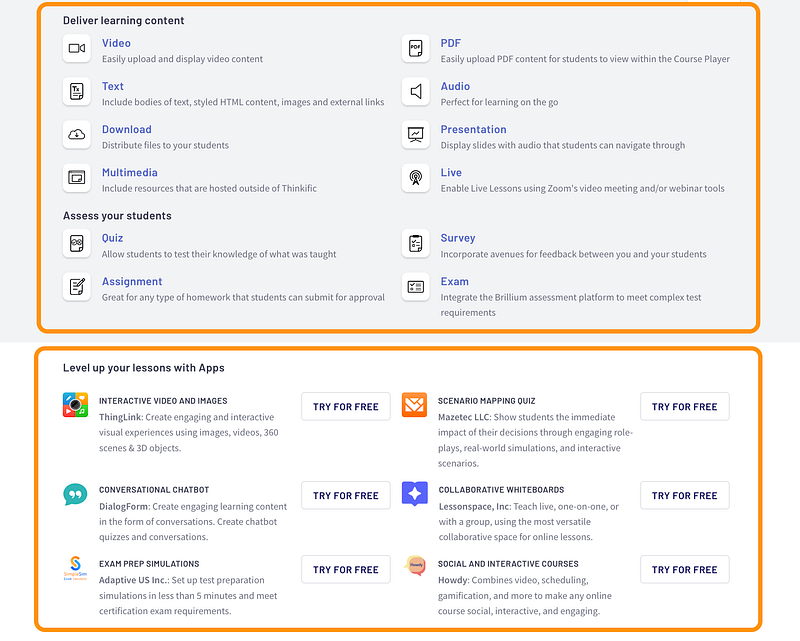
After adding lessons to your chapters, you can choose what type of content to use.
You’re not limited to just video, text, or quizzes—there are a lot more options.
I was actually surprised by how many there were. When I made my first course, I thought it would just end up being one long video.


One feature I really like is being able to add extra materials to lessons.
For example, if you have a video lesson, you can scroll down and attach more content.
This could be notes, thoughts, or corrections if you missed something in the video. You can also add downloads. (In my blogging course, I added templates for students to grab.)

One thing that bugs me with video lessons is the file size limit and how long it takes to preview them.
It makes sense since the platform has to process each video before it can play, but it can still feel confusing.
Sometimes it takes 30–60 minutes before your video shows up. Until then, you can’t even watch the lesson.
My tip: compress your videos first and bulk upload them to the library. Just give them clear names so you know which is which.

You can use HandBrake to compress your videos.

Another feature I like in Thinkific is adding quizzes for students. It’s a simple way to keep them engaged. You can drop these quizzes in as their own lessons.

Just type your question, add the answers, and pick the correct one.

Almost forgot—you can drag and drop lessons and chapters in the course editor. This lets you organize your course any way you like, without having to build it in a fixed order.

A cool feature to try out is Thinkific Apps (integrations). These third-party apps let you extend what Thinkific can do. If something’s missing, you can usually find an app to fill the gap.
The downside is that these apps aren’t cheap. Many of them cost about the same as the Thinkific Standard plan. That’s a lot to pay just to add one extra feature on top of everything Thinkific already gives you.
Still, if you really need it, it might be worth it.

Customizable Website
What about building a website for your course?
Because you don’t just need a page for your lessons—you also need a real course site, right?
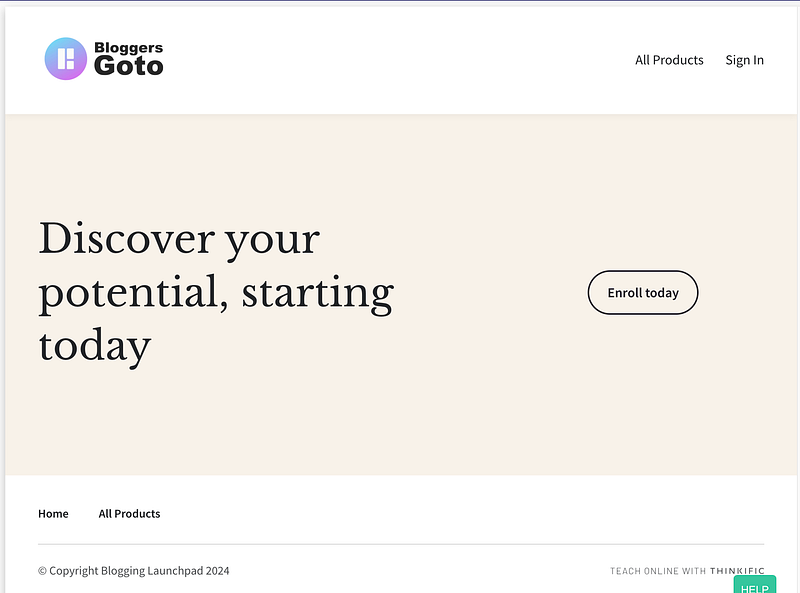
Thinkific makes that easy. It comes with a landing page builder so you can create a solid course page. The ready-made template gives you a good starting point.
Let’s test it out with my sample course:

Here’s the default course page that Thinkific generated for my sample course:

As you can see, it already looks pretty good and works right out of the box.
You can always add your own touch, but the structure is solid. It shows the course name and has a clear CTA to enroll.
Scroll down and you’ll see more elements to help promote your course.
You can change the theme of your course pages by clicking “Theme Settings” on the left.
From there, you can update colors, fonts, images, and more.
The only issue I ran into is that it changes the theme for all your courses, not just the one you’re working on. I learned that the hard way when I accidentally changed the look of all three of my courses.

Overall, the site builder is super easy to use, and I recommend just jumping in and trying it out.
You can add new sections to your page with the “+ Add Section” button. Building your course site really is that simple.

For example, let’s add a counter at the bottom of the page to help drive sales.
It’s a common but powerful trick. Just click “Add Section” and search for “Counter.”

Here it is:

You can set the duration by clicking the counter and adjusting the settings on the left.

That’s the main workflow with the site builder:
- Search for an element
- Click to add it to your page
- Drag it where you want in the editor
- Edit the content and settings in the left panel

This makes it super easy to use. Just pick an element and edit it with the simple controls.

The only drawback is the lack of customization.
It’s not a dealbreaker, but you’ll notice it pretty quickly.
For example, I find LearnWorlds and Teachable (covered later) a bit stronger in this area.
One thing I wanted, for instance, was to show a strikethrough on the original price next to the discount price, like this:

But Thinkific doesn’t let you do that. Not a huge issue, but it’s such a common feature that it would be nice if they added it.
Marketing and Sales Tools
Once your course is ready (and your landing page is set up), the next step is marketing.
This is important—people won’t just find your page and buy. You need to promote your course with offers, funnels, and other tactics.
And no surprise, Thinkific has tools for that too.

For example, you can make one lesson free as a preview, and then lock the rest behind a paywall.

You can also create promo codes for your course. I’ve used them myself, and they work well.

You can even limit discounts to the first 10 sign-ups (or any number) to add scarcity and make the offer more tempting.

Analytics and Reporting
Once you start getting students, you can track things like transactions, revenue per user, total revenue, and more.
Some of these come with the Standard plan, but for deeper analytics you’ll need to upgrade to a higher plan.

I’m not a big fan of putting detailed stats behind a paywall.
That said, I only have 2 courses and can already see all the key analytics I need, so I don’t really have much to complain about. 🙂
Student Management and Support
Last but not least, Thinkific lets you manage, communicate with, and support your students.

For example, you can track your students’ progress.
Who’s stuck?
Who hasn’t started yet?
Who’s finished the course?
And more.

You can also build a community inside Thinkific around your courses.
And when students finish a course or module, you can reward them with a certificate.

Preview
Before launching your course, double-check that everything looks good.
Thinkific makes this easy—you can enroll in your own course as a student to see exactly how it works.

One of my favorite things about Thinkific is how it handles all the technical stuff for you—organizing, tracking, and viewing lessons.
It keeps track of progress, lesson numbers, chapter numbers, and more.


That’s the big advantage of using Thinkific.
Without a platform like this, coding all these features into your own course would be a huge challenge.
Sure, you could just share a private link to a long video, but if you want to track progress, accept payments, build a landing page, and more—you need a tool like Thinkific.
I definitely recommend giving it a try, especially now that you can get my free deal here.
Pros
Thinkific is a complete platform. As you’ve seen, it packs in everything you need for a smooth course experience.
Everything is handled in one place. You can design, build, edit, host, market, and sell your course all from the same platform. There’s even a community feature where you can chat with your students.
- Websites — Thinkific doesn’t just build courses and landing pages. You can also create a simple website to showcase all your courses. The customization is limited, but it’s very easy to use.
- Progress tracking and analytics — See how students are interacting with your content, track their progress, and step in if someone is stuck.
- Payments — Handles payments, refunds, sales, coupons, and all the technical stuff for you.
- Support — I’ve sent multiple questions to their team, and they’ve always responded quickly—even with me in a different time zone.
These are just some of the good things I like about Thinkific. Sure, you could host a course without a platform like this, but it would quickly become way too inconvenient.
Cons
- Limited customization — The basics are covered, but if you want more tailored options, you’ll feel restricted. For example, I couldn’t adjust the original price on my landing page.
- Expensive apps — If Thinkific doesn’t have a feature you need, you can often find it through an integration app. The problem is, most of these apps are pricey.
- Occasional downtime — When I first started, my account went down for days without warning because I hadn’t uploaded a tax document. My students had no idea what happened. A simple notice in the UI would’ve saved a lot of confusion.
Pricing

There are quite a few plans on Thinkific:
- Free plan — $0
- Basic plan — $49 per month
- Start plan — $99 per month
- Grow — $199 per month
To Take Home
I recommend Thinkific for creating a course.
You can build different types of lessons, track progress, manage sales, market your courses, and more—all in one place.
The downsides are small. Some marketing tools are missing, and the landing page builder can feel a little rigid.
But honestly, those things won’t matter until you’re dealing with hundreds of students. 🙂
2. LearnWorlds
Best for Schools and Organizations

LearnWorlds is a great platform for creating and selling online courses.
It’s easy to use and comes with everything you need—customizable templates, interactive videos, exams, and more.
It’s a solid choice for educators and entrepreneurs who want to build engaging learning experiences.
I recommend it if you’re planning to take your teaching online.
Now let me show you the key features and how it works in practice.
Key Features
Before I show you my own results with LearnWorlds, here’s a quick overview of its features:
- Unlimited courses — Create and manage as many paid courses as you want.
- Interactive videos — Add quizzes and interactions inside videos.
- Assessment tools — Exams, quizzes, and certificates are all included.
- Live classes — Host live classes and webinars.
- Customization — Customize the course player, website, and even build a mobile app.
- Marketing tools — Integrates with email marketing, lead generation, and affiliate programs.
- Analytics — Track learner progress with detailed reports.
- Scalability — Handles high volume or corporate use, with dedicated support.
My Experience
I’ve tested LearnWorlds thoroughly as a course creator, and now I’ll share my experience with it.
I’ll also give you a quick tour so you can see what the platform is like.
Getting Started
Unlike some premium platforms, LearnWorlds gives you a free trial without asking for a credit card.
Just hit “Get started for free” on their homepage.

To start the free trial, just sign up.
Next, you’ll create your school. This isn’t the same as a course—your school is the main hub with a website, course library, and more.
I named mine Blogging School. You can also customize the website URL here. If you leave it as is, it’ll just use your school’s name.

It takes about 10–15 seconds for LearnWorlds to set up your school’s workspace.
After that, you can pick a template (or theme) for your school.

Be sure to answer the setup questions as best you can. It’ll help tailor the platform to your needs.

Once you’ve answered the questions, you’re ready to create your first course.
Tip: I suggest booking a call with LearnWorlds. The platform has a lot of features, and it can feel overwhelming at first—especially if you’re just starting out.

Here’s your School Dashboard:

This is the main dashboard where everything happens. You can check stats, create courses, view reports, run marketing, customize your site, and more.
But let’s start with the main thing—course creation.
Creating a Course
Making a course in LearnWorlds is pretty straightforward. Just click “Create course.”

Next, give your course a name. I called mine Blogging 101—an intro to blogging for my Blogging School.
And don’t forget to add a thumbnail image for your course!

Next, set a URL path for your course. This makes your course link clear when you share it with others.

Here’s something I didn’t notice on other platforms.
When you set your course access, if you pick anything other than “Draft,” your course goes live immediately. So keep it in Draft if you don’t want people joining while you’re still building it!
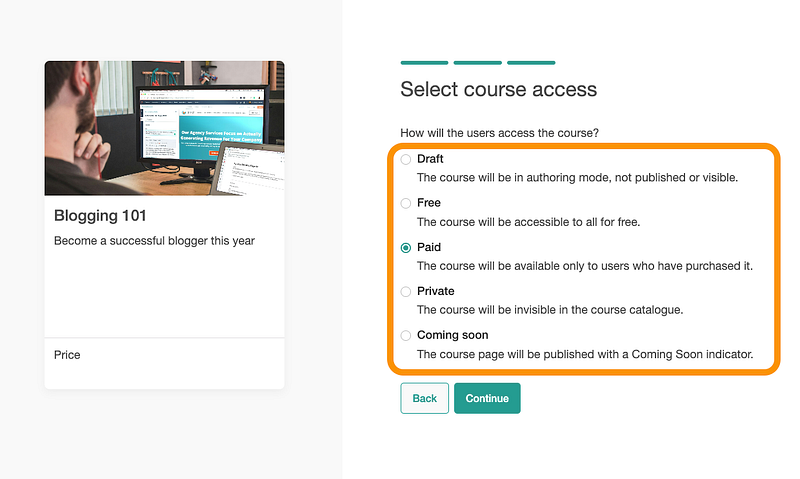
When I finished my sample course on LearnWorlds, I started looking for a launch button. Then I realized it had already gone live before I even built it…
That’s different from other platforms I’ve used. Not a big deal, but worth keeping in mind.
If your course is paid, you’ll also set the price here.

Besides setting a fixed price, you can also add a discount and show the original price with a strikethrough.
It’s a great feature because it helps boost sales, and surprisingly, many platforms don’t let you do this. (I still haven’t figured out how to do it on Thinkific, even though it feels like a basic option.)
After that, it’s time to build your course content. To speed things up, let’s use AI again.

Unlike Teachable, this step asks you to fill in some details carefully. That way the AI doesn’t go off track.
For example, you can choose the content types, sections, number of activities, and more.

Once you’ve filled everything in, the AI will generate your course. It takes about 30 seconds. After that, you’ll see a screen like this:

Scroll down and click “Insert” to add the outline to your course.
If you want to change the order of the lectures, just drag and drop them in the view.

One thing I noticed right away is that the AI didn’t create descriptions or text for the lectures. It only named them and put them in order.
To add or change content, just click the pen icon and write your own descriptions.

Don’t forget to save.
At first, I got a bit lost because I couldn’t find how to upload a video to the lectures. Then I realized it’s under the “Settings” tab.

You can use Vimeo, YouTube, or other platforms, or just upload your own video.
To upload your own, select “From course video library.”

This part is a bit of a hassle. It takes you out of the course outline and into the library page. Then you have to upload the video and wait quite a while—sometimes tens of minutes—for it to process.

You can’t use the video in your lectures until the upload and encoding are finished. I didn’t like this because it means I have to remember to come back later and add the video I already uploaded.
Once the upload is done, you can get back to your course editor through the “Course outline” section on the left.

Next, you can add a cover image for your section.
It’s optional, but I recommend doing it—it makes your course look more engaging and professional.
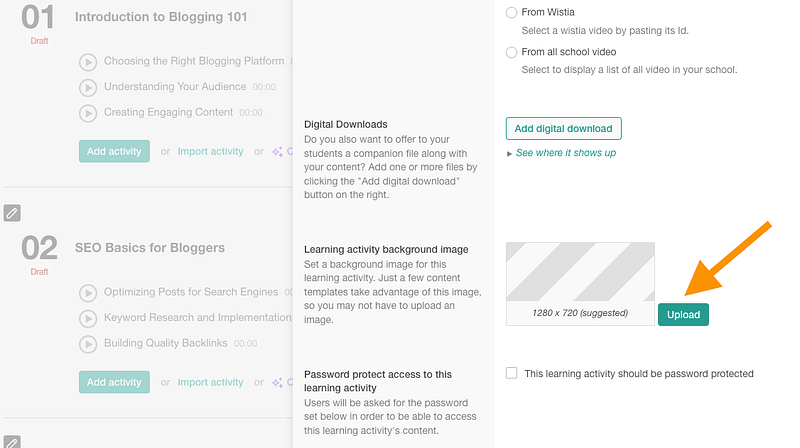
If you don’t have your images, pick one from a library like Unsplash:

After that, you can move on to other parts of your module.
Right now my course is only videos, which isn’t the best format. You should mix in some interaction too.
That’s where activities come in.

There are dozens of activities to choose from.

One thing I couldn’t find was quizes, though.

Since a quiz wasn’t available, I made a small text assignment for my students instead:

This is where I started to see how versatile the platform is.
You’re not limited to just adding a question and answer—you can also format it in different ways.

When your activity is ready, you can preview it from the top right.

This lets you see the activity the same way your students will.

You can even complete the assignment yourself (or any activity you’re previewing).


Pretty cool, right?
That’s how you create course content in LearnWorlds.
I won’t go through every single activity type here—you can test those out on your own.
Let’s move on to the course layout.
Editing the Layout
One of the best features in LearnWorlds is that you can fully customize your course layout.
Once your content is ready, just pick “Course page layout” from the left menu.

Then just click an element to edit it. You can drag it around, change fonts, colors, and more.

After customizing my page, I noticed LearnWorlds gives you more control than other platforms I’ve tested.
It has more options, more advanced settings, and the editor itself is just better overall.

After you adjust the layout, click the Preview button to see your changes.

Here’s how my simple sample page looks now:

Yeah, it’s not perfect, but I’m just testing things out.
And while we’re on layout, you can also change how your course player looks. Just go to Course Settings > Course player and pick the layout you like best.

There’s a lot more I could show you about customizing the course page, but no need to turn this into an e-book. The controls are simple and intuitive—you’ll figure them out quickly.
Let’s move on to some other useful features.
Useful Features
LearnWorlds gives you a detailed dashboard with real-time insights about your course. You can see revenue, student numbers, assignments, and more.

You can also open the course insights tab to track student performance. This becomes really useful once you have a good number of students enrolled for a while.

Publishing the Course
When it comes to publishing, you might be surprised to see your course is already live.
I was looking for a “Launch” button, but when I typed in my course URL, it was already published.

This happened because I set a price for the course, which made it public. So keep that in mind!
Luckily, my sample lessons without content weren’t visible—they were set as drafts automatically.
If you want to publish your content too, just go to the course outline, click the module, and set it to “Paid.” That makes the materials live.

Do this for all the lessons you like.
Website
Now that your course is created and published, let’s look at the website side of LearnWorlds.
When you sign up, the first thing you create is an e-school. That’s where all your courses live, and it also comes with a website for them.
To get to your site, go to the “Website” section in your school’s main dashboard.

From there, you can customize your website. For example, you can pick a design and change it up.
Here’s my school site using a Tropic Lake color palette and Poppins as the font:

Just like with your course page, you can edit your website too. Click on elements and adjust them until they look and say what you want.

You can also add new pages to your site—and even blog posts if you have that feature enabled.

There are page templates as well. Like I said, this platform really covers everything. You could even build a full website with it if you wanted to.

Marketing
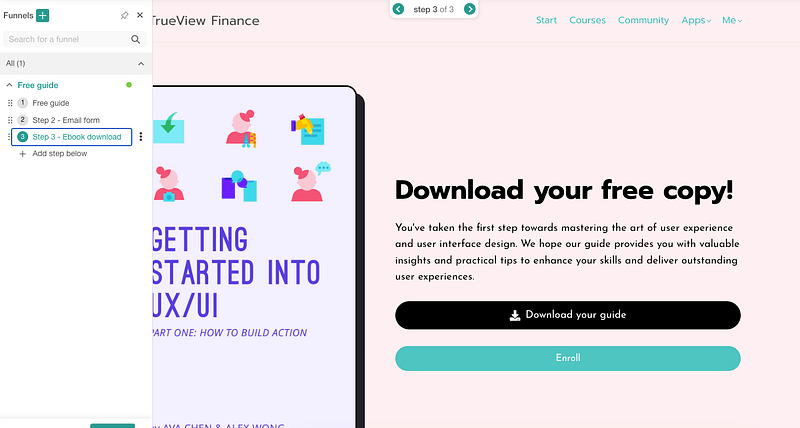
And of course, there are marketing features too. For example, you can (and should) set up a sales funnel for your courses to boost sales.

You’ll also find solid funnel templates to pick from. These are proven to work for course creators in different industries.
To take sales up a notch, you can set up an affiliate program. Your students can promote your courses and earn a commission for it.

Community
Next are the community features. Instead of setting up a Slack channel or WhatsApp group, you can build the community right inside LearnWorlds.

It works almost like a mini Slack. You get threads, notifications, spaces, hashtags, formatting tools, and more.

For example, here’s a space I set up called Testing, where I’m creating a poll for my students:

Pretty cool, right? You can do everything in one place.
And it’s not just in the browser—you can also use the mobile app.
With so many features, you might wonder how to keep it all organized.
The answer is simple: the main dashboard. That’s where you’ll see quick stats, notifications, and all the important stuff in one view.

Pros
- LearnWorlds has more features than any platform I’ve tested. Honestly, I think it’s even richer than Teachable.
- The free 30-day trial is great. It’s not a watered-down plan—it’s the real basic plan, and you get a full month to try everything.
- You can use it to build a full e-learning setup. You’ve got a school with a website, links, landing pages, marketing, support, analytics, payments—everything in one place.
- The course pages and websites are very customizable. More than I’ve seen on other platforms. The trade-off is that it makes the platform harder to use and the learning curve steeper.
Cons
- The interface isn’t as smooth as other platforms. For example, if you upload a video, you have to wait for it to process before you can use it. Then you need to remember to go back and add it. Also, my course was published before I realized it, which I didn’t like.
- It’s harder to get started. With so many features, things aren’t always well organized. It even took me a while to figure out how to upload a video.
- Too many features for beginners. This can be both good and bad. If you’re just making one or two courses for a YouTube community, it’s overkill. But if you want to build a full school, this platform is perfect.
Pricing

- Starter: $24/mo
- Pro Trainer: $79/mo
- Learning Center: $249/mo
- High Volume & Corporate: Contact sales
To Take Home
I like how versatile LearnWorlds is.
This is built for serious creators. You can use it to run a full online academy.
Everything is in one place—marketing, communication, content creation, editing, payments, coaching, outreach, and more.
That makes it a great tool if you want to build a real online course business.
But if you just want to launch a single course for your community, this platform is probably too much.
3. Teachable
Best for Beginners

Teachable is an online course platform that lets you create, market, and sell courses. It comes with all the basics you’d need to run a course successfully.
But is it really worth the hype? Does it actually deliver?
I’ve tested Teachable (along with other similar tools), and now I’ll share my review.
Let me show you around.
Key Features
Before I walk you through Teachable, here’s a quick look at its key features:
- Course builder — Easy drag-and-drop interface for creating and organizing courses.
- Customizable templates — Professional templates you can brand your own way.
- Multimedia support — Upload videos, audio, PDFs, and more.
- Payments — Built-in payment processing with support for multiple currencies.
- Student management — Enroll students, track progress, and engage with them.
- Marketing tools — Email campaigns, affiliate programs, and other built-in features to drive sales.
- Analytics — Track sales, student progress, and course performance.
Now, let me share my own experience and results!
My Experience
I launched and sold two courses in 2023–2024 using Thinkific.
But now I’m curious about other platforms and want to test them out to see if I’ve been missing anything.
So let me show you how Teachable works—and what I think about its features, usability, and more..
Getting Started on Teachable
To get started with Teachable, just sign up for the free plan.

On some platforms, the “free” plan isn’t really free. You just give your email, and then they immediately ask for your credit card. Honestly, I can’t stand that.
But with Teachable, that’s not the case. I was surprised to see there’s an actual free plan you can play around with.
When you sign up, Teachable first asks you a few questions about your goals.

Getting started on Teachable is that easy. After this step, you can jump right into creating your learning products.
Creating a Course
Choose your product next.

I wanted to try the Online Course option.

So far, everything’s been super easy. Less than 30 seconds after signing up, I was already making my first course. Pretty awesome!

Teachable has set up every step to be clear and make sure you don’t skip anything important.
For example, this is where you pick your course thumbnail (if you have one).

You can even use their crop tool to make it fit just right.

There it is!

Next, you can set a price for your course.
There are plenty of options here. Honestly, anything you’d want is probably already on the list:

I went with a one-time payment.
After that, you can set the price, name, subtitle, and description that appear on the checkout page:

Once you’ve set the course name, image, and price, it’s time to start adding content.
Since it’s 2025, there’s an AI option. I’m not super into it, but let’s give it a try for fun.

After this, it takes around 30–60 seconds for the AI to make course content drafts. (If you’re starting from scratch, there’s no waiting.)
Working with Your Course
Once the content is ready, you’ll see your course dashboard for the first time.

This is the main view where everything happens—creating content, marketing, and helping your students.
Before I can launch my course, there’s a lot to take care of.
First, let’s check out the curriculum. Keep in mind, this was all made by AI, and I haven’t changed a thing yet.

If you want to move a lecture around, just click the six dots on the left and drag it where you want.

Now, let’s start adding and editing the course content.
Adding Course Content
For example, here’s the text the AI created for the “Why Blogging Is Important in 2024” section:

I have to admit, the AI content is a bit generic and boring. If I wanted to publish it as-is, I’d need to rewrite most of it.
At the same time, I like it because it gives me a starting point. I already have a full course outline, so no staring at a blank page.
That said, you’re not stuck with just text (obviously).
Open a lesson and scroll down—you’ll see the Add Content button:

This lets you add all kinds of content to your course—videos, audio, quizzes, media, code samples, and more.
For example, here I’m uploading a lesson in the Video Content section:

One thing to note: the free trial only lets you upload up to 10 videos.

After uploading your video, it needs some time to process so the size is smaller but the quality stays good. You can leave the page while it’s working.
Depending on how long your video is, this could take an hour or two.

One neat feature that a lot of platforms don’t have is custom thumbnails for your videos.

This is great because eye-catching thumbnails help make sure your students actually watch the lessons and don’t skip around.
It also lets you control how your course materials look.
On the topic of looks, every lecture has a Preview button in the top-right corner:

This lets you see the lesson just like your students would.
For example, here’s how my course looks at the moment.

I think this is a great feature because it shows what the course really looks like. You can check that everything works the way you want for your students.
Now, let’s add more content to the course:

For example, I think quizzes are a great way to check what students have learned. I always include them in my courses.

On Teachable, adding a quiz is really easy. Just type your question, select the correct answer, and hit save.

Now, let’s get into some of the more practical stuff on Teachable.
Useful Features and Widgets
Here are some of the most useful features you should know about.
(I won’t cover everything—otherwise this would turn into an e-book.)
Before you launch your first course, it’s a good idea not to leave it on a blank profile. You can use Site > Bios to add a profile picture and a short description about yourself.

This way, when potential students visit your profile, they get an idea of who you are, what you do, and why they can trust you as a teacher.
If this is your first course, be sure to check out the Get Started tab on the left:

Here, you’ll find video tutorials, other products, and tools to set up and organize your school.
The next one you don’t want to skip is the Theme tab (also on the left side).

Here, you can set your course Logo, Thumbnail, and Favicon.
For example, here’s what I made:

You can also pick your color scheme and fonts.

Once you’re ready, just hit Preview to see your course. Here’s mine, for example:

If you don’t like the random URL Teachable gives your course, you can change it in the Domains tab.

This lets you get a custom domain for your course. Instead of something like artturi-jalli-s-school.teachable.com, you could use artturijalli.com/courses/ or something similar.
One of my favorite features is giving students discounts.
You might think it’s complicated, but it’s really not. On Teachable, it’s easy—just go to Site > Coupons and create a discount.

You can set discounts to expire at a certain time, limit how many are available, or create any kind of scarcity offer for your course.
You can also track how well your coupons are doing—see how many have been used and how many are left.
Speaking of tracking, go to Site > Breakdown to check how your courses are performing.

This view shows your total sales, any partner sales, and more. You can also see your daily earnings.
Student Engagement Features
Finally, let’s look at some ways to engage your students and build a community.
To see a list of all your students, go to Users > Students.

This doesn’t just show your students—it also lets you set up an affiliate program so your students can promote your course. That can be an extra income stream for them, but that’s a whole other topic.
One neat feature is the Coaching widget. You can use it from the Coaching tab on the left menu.
It lets you track student progress, keep notes, send messages, and a lot more.

Doing all this without a tool like this would be messy and inconsistent.
On the topic of student engagement, you can also create a community. This makes it easy to communicate with your students.
You can set up shared spaces for FAQs and different discussion topics.

You could use Slack or WhatsApp for this, but I think Teachable gets it right—everything happens in the same place where students learn.
Actually, that’s kind of the whole point of Teachable. Learning, coaching, communication, reports, billing, sales, marketing—it’s all under one roof.
Going Live
Now that I’ve covered most of the key features, it’s time to launch your course.
If you have a big audience waiting, one thing to do is customize your sales and post-purchase pages.
You can do this right in the main course view by scrolling down a bit.

You can click the links to open and view the pages:

For example, here’s what my sales page looks like:

To make changes, just click Edit sales page.

Here, you can rearrange things and change text, fonts, images, and more.

For example, here I’m editing a text section that’s way too long for my taste:

Once you’ve finished all your edits, it’s time to launch. Just scroll back up and click Launch your course.

And just like that—your first Teachable course is live!
Honestly, this is a really awesome platform. You can do everything in one place, and the controls are super easy and intuitive.
The AI features are fun, but let’s be real—they won’t do all the work for you. You still need to put in most of the effort. 🙂
Also, remember that when you’re just starting out, you don’t need all the bells and whistles.
Focus on building a loyal audience first and sell your course to them. Once you have hundreds of students, then you can start thinking about order bumps, CRO, affiliate programs, coaching, and all that extra stuff.
Pros
- Everything in one place: Teachable has all the tools you need for creating, marketing, and managing a course. Honestly, there are almost too many options for new creators, but that’s also kind of nice.
- Generous free trial: You can create a course and even market it (with some limits). Most platforms don’t offer anything close to this.
- Super easy to use: It’s as simple as setting up a social media profile. Everything is organized well and flows smoothly.
- Affordable pricing: Even the most expensive plan is under $200/month. Other platforms usually charge double or triple for the same features.
- Makes sense: Community, marketing, sales, student support, progress tracking, coaching, secure payments—it’s all in one place. You don’t need 10 different tools to run a course.
Cons
- Can be overwhelming: With so many features, it’s easy to get lost, especially if you’re just starting out. But honestly, that’s kind of a good thing too. 🙂
- AI content isn’t perfect: The AI drafts need lots of editing and fact-checking, so you might be better off starting from scratch.
- Limited customization: You can pick landing pages, logos, and colors, but there are still some obvious limits.
- Free plan is limited: The free plan is nice to try things out, but it won’t take you far because of the restrictions.
Pricing

- Free: $0/mo
- Basic: $39/mo
- Pro: $119/mo
- Pro+: $199/mo
To Take Home
Teachable is an excellent platform for creating online courses.
What I love is that it brings together everything you need to run a smooth and successful course.
You can host, edit, manage, promote, sell, engage with students—basically everything you’d want for a solid online course.
If you’re just starting out, don’t get overwhelmed by all the features. You won’t need most of them until you have hundreds of students. 🙂
4. Khan Academy

Khan Academy is an educational platform offering free resources and courses on a wide range of subjects.
But you can’t create and publish your own courses directly on Khan Academy.
Instead, the platform provides content made by its team of experts. You can use these ready-made courses to build learning paths and programs for your online school.
So, if your goal is to teach as easily as possible, Khan Academy is great. All the content is already there—you just organize it for your students.
Key Features
Before I show you how I use Khan Academy, here’s a quick look at its key features:
- Extensive Course Library: Covers a wide range of subjects and education levels.
- Video Lessons: Clear, high-quality tutorials that are easy to follow.
- Practice Exercises: Interactive problems with instant feedback.
- Personalized Learning Dashboard: Tracks progress and offers customized learning paths.
- Mastery System: Ensures students understand concepts before moving on.
- Teacher and Parent Tools: Resources for assigning lessons and monitoring progress.
- Accessible and Free: All content is free and works on multiple devices.
- Test Preparation: Offers resources for standardized tests like the SAT and ACT.
My Experience
As I mentioned, Khan Academy is completely free for both students and teachers. That makes it very different from platforms like Thinkific or Teachable, where the focus is on selling courses at a high price.
I’ve been watching Khan Academy videos on YouTube for over a decade, and I’ve learned a ton of math, physics, and chemistry from them. It’s a reliable platform that truly puts students first.
Since everything is free, all the course content is accessible without any cost.
Now, let me show you how it works.
As a teacher on Khan Academy, you can use their ready-made courses, track student progress through personalized dashboards, and assign lessons.
To get started, just sign up as a teacher:

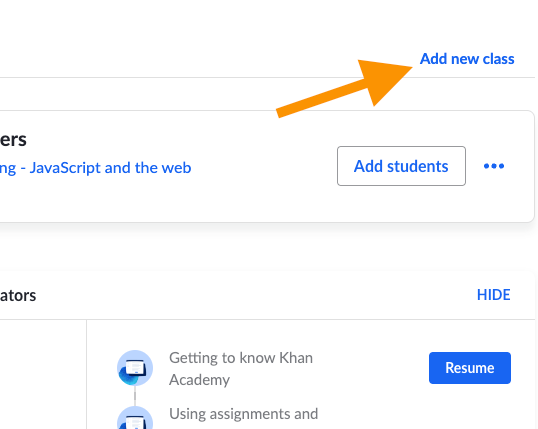
Create a class.

Give it a name:

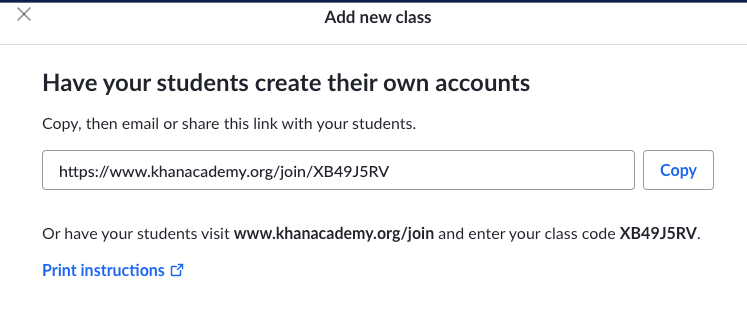
Next, choose how students will join your learning path:

I chose a link:
After creating a class, it’s time to add courses. Just click the Add Course button in the class banner.

Then it will suggest courses based on the name of your class. You can also search for other courses. Make sure to watch them first to see if they’re a good fit.

There’s a wide selection of courses to choose from:

You can add as many classes as you want.
You can also name your class.

Once you’ve pulled together the course content from the library, you can assign it to your students.
This will put the content into each student’s assignments section.
From there, you can track their scores using the interactive dashboard:

You can add new students to your class manually too.

In the top-right corner, there’s a class code you can share with anyone. Students can use this code to join the course.

Pretty simple, yet really versatile, right?
You can’t create your own course content, but you can use expert-made materials.
From there, you can put together your courses however you like. Add or remove students, assign work, track progress, and more.
I like this approach. Instead of spending hours creating content, I can just use a platform like this and focus on teaching.
Pros
- Non-profit and generous: I love Khan Academy. I learned math from them back in high school and even university. It’s amazing that a platform like this exists to make learning possible for everyone.
- Easy to use: Just sign up as a teacher (or student) and assemble a course from the available content.
- Transparent: You can see how your students are performing on lessons, projects, and assignments.
- Versatile content: Tons of lessons and courses to choose from, covering different skill levels and ages.
Cons
- Limited to Khan content: You can’t create your own course material—you have to use what’s already there.
- Non-profit focus: If you’re looking to make money from courses, this isn’t the right platform. Platforms like Thinkific or Udemy are better for selling and promoting your own courses.
Pricing
Khan Academy is completely free.
Take Home
I love Khan Academy. It’s a simple platform with ready-made courses you can add to your classes. You can manage students, track progress, and organize learning paths—all for free.
Honestly, what’s not to love?
5. Udemy

Udemy is a platform where teachers can share their skills with people all over the world.
It works on a revenue-sharing model, so you earn money based on how many students take your classes.
You might make less per student compared to selling your own course, but you can reach a much bigger audience.
The platform is easy to use, and there’s a supportive community to help you along the way.
Let me show you how it works!
Key Features
- Pay-Per-Course Model: Students buy individual courses, so you earn directly from each sale.
- Extensive Course Catalog: Tons of topics like business, tech, personal development, and more.
- Flexible Learning: Students can go at their own pace with lifetime access to courses.
- Global Marketplace: Reach learners from all over the world.
- Instructor Revenue Share: Earn a cut of each sale, with different revenue share options.
- Promotional Tools: Marketing features to help boost your course visibility.
- Course Engagement: Quizzes, assignments, and Q&A keep students active and learning.
- Multi-Device Access: Courses work on computers, tablets, and smartphones.
- Offline Viewing: Students can download lessons for offline use via the app.
- Instructor Resources: Guides and support to help you create and improve courses.
My Experience
Here’s my take on Udemy and how it feels to use it.
To get started as a teacher, just go to the Udemy website and click “Teach on Udemy.”

Unlike Skillshare and some other platforms, Udemy lets anyone start right away. You don’t need to apply or wait for approval to begin creating courses. Of course, your courses still go through a review process, but I think it’s much smoother this way.
Next, just click “Get started.”

After that, the platform will ask a few questions about the courses you want to create.

Be as accurate as you can. Don’t exaggerate your audience or past courses. If you haven’t created any courses before, that’s totally fine.
Once you’ve filled out the questions, click “Create Your Course.”

Next, choose whether you want to create a Course or a Practice Test.

Give your course a title:

Then specify a category:

This will open the course creation view, where you can start building your course.

This is your task list—you need to complete each step before submitting your course for review.
The most important part is the course content.
Udemy lets you add lectures, quizzes, coding exercises, tests, and assignments. To do this, just open a section and click “+ Content.”

Next, pick the type of content you want to add.

By the way, you can see your course from a student’s perspective anytime. Just click the “Preview” button in the top-right corner.

This is super useful because it shows exactly what your students will see. Every solid course platform should have something like this!
Now, back to adding content. For a lecture, you can upload downloadable files, pull from your library, or link to external resources (including code).

Exactly! Udemy makes adding quizzes very intuitive. After you click “Add Multiple Choice”, you can:
- Type your question.
- Add multiple answer options.
- Mark the correct answer.
- Optionally, give explanations for correct/incorrect answers so students learn even if they get it wrong.
This is a great way to reinforce learning and keep students engaged after each lecture.

Don’t forget to pick the correct answer.
Here’s what the quiz looks like from a student’s view:

Pretty useful, right?
You can also make assignments for your students. Just fill in the basic info, add instructions, questions, and answers.

Okay, that’s enough for the course content.
That’s a solid list of features for a basic course. You’ve got videos, files, code, assignments, quizzes, and more.
That’s plenty to create a course that teaches in different ways and covers everything well.
But the course isn’t ready just yet. You still need a landing page.
It might sound tricky, but Udemy makes it really simple. They have a template—you just upload an image and fill in a few fields, like I did here:

Then, you can preview the course page. This is what it looks like for me:

Pretty cool, right? If you’ve ever looked for info online, you’ve probably seen a page like this on Udemy. It looks nice and familiar.
The problem is, since it’s Udemy (not your brand), all pages look the same no matter who makes the course.
That’s a big drawback. You’re building Udemy’s brand, not your own.
After that, pick a price tier.

Write some course messages.

When you’re ready, click “Submit for Review.” This will send your course to Udemy’s content team to check it.

The review usually takes 2–5 business days.
Overall, I liked Udemy. It’s simple to use and easy to get started. Plus, it’s free to start making courses!
But it does have its limits.
First, you’re basically working for Udemy. You only get a small cut of the earnings, and you’re building Udemy’s brand, not yours. That’s a big drawback if you want to grow as a creator and make a name for yourself.
Second, the customization is limited. You get the basics—quizzes, assignments, videos, written content, and code—but not much beyond that. Platforms like LearnWorlds give you way more features.
Still, it’s simple and effective, so the limits aren’t all bad.
Pros
- Easy to use. It only took me 10 minutes to create a basic course on Udemy. Of course, I still need to add the content, but it’s super easy to get started.
- Promotion. Udemy has a huge reputation and audience. It pushes your courses to a wide crowd. You don’t need a big following to succeed.
- Cool landing page. The platform lets you create a nice-looking landing page, which is instantly recognizable because of Udemy’s reputation.
- All the essential features. You get the basics—videos, assignments, quizzes—making the learning experience fun and effective. Plus, since it’s not packed with extra features, it’s easy to pick up.
- Takes care of the hassle. Udemy handles payments, promotions, and all that so you don’t have to worry. You can start even without an audience or experience.
Cons
- Limited earnings. You’ll only earn from how much time paying members spend on your course. If you sold your course on your own, you could make $100–$1,000 per course. But on Udemy, it might just be a few dollars per student.
- Limited customization. Other platforms offer more features—like custom landing pages, community tools, and plugins. Udemy is simple and to the point, though.
- Limited pricing options. With platforms like Thinkific, you can set your own price. On Udemy, the pricing is limited to a few default tiers (up to $199 for my course).
Pricing
Teaching on Udemy is free!
There are no upfront costs or subscription fees to become a teacher.
Start creating on Udemy
To take away
Udemy is a great option for teachers who want to reach a global audience without having to build one themselves.
Even though you might earn less per student, reaching more people can make up for it.
The platform is simple to use and has a supportive community, making it a solid choice for anyone wanting to teach online.
Create your course on Udemy — it’s free!
6. Podia
Podia is a solid all-in-one platform for selling courses, memberships, and downloads.
But it’s more than just a course platform. It also gives you the tools you need to start making sales. You get features for building your website, marketing, and managing customers.
Let’s take a look at how it works and what it really offers.
Key Features
Here’s a quick look at the main features of Podia:
- Course Creation Tools: Create and sell courses with different types of content.
- Digital Downloads: Sell eBooks, PDFs, and other downloadable products.
- Membership Feature: Run membership sites with exclusive content.
- Website Builder: A no-code, customizable website builder.
- Email Marketing: Built-in tools for newsletters and automated campaigns.
- Sales Pages: Build high-converting sales pages.
- Webinars: Host live or pre-recorded webinars.
- Affiliate Program Setup: Set up an affiliate program to promote your products.
- Payment Processing: Integrated payment processing.
- Analytics: Track sales and customer behavior with detailed analytics.
My Experience
I’ve spent quite a bit of time testing Podia. Let me walk you through how it works, what it offers, and how it compares to other platforms like Thinkific or Khan Academy.
Podia is awesome because you can sign up for free and start creating courses right away.
Not every course platform lets you do this. Most either require payment or an application to get started.
After you sign in, this is what you’ll see:

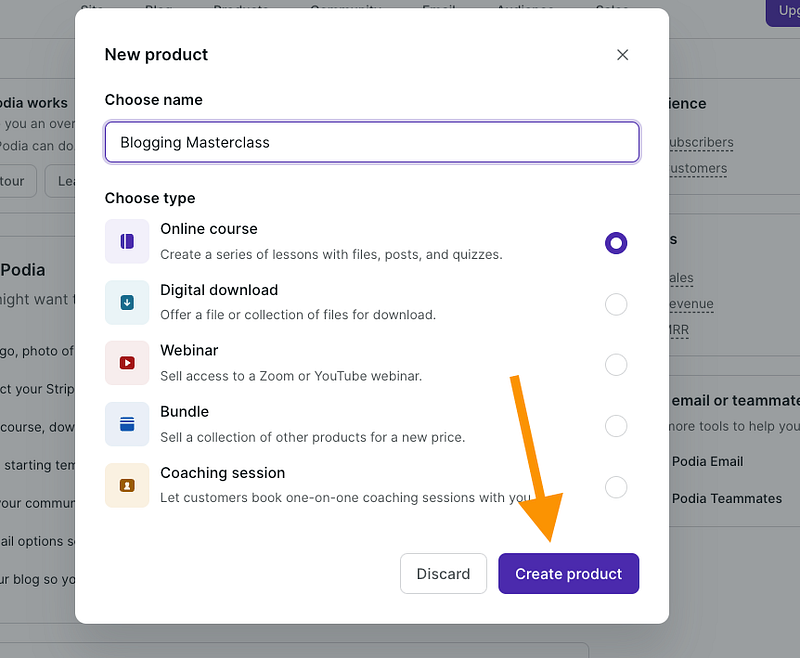
To start a course, just click on the “Create a product” section. (As you can see, there are plenty of other options to pick from too.)

Then pick the Online course:
Next, you’ll see a details page for your course. From here, you can add lessons and create new sections for your course:

Give your course a proper name:

Set the availability:

Give it a price:

And so on.
When adding content, you’ve got a few options:
- Text
- Embedded content
- Quiz
- Coaching
- Files

For example, here’s what a quiz looks like. You can give it a name, ask a question, and choose the correct answer.

Or, here’s what the coaching looks like:

In the coaching section, you can link your Calendly (or any similar calendar tool) so your students can pick a time to meet with you without the email back-and-forth. Pretty cool, right? Most course platforms don’t offer this.
The course text editor is pretty solid too. It has basic formatting options, so your text chapters or lessons won’t be just long walls of text. You can organize your content with lists, bold, italics, and more.

After adding your course content, you can edit your course landing page. This is where you’ll sell your course.

It lets you pick colors from popular color palettes.

Here’s what my empty landing page looks like:

It’s nothing too fancy, but it has all the key elements and colors set up. If you had to code this from scratch or use a different platform with no landing page templates, it’d take forever.
You can customize the pages with basic settings, like changing colors, fonts, buttons, links, and media.

When you’re ready, just click “View product” to check out your course.

This gives you a preview from the perspective of an enrolled student. It’s a really useful feature.

Once your course is live, you can share a link to it like this:

So that’s how course creation works on Podia. It’s simple and covers all the basic features. But it’s a bit limited in terms of customization. For instance, the LearnWorlds platform lets you do a lot more than what you can on Podia.
But creating a course is only half the battle. You also need to sell it. This is where Podia really stands out.
You can set up email campaigns to warm up your leads and potential students on your email list.

Create a campaign by clicking “Start campaign.”

Pick a name and set the condition for when you want to send it to your subscribers.

There are email templates you can pick from. But honestly, these days, it’s best to stick with a simple text template. It’s straightforward, relatable, and works well. No need for flashy colors or crazy formatting—that’s the old-school approach.

Here, I’m adding titles and preview text to my emails:

Email marketing could honestly use its own tutorial—it’s a lot to cover if you want to do it right. But let’s keep it brief.
Once your course, landing page, and emails are set up, you can start tracking your analytics. This lets you see how many emails you’ve sent, how many people opened them, and more.

You can also encourage your students to buy sooner by offering limited-time coupons, like 20% off for May 2025.

I haven’t created any coupons yet, but basically, you just need to choose a coupon name, set the sale amount, pick an expiry date, and decide on a limit (optional).

Last but not least, you can build a community around your learning content. This is pretty common these days. You can create topic pages and membership sites.

Once your customer base grows, you can try affiliate marketing. This means your students review your products and earn a small commission automatically whenever they make a sale through their affiliate link.

This is awesome, and again, not something every platform offers. Depending on your niche, a solid affiliate program can really boost your course sales.
So, I’d say Podia is a solid platform with lots of great features, from creating and selling courses to building a community of engaged students.
But after reviewing a bunch of platforms, you might be wondering what sets Podia apart from the rest.
The difference is simple:
For one, unlike Udemy, which is a marketplace, Podia gives you full control over your branding and customer relationships.
On the other hand, compared to platforms like Thinkific, Podia is more of an all-in-one solution with built-in email marketing. With Thinkific, you need to rely on a third-party email service.
But there’s definitely some overlap too!
Podia shares many features with platforms like LearnWorlds and Teachable.
Pros
- All-in-One Platform: Podia has everything you need for course creation, digital downloads, memberships, and email marketing.
- Easy to use: The platform is simple. Sign up, start creating your courses and landing pages, and sell. It’ll take time to build and grow your audience, but the technical side of things is as easy as it gets.
- No Transaction Fees: Unlike some competitors, Podia doesn’t charge transaction fees on any plan.
- Customer Support: Podia’s customer service is top-notch—quick, helpful, and always ready to assist with any questions.
Cons
- Limited Customization: There are fewer design customization options compared to some competitors, and content options are pretty basic.
- Basic Reporting: The analytics and reporting features could be more advanced, but this isn’t a big deal when you’re just getting started.
- Limited Community Features: The tools for building a community aren’t as strong as on other platforms. You might be better off using Slack or another third-party service for that.
- Fewer Integrations: Podia has fewer third-party integrations compared to some other platforms.
Pricing

- Free Plan: $0/month
- Starter Plan: $4/month
- Mover Plan: $33/month
- Shaker Plan: $59/month (first year pricing, then $75/month)
To Take Home
I love Podia.
While I wouldn’t rank it as the #1 tool right now, it does a great job when it comes to course creation.
It’s not just about creating a course and putting a price tag on it—it also has marketing and community features built-in!
Podia gives you full control over your branding and customer relationships, unlike platforms like Skillshare or Udemy.
Thanks for reading! 🙂