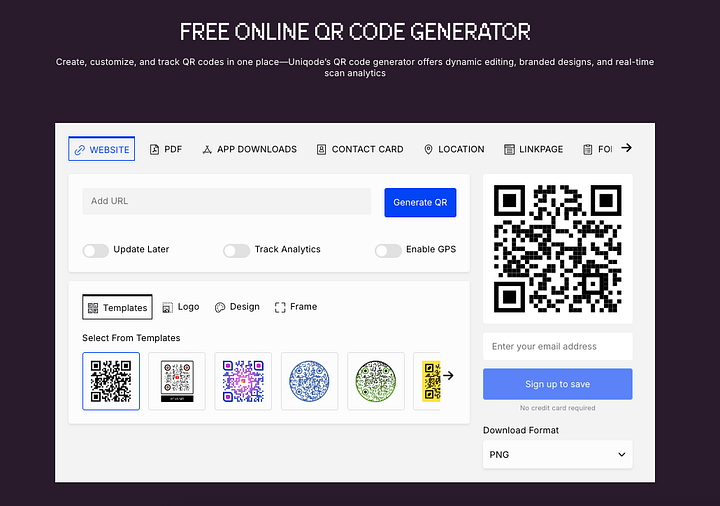
The platform is ridiculously easy to use. Simply visit this page to create your QR code for free.
Just as an example, you can enter a website URL to create your card.
This will then create a QR code that, once scanned, brings the person to the URL you specified in the field.
Because it’s a quality platform, there’s not just one QR code, but you can choose one that best fits the mood/your brand.
Notice that you can also:
Make your QR code updateable
Track the performance (analytics)
Enable GPS information
Also, it’s not just a QR code generator for websites. The platform has got you covered, whatever you’re trying to make QR-scannable.
There are PDFs.
You have app downloads.
You can create Contact Cards.
Heck, you can even create a QR code for a location.
There are so many QR code options that you won’t face any obstacles with this platform.
Let me show you a more detailed look at one of the QR codes that I created.
First, I picked the Website QR code option from the above list.
I then chose a QR code template that looked the best for me.
I also customized the QR code URL page, so that it’s not a random, fishy-looking URL.
Then I gave the QR code a name.
And then I published it.
Once I did that, the QR code is now sitting at my QR Codes library from which I can track its performance and do edits to it.
One thing that’s super handy here is that you can download the QR code in all the most common formats.
Also, you can edit the code after the fact. For example, you can duplicate it, create a template, label it, or change the details.
Here’s a full-screen version of my QR code. I may have deactivated it when you’re reading this, so don’t worry if the scanning doesn’t work anymore. It’s just a test QR code anyway.
Now, let’s talk about the analytics of the QR codes you create.
It’s one thing to put a QR code out there, but it’s an entirely different thing to know how it’s performing. That’s something you don’t want to do by guess. Instead, you want to see reliable data on the number of scans, unique scans, locations, and more.
To view your QR code analytics, head over to Viewer Analytics in your QR Codes tab.
This shows you the number of total scans, whether it’s the same person or multiple persons.
Also, you get to see the number of unique scans, which lists the number of people that have scanned your QR code.
So, for example, if one person scans your code 100 times, the Total Scans says 100, but the Unique Scanners says 1.
I noticed that this information is updated very quickly. I scanned my QR code 3 times, and it didn’t take more than 15 seconds for the dashboard to reflect that.
Notice that you get a view to more granular analytics too. You can see daily charts. You’ll see the devices used to scan your codes. Also, you’ll see the most active times of the day when your code has been scanned.
Last but not least, you also get to see from where your QR codes are scanned.
Notice that Uniqode is not just a plain QR code platform. Instead, it’s a proper QR code system for businesses. It allows you to create:
Linkpages — A web page that contains multiple hyperlinks, often used for navigation, promotion, or social media bios.
Forms—This feature allows for gathering responses from your scanners.
Digital Business Cards—These replace the physical wallet cards with QR-scannable digital wallet cards you can place in Apple/Google wallet on your smart device.
Landing pages—This is a basic information-rich, neatly designed website where you can send people from your business cards or QR codes.
If you want to build a link page, there are lots of good-looking templates to choose from.
To build a form, you can watch the tutorial on the forms page.
If you want to create a mobile-optimal landing page for yourself, that’s possible in Uniqode too.
Also, don’t forget about the integrations that Uniqode offers.
Lastly, for the technical readers out there, it’s good to know that once you create your code, it will automatically create an API key for it.
This is useful if you want to integrate your app and create custom QR code campaigns.
Notice that Uniqode also lets you create a digital business card. To do this, just switch to the Cards tab in the dashboard.
For example, here’s a card I created for myself:
You can create these types of cards just by filling in your details, adding/removing buttons, and customizing the colors.
The tool also creates a QR code for your business card, which is handy, since you can save this to your Apple/Google wallet for easy access.
Similar to QR codes, you can track the analytics of your business cards easily with the tool.
Overall, this is a great platform for creating QR codes and digital business cards. As you can see, it meets all your demands, from creating QR codes for many purposes to tracking the performance.
Next, let’s jump into the comprehensive reviews of every single course platform on this list.
Disclaimer: This article is reader-supported. If you choose to pay for the tools listed in this article, I might earn a small commission at no cost to you.
Thinkific is the best online course creation platform. You can create, launch, market, and sell courses with it.
Instead of sharing your course through a Google Drive folder with a passphrase, Thinkific lets you create a complete course environment open to everyone.
This platform takes care of all the technical stuff and ensures the courses are as accessible and enjoyable as possible.
I’ve used this platform to launch and sell 2 courses, and this is my top recommendation of them all.
I’ve used Thinkific for over a year now and have successfully launched and sold two different courses there. Now, I’ll show you the ins and outs of Thinkific from a course creator’s perspective.
Thinkific Course Creation Tools
You can start on Thinkific for free.
Once you’ve signed up, it’s time to create your course.
To do this, click the “+ New Course” button:
Then it asks you to choose a course template. This is already where the platform stands out from the masses. You’ve got all sorts of minimalistic yet powerful designs to choose from.
I’ll choose the blank template for now, though.
Then it’s time to create chapters.
Oh, and just to clarify, on Thinkific, you have:
Courses that have Chapters.
Chapters that have Lessons.
As an example, your first Chapter could be an introduction. Then you can add lessons, such as who you are, expectations, etc.
Here’s me doing that:
Once you start adding lessons to your chapters, it’s time to choose the type of learning content.
Instead of being limited to video, text, or quizzes, you have many more options.
I was surprised by the variety of content types available. When I started my first course, I thought it would just be one long video.
One thing I love is that you can add extra materials to your lessons.
For example, if you have a video lesson, you can scroll down and add additional content.
This can include notes, thoughts, or corrections if you missed something in the video editing. You can also add downloadable materials. (In my blogging course, I included templates for students to download.)
Speaking of video materials, one thing that annoys me is the limit on video size and the time it takes to preview the videos.
It makes sense because the platform has to process each video and prepare it for display, but it can be confusing.
Sometimes it takes 30–60 minutes for a video to become visible! Before that, you can’t watch your lessons.
To this end, I’d actually recommend compressing your videos and bulk uploading them (with good names so that you can remember them) to the library.
You can compress your videos with HandBrake.
Another thing I always enjoy doing on Thinkific is testing my students with a quiz. It’s a simple yet effective way to keep them awake. You can easily add these quizzes as separate lessons.
Then type in the question, add answers, and choose the right one.
Oh, and I almost forgot to mention: You can always drag and drop lessons and chapters in the course content editor. This means you can organize your course content without working in any specific order.
One cool feature worth experimenting with is Thinkific Apps or Integrations. These (3rd-party apps) can enhance your Thinkific environment. If there are missing features, you can use an App to bridge the gap.
The only downside is that these apps are pricey. Most of them cost about the same as the Thinkific Standard plan. That’s a lot just to add one more feature to the hundreds we already have.
But if you need it, why not use one?
Customizable Website
How about creating a website for your course, then?
After all, that’s what you need — not just a course materials page, right?
Well, Thinkific has you covered!
They offer a landing page builder to help you create a highly effective page for your course. The pre-made template is a great starting point.
Let’s give it a try for my sample course:
Here’s the pre-made course page for the sample course I just created:
As you can see, it already looks decent and works well.
Adding a personal touch would be great, but the structure is solid. It has the course name and a clear CTA to enroll right away.
Then, if you scroll down, you will find more relevant course promotional elements.
You can also change the theme of your course pages by clicking “Theme Settings” on the left-hand side.
This will adjust your colors, fonts, images, and more.
The only problem I had was that I didn’t realize it would change the theme for all my courses, not just the one I was testing. So, I accidentally changed the look of all three of my courses.
Anyway, these site-building features are so easy to use that I recommend just diving in and experimenting.
You can add new sections to your page with the “+ Add Section” button. Building your course website is really that simple.
For example, let’s add a little counter to the bottom of the page to boost sales.
This is a popular and powerful trick. To do this, all you need to do is click “Add Section” and search for “Counter:”
And there it is:
Setting the duration happens by clicking the counter and tweaking the parameters on the left.
This shows you the main workflow with the site builder.
Search for an element.
Click to add it to your page.
Drag it around in the editor.
Customize the contents and parameters in the left-hand side panel.
This makes it very simple to use. Just choose an element and edit it with intuitive edits and controls.
The only thing that’s missing is customizability.
This is mostly not a make-or-break problem, but it’s something you will quickly stumble across.
For example, LearnWorlds and Teachable (platforms below Thinkific) are better at this, in my opinion.
Just as an example, I would’ve liked to have a strikethrough on the original price next to the reduced price like this:
But this is not possible on Thinkific. It’s not a big problem, but that’s such a common thing to do that I would appreciate it if they added it into the mix.
Marketing and Sales Tools
After you’ve created your course (and customized your landing page,) it’s time to start marketing.
This is big: People won’t just stumble upon your landing page and buy. You need to actively promote the course to your audience with offers, funnels, and other strategies.
It’s probably not a surprise anymore, but Thinkific does this too.
For example, you can create a preview lesson for free. Then you can set the rest of it behind a paywall.
Then, you can of course create promo codes for your course too. I’ve found these to be effective in my courses.
You can even limit the number of discounts to e.g. the first 10 sign-ups to make it scarce and more tempting.
Analytics and Reporting
Once you have a bunch of students, you can use analytics to track metrics like transactions, revenue per user, total revenue, and more.
Some of these are available with the Standard plan, but for more detailed analytics, you’ll need to upgrade to a higher-tier plan.
I’m not sure if I’m a huge fan of putting the statistics behind a paywall like that.
On the other hand, I just have 2 courses and I can access all the important analytics information without this, so not much to complain about either. 🙂
Student Management and Support
Last but not least, Thinkific allows you to manage, communicate, and support your students.
For example, you can track the progress of your students.
Who’s struggling?
Who hasn’t even started?
Who has completed it?
And much more.
You can even use Thinkific to create a community (that lives in Thinkific) around your courses.
You can reward your students with a certification once they’ve completed a course or a module.
Preview
Once your course is ready to be launched, make sure everything looks right.
This has been made handy: You can enroll in your course as a student to see how it works.
This is my favorite aspect of Thinkific: It takes care of all the technical aspects of organizing, completing, and viewing lectures.
It tracks progress, lecture numbers, chapter numbers, and more.
That’s the advantage of using Thinkific!
Without a tool like this, coding all these features into your course would be a real challenge.
Sure, you could host a course by sharing a private link to a long video, but to track progress, handle payments, build a landing page, and more, you need a platform like Thinkific.
I definitely recommend giving it a try, especially now that you can get my free deal here.
Pros
Thinkific offers a comprehensive platform. As I’ve shown, it includes all the features you need for a user-friendly and enjoyable course experience.
Everything is in the same place. This product takes course creation to the next level. You can design, create, edit, host, market, and sell your course on one page. Heck, there’s even the community option with which you can chat with your students.
Cool websites. Not only does Thinkific create courses and landing pages for those, but you can also create a simple website to promote all your courses. This website builder is limited in customization but very easy to use.
Progress tracking and analytics: The platform lets you see how people interact with your content and track their progress. This allows you to help students who are stuck.
Payments: Thinkific manages payments, refunds, sales, coupons, and all the technical details.
Quick support: I’ve sent several questions to their support team, and they always respond quickly, even though I’m in a different timezone.
These are just a couple of good things I have to say about Thinkific. You can for sure host a course without a platform like this, but everything becomes infeasibly inconvenient.
Cons
Limited customization: The platform covers all the basics, but options for more specific or tailored features are limited. For instance, I couldn’t adjust the original price on my landing page.
Expensive apps: When Thinkific lacks a feature, you might find an integration app that provides it, but these apps tend to be quite pricey.
Occasional downtime: When I first started, the platform went down for days without notice because I hadn’t provided a tax document. My students were left wondering what happened. A warning on Thinkific’s UI would have been helpful to avoid confusion.
Before I show you my results with the platform, let’s take a high-level overview of the features.
Unlimited Courses: Create and manage unlimited paid courses.
Interactive Videos: Add quizzes and interactions to videos.
Assessment Tools: Comprehensive tools for exams, quizzes, and certificates.
Live Classes: Support for live classes and webinars.
Customization: Customizable course player, website, and mobile app builder.
Marketing Tools: Integrations for email marketing, lead generation, and affiliate programs.
Analytics: Detailed learner analytics and progress reports.
Scalability: Options for high volume and corporate use with dedicated support.
My Experience
I’ve extensively tested LearnWorlds as a course creator, and now I will share my experience with it.
I’ll also show you around so that you can get a better picture of the platform.
Getting Started
Unlike some high-end course platforms, LearnWorlds offers a nice free trial that requires no credit cards.
Just click “Get started for free” on their homepage.
You can activate the free trial by signing up.
Then it’s time to create your school. This is not the same thing as your course. Your school is the main entity with a website, course library, and such.
I call my school the Blogging School. You can also customize your school’s website URL at this stage. If you don’t touch it, it will be the same as your school’s name.
Then it takes about 10–15 seconds for LearnWorlds to create your school’s working spaces.
After this, you can choose your school’s template (or I would call it theme.)
Then make sure to answer the questions as well as you can. This will only help you get a better experience on the platform.
Once you’ve answered every question, you’re good to start creating your first course.
Tip: I recommend booking a call with LearnWorlds. As you’ll soon figure out, the platform is quite complex and has a lot of features that may confuse you, especially if you’re just getting started there.
After this step, here’s your School Dashboard:
This is where the magic happens. You can visit stats, create courses, check reports, do marketing, customize your website, and more.
But let’s start with the most obvious one, which is the course creation.
Creating a Course
Creating a course on LearnWorlds is relatively simple. Just hit “Create course” first.
Then give it a name. I call mine “Blogging 101,” which is an introductory course to blogging in my blogging school. Don’t forget to add a thumbnail image to your course!
Then create a URL path name for your course. This clarifies the links you send to people.
Then here’s a funny thing I didn’t see on the other platforms.
When you choose your course access, if you choose anything else than “Draft,” your course will be launched right away. So make sure to use Draft if you don’t want anyone to join your course while creating it!
When I was ready with my sample course on LearnWorlds, I started to look for the launch button. But then I realized that I had launched it already before creating it…
This is unlike other platforms that I’ve used. But not a big issue, just keep this in mind!
If you choose a paid course, then you get to set the pricing for it.
On top of just creating a fixed price, you can also apply a discount and strike through the original price.
This is an awesome feature as it boosts sales. Yet many platforms don’t allow you to do this. (I still don’t know how to do this on Thinkific, even though it’s such a basic task.)
Then, it’s time to create your course content. Once again, let’s take a shortcut and use AI.
Unlike Teachable, this step requires you to fill in some careful information. This way, the AI doesn’t go crazy with it. For example, here you can choose the course content types, sections, and activity numbers etc.
Once you’ve done this, the AI will render the course. This takes about 30 seconds or so. After this, you will see a view like this:
Just scroll below and choose “Insert” to add this outline to your course.
If you want to rearrange the lectures, just drag and drop them in the view:
One thing I instantly noticed is that the AI did not create a description or any textual content for the lectures. It just named those and arranged them in a consistent order.
To change the section content, hit the pen icon and write the descriptions and such.
Don’t forget to save.
Next up, I got lost a bit because I didn’t find a way to upload a video to these video lectures. But then I realized it’s the “Settings” tab where you can do this.
You can use Vimeo, YouTube, or other platforms, as well as upload your own video.
To upload your own video, choose the From course video library.
This is a bit of a hassle. It takes you to the library page and closes the course outline editor. Then you need to upload the video and wait tens of minutes for it to process.
Before the loading and encoding have completed, you cannot use the video in your lectures. I didn’t like this because this means I need to remember to come back to the video lessons to add the video (that I already uploaded).
When the upload completes, you can jump back to your course content editor from the “Course outline” section on the left.
Then you can, for example, add a cover for your section.
This is a suggested change, so make sure to do it to make your course content more engaging and professional.
If you don’t have your images, use Unsplash:
After this, you can move on to different parts of your module.
For example, my course is now just a video course. But that’s usually not a good format. On top of videos, you should add some interaction.
This is where you can use the activities.
There are tens of activities to choose from.
(I tried to find a quiz but couldn’t, though.)
Because a quiz was not available, I decided to create a little text assignment for my students:
Here’s where I started to realize how versatile and well-rounded this platform is.
You can not only add a question and answer, but you can do all sorts of formatting and such on it.
Once your activity is ready, you can preview it on the top right.
This shows you the activity as seen from a student’s perspective.
You can even complete the assignment (or whatever activity you’re previewing.)
Pretty cool, huh?
So this is how you create your course content on LearnWorlds.
As much as I’d like to, I won’t show the rest of the activities. You can experiment with those freely as seen above.
Let’s move on to the course layout next.
Editing the Layout
Now, one of the coolest features of LearnWorlds is the ability to fully customize your course’s layout.
Once you’re satisfied with your course contents, you can choose the “Course page layout” feature from the left.
Then just click the elements to make changes to those. For example, you can drag them around, change fonts, change the color, and such.
After customizing my page, I can see that LearnWorlds allows for more customization than other platforms I’ve tested.
There are simply more options and advanced settings, and the editor is better overall, too.
Once you have changed the layout, you can preview your changes with the Preview button.
This is what my simple sample page looks like now.
Yeah, it’s not perfect, but I’m just experimenting with it.
And speaking of layout customizations, if you want to change the way your course player looks, go to Course Settings > Course player and choose the layout you like the most.
There are lots more I could show related to customizing the course page, but let’s not make this an e-book. The custom controls are so intuitive and easy to use that you’ll get the gist of it in a second.
Let’s move on to other useful features.
Useful Features
LearnWorlds has a comprehensive dashboard that shows real-time insights related to your course. You can see the revenue, number of students, assignments, and whatnot.
Then you can also check the course insights tab below to see the performance of your students. This is useful once you have a bunch of students who have been around for a while.
Publishing the Course
Now, when it comes to publishing your course, you may be surprised to find out that it might be published already.
I started to look for the “Launch” button, but to my surprise, when I visited my course URL (that I happened to remember), it was live already.
This is because I started the course and set a price for it. This made the course public, too. So be aware of this!
Luckily, my sample lessons without content are not out there yet. Those are generated to be drafts automatically.
If you want to publish your course content too, check the course outline, click on the module, and select “Paid.” This publishes your materials for that module.
Do this for all the modules and lessons you like.
Website
Now that you’ve created and published a course, let’s talk about the website.
When you sign up for LearnWorlds, the first thing you do is create an e-school. This is the place where all your courses will end up. This also creates a website for your course.
To access this site, check the “Website” section on your school’s main dashboard.
From there, you can customize your website. For example, you can choose the Design and change it.
Here’s my school’s website with a Tropic Lake color palette and Poppins as the font:
Then, similar to how you edit your course page, you can edit your website too. Just click elements and mess around to make them look and say what they’re supposed to.
You can also add new pages (and blog posts if that’s enabled) to your website easily.
There are templates for the pages, too. Yes, I told you, this platform covers everything. You can use it to create an entire website if you want to.
Marketing
Then, of course, you’ve got all the marketing features too. For example, you can (and should) create a sales funnel for your courses to multiply your sales.
There are great funnel templates to choose from. These are what work for course creators across different industries.
To take your sales to a different level, you can also create an affiliate program for your students to promote your services and to get paid for that.
Community
Then you’ve got the community features. Instead of creating a Slack channel or WhatsApp group, you can use LearnWorlds.
It’s almost like a mini Slack, if you will. You’ve got threads, notifications, spaces, hashtags, formatting options, and all.
For example, here’s a space I created that I call “Testing,” and I’m writing a poll for my students:
Isn’t that epic? You can do it all in one place.
And this is not just a web browser tool, but you can also access it with the mobile app.
So with all the bells and whistles, you might think about how you keep it all organized.
Well, the answer is simple. Use the main dashboard. There you’ll see quick stats, notifications, and all that important stuff in one view.
Pros
LearnWorlds has all the possible features you can imagine. I think it’s even more feature-rich than Teachable or all these other platforms I’ve tested.
The free 30-day trial is epic. It’s not just a restricted plan with limited options, but the basic plan in action. You’ve got 30 days to experiment with all the features.
You can use this tool to create an entire e-learning organization. You have a school with a website. That site can hold links and landing pages for your courses. Then you’ve got all the marketing features, student support, analytics, payments, and stuff like that.
The course pages and websites are customizable to an extent I haven’t seen before. On the flip side, it makes it a bit harder to use, and the learning curve is steep.
Cons
The user interface isn’t as good as other platforms. For example, if you add a video, you can’t use it before it has been processed, which can take a while. Then you need to remember to come back to add it. Also, I didn’t like the fact that my course was published without me realizing it.
Harder to start. With all the bells and whistles, it’s much harder to start with this product because it’s not as well organized. For example, it took a while for me to even find how to add a video to my course.
Too many features for beginner course creators. This is a pro and a con at the same time. If you’re just launching a course or two for a YouTube community, this might be way too much. But if you want to start a proper school or use this in an existing one, then this is your platform to go with!
Teachable is an online course platform for educators to create, market, and sell courses. It has all the features and widgets that a successful online course needs.
But is it worth the hype? Does it work?
I’ve extensively tested the platform (and other similar products), and now it’s time to share the review.
Let me show you around.
Key Features
Before I show you around, let’s take a quick look at the key features of Teachable.
Course Builder: An easy-to-use drag-and-drop UI for course creation and organization.
Customizable Templates: Professional, customizable templates to match your brand.
Multimedia Content Support: Upload videos, audio files, PDFs, and other content types.
Integrated Payment Processing: Secure payment gateways (with support for multiple currencies).
Student Management: Manage student enrollments, track their progress, and engage.
Marketing Features: Built-in marketing features, including email campaigns and affiliate programs to boost sales.
Analytics: Comprehensive analytics to track sales, student performance, and overall course success.
But now, let me share my experience and results!
My Experience
I have launched (and sold) two courses during 2023–2024. However, I have used a course platform called Thinkific.
But now I have become curious and want to give these other similar tools a try too, to make sure I’m not missing out.
With that being said, let me show you how Teachable works and what I like about its features, usability, and such.
Getting Started on Teachable
To start using Teachable, you can activate the free plan.
On some other platforms, the “free” plan is not free. All you get to do is enter your email for free. Then it already prompts you to insert your credit card… I hate that, to be honest.
But on Teachable, I was surprised to see that this is not the case. There’s an actual free plan you can mess around with.
To get started, the tool first asks you to share some insights about your goals and such.
This is how easy it is to start on Teachable. After this step, you can already start creating your learning products.
Creating a Course
Then you get to choose your product.
As a course creator, I wanted to try the Online Course option.
Thus far, everything seems like smooth sailing. It didn’t take more than 30 seconds after signing up that I was already creating my first course. Epic!
Teachable has designed every step to be consistent and to make sure your course isn’t missing some key parts.
For example, here you get to choose the thumbnail of your course (if you have one).
You can even use their cropping tool to make sure it fits nicely.
There it is!
Next, you can set up a price point for your course.
There are lots of options to choose from. There’s no option that would be useful not included in this list:
I went with a one-time purchase.
Then you can choose the pricing, name, subtitle, and description that show up on the checkout pages:
Once you’ve created the course name, image, and pricing, it’s time to start creating the content.
Because it’s 2025, there’s the AI option. I’m not a huge fan of this, but just for the heck of it, let’s give it a shot.
After this step, it takes about 30–60 seconds to create the course content drafts with AI. (If you start from scratch, you don’t have to wait.)
Working with Your Course
Once the contents have been created, you will see your course content dashboard for the first time.
This is the main view where all the magic happens, from course content creation to marketing and supporting your students.
Before I launch my course, there are a lot of things I need to do.
First, let’s go through the curriculum. Remember, this is entirely generated with AI, and I haven’t touched any of it just yet.
If you want to rearrange these lectures, just click on the six dots on the left-hand side and drag and drop the lesson.
Now, let’s start adding/editing the course content.
Adding Course Content
For example, here’s the text section that the AI rendered for the “Why Blogging Is Important in 2024” part:
I have to admit that the AI-generated content is generic and boring. If I wanted to publish this, I’d have to go through it carefully and write it from scratch.
But at the same time, I like it because now I don’t have to start from scratch. I have an entire course curriculum in place. This way I get to avoid the blank page syndrome.
But that being said, you’re not just limited to text (obviously.)
By opening a lesson and scrolling below, you’ll find the add content button:
This gives you an option to add different types of content to your course. This could be videos, audio, quizzes, media, code examples, and more.
For example, here I’m uploading my lesson to the Video Content view:
One thing to keep in mind is that the free trial doesn’t allow you to upload more than 10 videos.
After you’ve uploaded your video, it takes a while to process it to optimize the size while retaining the quality. You can exit the view at this point.
Depending on the length of your video, this might take up to an hour or two.
One cool thing that many platforms don’t offer is custom thumbnails for your videos.
This is awesome because by customizing your thumbnails to be eye-catching, you make sure your students watch all the content and don’t skip lectures that easily.
Also, this way you can control what your materials look like.
Speaking of the looks, in every lecture, there’s a Preview button in the top-right corner:
This allows you to view that lesson in the eyes of your student.
For example, here’s what my course looks like right now.
I think this is an awesome feature because this shows what the course actually looks like. You can verify that everything works out the way you anticipated for your students.
But now, let’s add more content to the course:
For example, I think a quiz is a wonderful way to test the knowledge of a student. I always add those to my courses.
On Teachable, adding a quiz is super simple. Just type in the question, mark the correct answer, and hit save.
Now, let’s move on to more practical stuff on Teachable.
Useful Features and Widgets
Let me review some of the most practical must-know features of Teachable.
(I won’t go through them all because this would be an e-book after that.)
Before you launch your first course, it might be a good idea to not just host it on a blank profile. To this end, you can use the Site > Bios feature. This allows you to update a profile picture with a short description of yourself.
This way, when potential students visit your profile, they will get an impression of what you do and who you are (and why they should trust your education).
If you’re a first-time course creator, make sure to visit the Get Started tab on the left:
Here you can find video tutorials, other products, and the options to set up and arrange your school.
Then the next one you don’t want to miss is the Theme tab (on the left-hand side, too.)
Here you can choose your course Logo, Thumbnail, and Favicon.
For example, here are the ones I created:
Then you can also choose your color scheme and fonts.
Once you’re ready, just preview your course. Here’s mine, for example:
Then, if you’re not happy with the random URL that Teachable gives for your course, you can always change it from the Domains tab.
This allows you to purchase a custom domain name for your course. Instead of being, for example, artturi-jalli-s-school.teachable.com, you could do artturijalli.com/courses/ or such.
Then, one of my favorite features is being able to give discounts to students.
You might think that it’s a hassle, but it’s not. Giving discounts has been made easy on Teachable. Just visit the Site > Coupons page and create a discount.
You can set the discounts to expire at a certain time. You can create a set number of discounts. You can do anything to create a scarcity offer for your product.
Also, you can track the performance of the coupons here too. You can see how many coupons have been used and how many of those are left.
Speaking of performance, head over to Site > Breakdown to see how your courses are performing.
This view shows you how many sales you’ve made, how many partner sales you’ve gotten, and so on. It will also give you the total earnings day by day.
Student Engagement Features
Last but not least, let me show you some community and student engagement features.
To view a list of students, you can check it at the Users > Students tab.
This not only shows you the students but also allows you to create an affiliate program for your students to promote your course. This can be an additional income stream that your students can earn with too. But that’s a different story.
One cool feature is the Coaching widget that allows you to arrange coaching with your students without hassle. You can use this at the Coaching tab on the left-hand side menu.
This allows you to track your students’ progress, keep notes, send messages, and so much more.
This would be inefficient and inconsistent without a feature like this that takes care of it all.
Speaking of engaging with your students, you can also set up a community. This allows you to communicate with your students with ease.
You can set up common spaces for frequently asked questions and topics.
Although you could use Slack or WhatsApp to do this, I think Teachable nails it because this way you can communicate in the same place where you study.
Now that I think about it, it’s an overall theme in Teachable. Everything happens in the same place.
Learning, coaching, communications, reports, billing, sales, and marketing. Everything is under the same umbrella.
Going Live
Now that I’ve shown you most of the important features of Teachable, it’s time to go live with your course.
If you have a big audience waiting for the launch, one thing you need to do is customize your sales and post-purchase pages.
You can do this in the main view of your course by scrolling down a bit.
You can click the links to view the pages:
For example, here’s my sales page:
To edit it, just click “Edit sales page.”
Here you can move things around and change texts, fonts, images, and whatnot.
For example, here I’m editing the text area that’s way too long for my liking:
Once you’ve done all your edits, it’s time to launch the course. To do this, scroll back up and click “Launch your course.”
And Voila! Your first Teachable course is live.
Now, I must say that this is such an awesome platform. You can do everything in the same place with very easy and intuitive controls.
And let’s be honest, the AI features are cool, but they won’t get you far. You still need to do most of the work 🙂
Also, keep in mind that you don’t need most of the features when you’re just getting started.
Build a loyal following to whom you market the course first.
Then, once you get hundreds of students, you can start worrying about order bumps, CRO, affiliate programs, coaching stuff, and whatnot.
Pros
Teachable has all the features for course creation, promotion, and management. And I mean all. Almost too many tools and widgets for some new creators, to be fair!
There’s a generous free trial for the product. This allows you to create a course and market it (with some limitations.) Most platforms don’t offer one like this.
The tool is super easy to use. It’s as easy as hosting a social media profile. Everything is organized nicely and flows smoothly.
The pricing is not through the roof. Even though this is such a well-rounded platform, even the most expensive option is less than $200/mo, which other similar platforms usually double or triple.
Everything makes sense. The tool combines community, marketing, sales, student support, progress tracking, coaching, secure payments, and whatnot. It all happens in the same place instead of having to use like 10 platforms to host a course successfully.
Cons
Sometimes I get lost in all the features. This is not good if you’re just getting started. But at the same time, it’s a pro too! 🙂
The AI content is not a good idea. There, you need to do so many customizations and factual fixes that I would probably just start from scratch.
The customization is limited. You can choose your landing page designs, logos, and whatnot, but there are some obvious customization limitations in the product, too.
The free plan is limited. Although I like the free plan, you won’t run far with it because it’s heavily limited.
Pricing
Free: $0/mo
Basic: $39/mo
Pro: $119/mo
Pro+: $199/mo
To Take Home
Teachable is a great online course platform for building courses.
I love the fact that this platform combines everything that it takes to make a successful and streamlined course.
You can host, edit, manage, promote, sell, engage, and do whatever you can imagine to be useful for a perfect online course.
If you’re just getting started, though, make sure not to get overwhelmed by the sheer number of features. You don’t need most of it before you hit hundreds of students 🙂
iSpring is an eLearning authoring toolkit and LMS combo for creating training materials, courses, and assessments for professional use.
This tool is great for companies that need to create and deliver training materials at scale.
Let me show you how it works and what it does.
Key Features
Let’s take a look at the main features first.
PowerPoint Integration: Build interactive courses right inside PowerPoint with the iSpring Suite add-in.
Quizzes and Assessments: Create quizzes, surveys, and interactive tests.
Video and Screen Recording: Record training videos, screencasts, or lectures.
SCORM/xAPI Support: Export courses that work seamlessly in any LMS.
iSpring Learn LMS: A built-in learning management system to deliver and track training.
Interactions and Simulations: Add role-plays, dialog simulations, and branching scenarios.
Analytics and Reports: Track learner progress, completion rates, and results.
My Experience
Most course platforms I’ve tried are geared toward solopreneurs or educators.
iSpring is different, though.
It’s ideal for corporate training and HR teams who need professional, structured learning paths.
iSpring Suite plugs directly into PowerPoint.
That means if you’re already familiar with PowerPoint, you can jump right in without a huge learning curve.
Getting Started with iSpring
After you’ve registered and signed up to iSpring, you’ll see a team view from which you can easily create micro courses.
You can create course pages or quizzes.
You can easily share these materials with your teammates via email.
But this is just the online version of iSpring.
The true power is behind the installable desktop app (for Windows only).
To install it, head over to your profile icon on the top right and click “Download iSpring Suite”.
Then just sign in to your account.
Then, open up the iSpring Suite app on your desktop for the first time. You’ll see a quick start view like this:
There are quite a few options to create courses, including:
Create courses directly from PowerPoint
Build interactive quizzes and assessments
Design role-plays and scenario-based training
Record screencasts and video tutorials
Add engaging interactions and digital books
Use cloud tools to publish pages and online quizzes
In this example, I will show you how to create a course from PowerPoint slides.
So now that you have installed iSpring Suite, you can open up PowerPoint, and you’ll see a new tab.
This is the iSpring Suite tab, which lets you convert PowerPoint slides into courses.
Here’s a sample PowerPoint slideshow that I’ll be using.
One thing that’s handy is the ability to adapt to different screen sizes. The iSpring Suite courses go well with desktops, tablets, and mobile devices.
But now, let’s look at the options you have.
It’s not just that you can convert PowerPoints to courses, but it also allows you to record course materials to your PowerPoint slides much more easily.
At the top bar, you now have audio recording, screen recording, video recording, and more.
Pretty handy, isn’t it?
Oh, and you can also choose content from the content library. You have backgrounds, templates for your PowerPoint slides, icons, and more.
Just as an example, let’s create a simple quiz for our course.
Let’s add a question to it.
Once you’re ready with the course, it’s time to publish it.
You have a couple of options for how/where you can publish the course.
My Computer — Save your course and contents locally.
iSpring Space — Publish the course to iSpring’s cloud space.
iSpring Learn — Upload directly to iSpring’s LMS.
LMS — Export in LMS-ready formats (e.g., SCORM, xAPI).
YouTube — Publish as a video to YouTube.
For example, I will publish my course in this example to iSpring Space. This way, my team members can view the course immediately.
Depending on your course size (recordings, audio, etc.), the saving/uploading process can take a while.
Once the uploading is ready, your team can view the course in the iSpring Team view.
Isn’t it handy?
You can also share a link directly to the course from the settings.
Useful Features and Widgets
Here are some useful features of iSpring that make it stand out.
Role-Play Simulations: Great for training customer service or sales teams.
Certificates: You can issue certificates automatically after course completion.
Learning Tracks: Combine multiple courses into structured programs.
Mobile Learning: Courses adapt to phones and tablets without extra work.
Pros
Tight integration with PowerPoint makes course creation fast and intuitive.
Built-in quiz and assessment tools are strong
Great for corporate training, compliance, onboarding, and employee development.
The LMS option (iSpring Learn) makes delivery and tracking seamless.
Supports SCORM/xAPI, so courses work in almost any LMS.
Cons
Windows-only for the full Suite (Mac users need virtualization or to rely on the more limited cloud tools).
Feels more corporate than creative. Not the best fit if you’re looking to market and sell courses publicly.
The interface is professional but not as “modern” or “fun” as newer online-first tools.
Pricing is higher than that of simple course platforms, since it’s geared toward businesses.
Pricing
iSpring Suite (€970/year) — Core eLearning authoring toolkit with support and content library.
iSpring Suite Max (€1,290/year) — Full authoring suite with text-to-speech and iSpring Cloud included.
iSpring Cloud (€720/year) — Cloud-based course builder with AI assistant, collaboration, and storage.
To Take Home
iSpring Suite is a great online course platform for turning PowerPoints into online courses.
This tool is best for businesses to create training materials and microcourses.
For instance, if you’re an HR manager, L&D professional, or part of a company that needs structured learning programs, iSpring is a great choice.
Khan Academy is an educational platform that provides free resources and courses on various subjects.
However, Khan Academy doesn’t allow you to create and publish your courses directly on their platform.
Instead, Khan Academy offers content created by its team of experts. You can use these pre-built courses to create specific learning paths and programs for your online school.
So if your goal is to teach something as easily as possible, this is a great platform. All the content sits out there already. You just need to pile it up to cater to your students in your class.
Before I show you myself using Khan Academy, here’s a list of key features of the platform:
Extensive Course Library: A Wide range of subjects and educational levels.
Video Lessons: High-quality, easy-to-understand tutorials.
Practice Exercises: Interactive problems with instant feedback.
Personalized Learning Dashboard: Customized learning paths and progress tracking.
Mastery System: Focus on mastering concepts before advancing.
Teacher and Parent Tools: Resources for monitoring and assigning lessons.
Accessible and Free: All content is free and accessible on multiple devices.
Test Preparation: Resources for standardized tests like the SAT and ACT.
My Experience
As I said before, Khan Academy is a free resource (for both students and teachers). Thus, it’s quite a bit different than Thinkific or Teachable, where the point is to sell flagship courses at a high price point.
I remember watching Khan Academy on YouTube for over a decade, and I’ve learned a lot of math, physics, and chemistry-related stuff. This is a reliable and honest platform that puts students as its main priority.
Hence, all the course content is free.
But now, let me show you how the platform works.
As a teacher at Khan Academy, you can use their pre-made courses, track student progress with personalized dashboards, and assign lessons.
To get started, sign up as a teacher:
Then just create a class.
Give it a name:
Then select the method for students to join your learning path:
For example, I chose a link:
Once you’ve created a class, it’s time to add courses to it. You can do this by clicking the “Add Course” button in the banner of your class.
Then it suggests content related to how you named the class. You can search for other courses too. Make sure to watch the courses beforehand so that you know how well they fit.
There are lots of courses to choose from:
You can add as many classes as you need.
You can also name your class.
Once you’ve gathered the course content from the existing course library, you can assign content for your students
This will add the content to the particular student’s assignments section.
Then you can track the scores of your students in this interactive dashboard:
You can manually add new students to your class as well:
On the top right, you have a class code that you can share with anyone. This allows the students to join the course too.
Quite a simple yet versatile platform, huh?
It doesn’t let you create your course content, but it lets you use professionally created expert teaching content instead.
You can assemble your courses from that material in the way you like and feel appropriate. You can add and remove students, add assignments, track progress, and more.
I like this kind of concept. Instead of having to grind hard in creating the course content, I can use a simple platform like this.
Non-profit, generous platform. I love Khan Academy. I learned maths from them too when I was in high school or even university. I love to see that they have a platform like this that makes learning possible for everyone.
Easy to use. Just sign up as a teacher (or student). Then assemble a course from the existing course contents.
Transparent. This platform allows you to see how your students have performed with lessons, projects, and assignments.
Versatile content. There are so many lessons and courses you can use in your learning paths. These target different skill levels and ages.
Cons
Limited to Khan content only. It’s hard to come up with cons of a non-profit platform like Khan. Perhaps the only thing missing is the fact that you can’t create your course content but have to use existing stuff instead.
Non-profit. If you’re an influencer or course creator looking to make a big buck with education, this is not your place. Instead, you should choose a platform like Thinkific or Udemy to launch, promote, and sell courses.
Pricing
Khan Academy is non-profit and free.
To Take Home
I love Khan Academy. It’s an easy course platform that offers you ready-made courses to add to your classes. You can manage your students and track their progress in the courses. All this is free and non-profit.
Udemy is a course platform for teachers to share their skills with people all over the world.
It works through member fees, so you earn money based on how many people watch your classes.
While you might make less per student, you can reach a lot more people.
The platform is easy to use, and there’s a helpful community to support you.
Let me show you around!
Key Features
Pay-Per-Course Model: Students purchase individual courses, providing direct revenue for each sale.
Extensive Course Catalog: A wide range of topics, including business, technology, personal development, and more.
Flexible Learning: Learn at your own pace with lifetime access to purchased courses.
Global Marketplace: Reach a diverse audience from around the world.
Instructor Revenue Share: Earn a percentage of each course sale, with various revenue share models.
Promotional Tools: Access to marketing tools and promotional options to boost course visibility.
Course Engagement: Interactive features such as quizzes, assignments, and Q&A to enhance learning.
Multi-Device Access: Watch courses on your computer, tablet, or smartphone.
Offline Viewing: Download courses for offline access with the mobile app.
Instructor Resources: Comprehensive support and resources to help instructors create and improve their courses.
My Experience
Let me share my experience with the platform as well as my opinion on it.
To start on Udemy as a student, just head over to their website and click “Teach on Udemy.”
Unlike Skillshare (or many other similar platforms,) Udemy allows anyone to start without having to apply separately. So you don’t need to worry about getting approved or having to wait to start creating. Of course, the courses you create go through a review process, but it’s much smoother that way in my opinion.
Then click “Get started.”
Then the platform asks you a couple of questions related to your courses.
Try to be as accurate as possible. Also, be honest. You shouldn’t lie about your audience or the number of previous courses. If you haven’t created it in the past, that’s 100% fine.
Then once you’ve answered the questions, click on “Create Your Course.”
Then choose between a Course and a Practice Test.
Give it a title:
And a category:
This opens up the course creation view for your course:
This is a task list where you should complete every single step before submitting your course for review.
The most important part is the course content.
Udemy lets you create lectures, quizzes, coding exercises, tests, and assignments. You can add those by clicking a section and clicking “+ Content:”
Then choose one of the content types.
By the way, you can preview your course at any time as an enrolled student. This happens by clicking the “Preview” button on the top-right corner.
This is handy as you can see what the course looks like in the eyes of an enrolled student. Any quality platform should have this feature!
But then, let’s continue with the content. For example, if you want to add a lecture, you can add downloadable files, add from your library, or refer to external resources (or code.)
For example, I added a downloadable file that is a video of me speaking in the introduction of the course.
One of my favorite ways to test my students after lectures is by adding multiple-choice quizzes. Well, thanks to Udemy, that’s very easy to do.
Once again, choose the “+ Content” option and click “Quiz.” Then just choose “Add Multiple Choice.”
Don’t forget to choose the right answer.
Here’s the preview of the quiz in the eyes of a student:
Pretty handy, huh?
You can also create assignments for your students. To do this, fill in the basic information, instructions, questions, and solutions.
Ok, that’s enough for the course content.
That’s a comprehensive list of cool features that a basic course should have. There are videos, files, code, assignments, quizzes, and such.
Those are more than enough to put together a good and comprehensive course that teaches from different angles and ways.
But at this point, the course is not ready yet. You should also build a landing page for it.
Sounds scary, but luckily, Udemy has a very simple template for doing this. You just need to upload an image and fill in a couple of fields like I’ve done here:
Then, you can preview the course page. This is what it looks like for me:
Isn’t it cool? If you’re someone who has ever searched for information online, you might have stumbled across a page like this on Udemy. That’s a recognizable and cool-looking page.
However, the problem is that because it’s Udemy (and not your brand) the page will always look the same across different course creators.
That’s a big limitation. You’re not building your brand but Udemy’s brand instead.
Then choose a price tier.
Write some course messages.
When you’re ready, click “Submit for Review.” This will send the course to Udemy’s content managers for review.
The review process lasts 2–5 business days.
Overall, I liked Udemy. It’s very simple to use and get started with. Also, it’s free to start creating courses on!
But it’s quite limited.
First of all, you’re essentially working for Udemy. You’re getting a small percentage of the earnings. You’re also building Udemy’s brand reputation, not yours. This is a big no if you want to become a successful name and creator in your space.
Secondly, the customization options are limited. There are basic features like quizzes, assignments, videos, written content, and code. But that’s pretty much all the platform offers. Other tools like LearnWorlds offer 10x more features.
But then again, it’s a simple platform that’s easy and effective, so the limitations are not all negative.
Easy to use. It only took 10 minutes to create a course skeleton on Udemy. Of course, I’d need to create the content on top of that, but it’s so easy and seamless to get started with.
Promotion. The platform has a huge reputation and audience. It promotes your courses through the roof. You don’t need to have a big audience to thrive.
Cool landing page. The tool allows you to create a good-looking landing page that’s internationally recognizable thanks to the reputation of Udemy.
All the necessary features are included. The tool has a lot of basic features like videos, assignments, and quizzes. This makes the learning content enjoyable and effective. Also, as it’s missing all the bells and whistles, it doesn’t have a steep learning curve.
Takes care of the hassle. Udemy takes care of payments, promotions, and hassles like that so that you can come in with no audience or course background.
Cons
Limited earnings. You will only earn based on how paying members spend time on your courses. If you sold your course, you could easily do $100-$1,000/course. But on this platform, you might earn only a mere dollars per student.
Limited customizability. Some other platforms on this list have all sorts of features, such as custom landing pages, community features, plugin stores, and more. Udemy is rudimentary. (It’s simple and effective, though.)
Limited pricing tiers. When you sell your course on a platform like Thinkific, you can choose whatever price you want. But on Udemy, the pricing was limited to default tiers (up to $199 for my use case.)
Pricing
Teaching on Udemy is free!
There are no upfront costs or subscription fees required to become a teacher.
Podia is a well-rounded course platform that allows you to sell courses, memberships, and downloads.
But it’s not just a course platform. On top of that, it comes with the tools you need to start making sales. It offers various features for building a website, marketing, and customer management.
Let’s see how it performs and what it truly offers.
Analytics: Track sales and customer behavior with detailed analytics.
My Experience
I’ve extensively tested Podia. Let me show you how it works, what it does, and how it’s different from other platforms like Thinkific or Khan Academy.
Podia is great as it allows you to sign up for free and start creating your courses.
This is not something every online course platform allows. Most either require you to pay or apply.
Once you’ve signed in, you’ll see a view like this:
To start a course, you can choose the “Create a product” section. (As you can see, there are lots of other options to choose from as well.)
Then choose the Online course:
After this, you’ll see a details page for your course. You can create lessons and new sections for your course here:
Give it a name:
Customize the availability:
Set a price:
And more.
Also, when it comes to adding content, you have a couple of options:
Text
Embedded content
Quiz
Coaching
Files
For example, this is what a quiz looks like. You can give it a name and then ask a question and select the right answer.
Or, for example, here’s what the coaching looks like:
In the coaching section, you can connect your Calendly (or other similar calendar) for your students to pick a slot with you without the back-and-forth email hassle. Pretty cool, huh? This is not available on most course platforms.
The course text editor is decent as well. It has basic formatting options so that your text chapters or lessons won’t end up being just boring walls of text. You can structure your content with lists, bolding, italics, and such.
Once you’ve added the course content, you can edit your course landing page. This is the place where you sell your course.
It allows you to choose colors from common color palettes.
Here’s what my blank landing page looks like:
That’s nothing too crazy, but it still has the key elements and colors in place. It would take a long time to create a page like this if you had to code it from scratch or use a separate platform with no course landing page templates.
You can customize the pages with basic settings, such as changing the colors, fonts, buttons, links, and media.
Then once you’re ready, you can view your course by clicking “View product.”
This shows a preview in the eyes of an enrolled student. This is a pretty handy feature.
Then once your course is live, you can share a link to it like this:
Ok! That’s how the course creation happens on Podia. It’s simple and has all the basic features. But it’s also a bit limited when it comes to customization. For example, the LearnWorlds platform allows you to do a lot more than what you just did in Podia.
But creating a course is not enough. You also need to sell it. This is where Podia shines.
You can create email campaigns to warm up your leads and potential students in your email list.
Just create a campaign by clicking “Start campaign.”
Then specify the name and the condition under which you want to send it to your subscribers.
There are email templates to choose from. Although I must admit that these days it’s best if you just use a simple text template. This is relatable, basic, and effective. No need to customize it by using flashy colors or crazy formatting. That’s the old-school way.
Here I’m adding titles and preview texts to my emails:
This would deserve its own tutorial because there’s so much going on when it comes to email marketing successfully. But let’s keep it short.
Then, once you have your course, landing page, and emails in place, you can start to track your analytics. This allows you to see how you’ve sent your emails, how many people have opened those, and so on.
You can also incentivize your students to buy quicker by offering limited-time coupons, such as 20% off for May 2025.
I haven’t created any coupons, but basically, you just need to come up with a coupon name, sale amount, expiry date, and limit (optional.)
Then, last but not least, you can create a community around your learning content. This is common these days. You can create topic pages and membership sites.
Then, once your customer base is big, you can test affiliate marketing. This means your students review your products and get a little compensation (automatically) whenever they bring you a sale with their affiliate link.
This is awesome and once again not something that every platform offers. Depending on your niche, a good affiliate program can boost your course sales significantly.
Overall, I’d say it’s a solid platform with a lot of good features, from creating to selling a course successfully to a warmed-up community of students.
But now that I’ve reviewed a whole bunch of platforms, you might wonder what makes Podia different from other platforms.
The difference is quite simple:
For example, unlike Udemy, which is a marketplace, Podia gives you full control over your branding and customer relationships.
On the other hand, if you compare it to platforms like Thinkific, Podia is more like an all-in-one solution with built-in email marketing. On Thinkific, you need to rely on a third-party email service.
But there’s a lot of overlap, too!
For example, Podia has a lot of similar features to LearnWorlds and Teachable.
Pros
All-in-One Platform: Podia comes with all solutions for course creation, digital downloads, memberships, and email marketing.
Easy to use. The tool is simple. Just sign up, start creating your courses and landing pages, and sell. Of course, it takes time to build and warm up an audience, but at least it’s made as frictionless as possible when it comes to the technical side of things.
No Transaction Fees: Unlike some competing products, Podia doesn’t charge transaction fees on any plan.
Customer Support: Podia has highly talented and highly responsive customer service that helps you with questions related to different parts of the platform.
Cons
Limited Customization: I noticed that there are a bit fewer design customization options compared to some competitors. Also, the content options are quite limited, although they cover the basics.
Basic Reporting: Analytics and reporting features are not as advanced as I’d like them to be. But once again, this is not an issue when just getting started.
Limited Community Features: The community-building tools are not as robust as some other platforms. I think it would make more sense to use Slack or some other third-party service to host a course community.
Fewer Integrations: Fewer third-party integrations compared to what some other competitors bring in.
Pricing
Free Plan: $0/month
Starter Plan: $4/month
Mover Plan: $33/month
Shaker Plan: $59/month (first year pricing, then $75/month)
(For a course creator, that Mover plan is good because it comes with Unlimited courses.)
Disclaimer: This article is reader-supported. If you choose to pay for the tools listed in this article, I might earn a small commission at no cost to you.
My Results & Experience
You can try Elevenlabs AI free here. It doesn’t even ask you to sign up. Speaking of confidence in the product!
To change the voice, drop an audio clip there and pick a voice.
If the preview sounds good, sign up to download the voice clip.
Once you’ve signed up, you can choose more AI voices from the library. To do this, click “Voice Changer”.
Drop your audio clip into the view:
You can record clips in the editor if you don’t have anything to begin with. Just accept the use of a microphone first.
Speaking of a microphone, you don’t need to have a good mic for this to work! As you can hear from my clips, the AI removes background noise and improves the audio quality to studio levels.
Once your voice clip is in, change the settings:
For example, I did the following tweaks to my clip:
I changed the voice to “Brian.”
I changed “Similarity” to 100%. This keeps my talking style, flaws, and such there (which is the whole point I’m using this tool).
To change the audio, just hit “Generate”.
It takes just 10–20 seconds for the AI to create your clip with the changed voice.
For example, here’s a before-and-after comparison between the audio clips I got from Elevenlabs:
That’s impressive! More so than I expected.
Also, the free trial is great, so there are no watermark chants or anything in the clips.
The only problem with some of the clips is that the AI sometimes accidentally swaps words that sound close to another similar word.
That’s a bit annoying, I have to admit.
For example, in the above clip, it sounds like the AI voice is saying “Infer” while I said “Include”.
However, that’s subtle, and I’m not sure if I just heard it the wrong way. Leave your thoughts in the comments.
Nonetheless, let me show you some more examples.
As the next step, I asked the AI to use Callum’s voice.
Here’s the clip I got back (compared with the original voice):
Lastly, I changed my voice to Alice’s voice.
Here’s the result:
Isn’t that cool?
It doesn’t sound like AI because it has all the flaws and natural “errors” that I make as I speak. Otherwise, I could just use text-to-speech tools to get the job done.
I have to say I’m impressed by the quality of the results. Also, the extensive free version and ease of use are something I have to highlight.
Sounds very realistic, close to a human voice. Only a small number of very subtle flaws and fails to copy the word in the exact style you may have.
This tool can change voices from short recordings.
Supports many languages.
Easy to use — you don’t even need to sign up to try it.
Offers a free plan with a good amount of credits.
Cons
There are some failures. By no surprise, this tool is not perfect. For example, it replaced my word “Include” to sound like “Infer,” but that’s subtle. I don’t know if you could hear it from the above clips.
Some voices sound a bit robotic, and the free trial version of my voice did not sound good!
Other Notable Features
ElevenLabs is not only for AI voice changing. Here are some more features:
Voice cloning from a short audio clip
Text-to-speech that sounds realistic
Voice customizer
Multi-language support
An online editor to preview and edit voices
And a lot more.
I definitely recommend trying it if you plan to either clone, change, or generate voice.
Free ($0): 10K credits/month, 10 min TTS or 15 min conversational AI, includes TTS, STT, AI, Studio, Dubbing, API access.
Starter ($5): 30K credits/month, 30 min TTS or 50 min AI, adds commercial use, instant voice cloning, 20 projects, Dubbing Studio.
Creator ($22, $11 first month): 100K credits/month, 100 min TTS or 250 min AI, adds pro voice cloning, usage-based billing, 192 kbps audio.
Pro ($99): 500K credits/month, 500 min TTS or 1,100 min AI, adds 44.1 kHz PCM output via API.
To Take Home
I didn’t know AI voice changing was a real thing yet. I thought the tools could just turn text into voices, but not directly clone it from an audio clip.
This is a cool use case for AI because now the voice sounds natural instead of being artificially perfect.
I tested a bunch of these AI voice changers, and to me, Elevenlabs sounded the best. I recommend checking it out.
I’ve tested a bunch of AI resume builder tools, and one of my favorites is called SheetsResume.com.
It’s affordable, easy to use, and the story behind it is fascinating.
In this post, I will show you how to use SheetsResume to create an epic resume in a couple of ways.
Disclaimer: This article is reader-supported. If you choose to pay for the tools listed in this article, I might earn a small commission at no cost to you.
To create a resume based on your LinkedIn profile, pick “Start with your LinkedIn profile” on the right-hand side.
Then, head over to LinkedIn, visit your profile, and copy the URL.
Paste the URL to this view:
The SheetsResume AI visits your LinkedIn profile and checks your information and experiences, and creates the first version of your resume based on that.
#3 Open The Editor
Once the first version of your resume is ready, you’ll see a view like this:
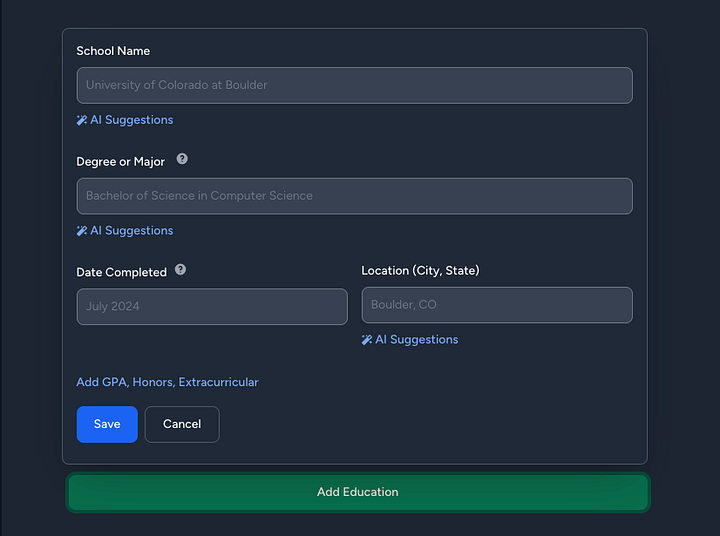
On the left-hand side, you can fill in the details that the tool asks for. These include name, email, work history, education, and so on.
On the right-hand side, you see the preview of your resume in real time. This means any change you make on the left will instantly show up on the right.
That’s neat because you don’t need to jump between windows or hit the refresh button.
#4 Fill in Your Details
For best results, make sure to enter your details for every section.
Feel free to move things around in the editor by dragging and dropping the elements.
#5 Write with AI
SheetsResume lets you use AI to write parts of your resume.
Just as an example, in the experiences section, you can fill in your company name and job title, and then ask AI to create a better description.
#6 Change Titles with AI
You can also use AI to make your title more attractive, especially if you’re targeting a particular role.
For instance, when I entered “Coder” and selected “AI Suggestions,” it generated a range of improved options.
#7 Find Certifications with AI
You can also rely on AI to find relevant, industry-specific certifications.
For example, if your resume highlights your experience as a software developer, you can use AI to search for certifications in your field and include the ones you’ve earned.
#8 Pick Hobbies with AI
In the interests section, you can simply use the AI-generated hobbies and interests rather than entering them manually.
#9 Tweak Settings
And don’t forget to adjust the settings as well.
Even though there’s just one resume template, you still have plenty of customization options to work with.
For example, you can do layout optimization, reorder your resume sections, choose a different font, and you can get those AI suggestions too.
#10 Purchase the License
When you’re finished, you can go ahead and purchase your AI-generated resume.
As of now, the cost is $99, which is a one-time payment for lifetime access — unlike many other tools that charge ongoing subscription fees.
#11 Download It
Once you’ve paid for the resume, you can download it and use it to land your next job!
That’s how you create a resume based on your LinkedIn profile.
But if you’re not using LinkedIn, let me show you how to create a resume from scratch or based on your existing resume.
If you need a cover letter for your resume, you can do that with SheetsResume AI writer, too.
Just pick tools from the top right.
And choose the AI Cover Letter Writer, which is free, by the way!
I tested it, and the result gives you a good direction when it comes to the language, format, and layout.
However, as you can imagine, with AI, the results are a bit generic.
Make sure to add your touch to it to make it count and to make sure everything is correct.
You can only imagine how many cover letters companies get where they can instantly tell that this is AI-written 100%. That’s something you don’t want to do.
Affordable lifetime access — One payment, no ongoing fees
Easy to use — Clean interface, no design skills needed
AI-powered writing — Drafts experience and summaries fast
LinkedIn import — Build a resume in seconds from your profile
Real-time editing — See changes as you type
Customizable — Rearrange sections and adjust layout
Free cover letter tool — No extra charge to create a cover letter
Cons
One resume template — Limited visual variety
No mobile app — Must use on desktop
Some AI suggestions feel generic — You’ll need to edit to stand out
Limited styling options — Fewer design tweaks than some tools
Upfront cost — $99 can be steep if you only need one resume
Quick Tips to Make Your Resume Stand Out
Even if you’re using a solid AI resume builder like SheetsResume, a few small tweaks can make a big difference:
Tailor Every Resume
Don’t send the same resume everywhere. Change your title, summary, and skills for each role. Most companies use software to scan resumes before a human ever sees them. Example: If you’re applying for a Project Manager, make sure it says Project Manager at the top and lists tools like Asana or Jira if the job post mentions them.
Focus on Outcomes
Show what you did and why it mattered. Results stand out more than tasks. Example: Instead of “Handled customer support,” write “Resolved 100+ customer tickets weekly with a 95% satisfaction rate.”
Keep It Clean
One page is enough for most people. Use clear headings, white space, and a simple font. No graphics or tables — many systems can’t read them. Tip: Always save your resume as a PDF so the layout stays intact.
Highlight Relevant Skills
Put the most important skills and experience at the top of your resume. Most recruiters skim fast. Example: If you’re applying for a developer job, list programming languages and projects first, not hobbies.
Proofread Everything
Small mistakes can cost you interviews. Run spellcheck and read it out loud. Tip: Watch for things like mixed date formats and extra spaces.
Customize Your Cover Letter
Even a short, specific cover letter helps. Use AI to draft, then tweak it so it sounds like you. Example: Mention something real about the company. “I admire [Company Name]’s work in renewable energy and would love to contribute to your next project.”
Hope you like it.
Thanks for reading, and I wish you the best of luck in your job hunt!
But now, let me show you how to use it, more results, tips, and more.
Disclaimer: This article is reader-supported. If you choose to pay for the tools listed in this article, I might earn a small commission at no cost to you.
My Results & Experience
Aiarty Video Enhancer is great for adding sharpness and removing noise from your videos.
Here’s a video I took at midnight during a thunderstorm:
Please, pay attention to the sky.
In the first clip, it’s super grainy.
In the second one, it’s much less grainy.
Isn’t it handy? The AI did all this for me with just a couple of clicks of a button.
Before I show you more results, let me quickly show you how to use Aiarty Video Enhancer to improve your videos.
How to Use Aiarty Video Enhancer
To start using Aiarty, download the video enhancer software here. You can test it for free!
Just drag and drop your videos into the view and start enhancing them with the different models available on the right.
For example, I dropped a video into the view where I’m throwing a disc golf disc.
At this stage, the video enhancement has not started yet!
Instead, it creates a preview of the current frame with the selected model to show what the video will look like if you use this setup to enhance it.
This is handy because the video enhancement process takes a long time. You don’t want to wait for 30 minutes to realise you used the completely wrong settings.
Speaking of the enhancements, make sure to tweak the right-hand side settings.
For example, the default upscaling factor is 2X. This essentially means it will make the video twice as large while maintaining the quality.
For example, with the above settings, the preview looks like this:
That’s handy! Now I can play with the settings to see if it could do any better.
For example, I chose a 4X upscaler factor, which means it’s going to make the video significantly sharper and higher in quality.
But here’s what the preview turned out:
That’s just a touch too much, in this example. So I’ll keep it at 2X for now.
This depends entirely on the type of video you have at hand. I think with people in the videos, the upscaling factor needs to be small, like 1x or 2x. But with scenery with no people, it might be just fine to use 4x and get much sharper results.
However, the upscaling factor is not the only thing you should play with.
Remember that there are three video enhancer models in this tool.
You’ll find those on the right-hand side too.
Here you’ll find the explanations for these models:
If you can’t see the image, here’s a table that summarizes the models:
/media/0e7a606a47a58ccfb672ba5db8737082
However, these are just words and numbers.
Let me show you some before-and-after footage to show what they actually do
First, I tweaked my settings on the right to look like this:
Here’s the moDetail-HQ v2 in action:
Then, here’s the Smooth HQ v2 model in action with 2x upscaling:
And here’s the SuperVideo vHQ in action with 2x upscaling:
Pretty cool, right?
(I’ll show you video clips in just a second, don’t worry!)
In each shot, you can clearly see the difference in the video quality. Especially the closer you zoom into it.
Once you’re happy with the preview, choose the time range (unless you want to enhance the entire video).
Just drag the sliders around to find the clip you want to enhance.
If you set the range, don’t forget to click the “Add Task” button.
Then hit “Export Current”. This starts the actual processing of the video.
At first, I was a bit confused since nothing happened, but then I noticed that the status bar is small and it’s at the bottom of the view.
Please keep in mind that this process takes a while. Even on my 4-second clip, I had to wait for 10–15 minutes for the AI to create the enhanced version.
If you’re too busy, you can use the Turbo mode to make it a bit faster, while sacrificing the quality a bit.
However, thus far, I’ve just shown you some screenshots. Let me show you a quick clip of these different models in action on the actual video. This should give you a better idea of how it works:
/media/ec378faefbe36d74542f1dba2a80b535
In this video, you’ll see all three above-mentioned AI enhancer models in action with different zoom levels.
As you can see, it’s nothing crazy. But it improves the video quality, especially when you zoom the video.
This screenshot describes it perfectly:
It’s better but not perfect, as justifiably expected.
On top of this one video, I enhanced a couple of stock videos to highlight the capabilities in different shots.
For example, the thunderstorm video from the intro…
Since it’s a nighttime video, you can see some graininess and noise in the original clip.
But the enhanced video gets rid of most of that.
It’s still not perfect, but it’s just so much better after the AI enhancement.
I really like it! The tool is easy to use. It has a bunch of models for different types of videos, and the results are nice.
Great results! The tool improved my video quality and sharpness.
Different upscaling and enhancing models for different video types.
Easy to use as a beginner—just download it, activate your key, and add your videos to the view for enhancement.
There’s a free trial version.
Cons
Once I had enhanced 3 videos, the tool crashed, and I had to reopen it to process more videos.
Too much upscaling messes up the quality, especially with faces.
Slow! It will easily take 15 minutes to enhance a 10-second clip. However, this is not a problem with Aiarty, but it’s an issue with this technology in general.
Aiarty AI Video Enhancer can significantly improve the quality and clarity of your videos.
It’s my favorite tool because it’s easy to use, delivers good results, and is reasonably priced.
Just keep in mind that this technology has limits.
If a video is poor to begin with, no software can fully fix it.
Think of tools like this as the icing on the cake: if your video is already a 7 out of 10, Aiarty might bring it up to an 8 or even 8.5. But you won’t turn a 3 into a 9.
Disclaimer: This article is reader-supported. If you choose to pay for the tools listed in this article, I might earn a small commission at no cost to you.
This allows you to build from scratch, import from LinkedIn, and import from an existing resume.
I chose the “Start with your LinkedIn Profile”. If you do this, it asks for your LinkedIn profile.
It’s clever, isn’t it? The tool uses AI to analyze your LinkedIn profile information and experiences, then automatically generates your resume.
Based on this information, it creates the initial version of your resume in an ATS-optimized manner.
#3 Open The Editor
Once the AI is ready, it will automatically open up the AI resume editor. If you used LinkedIn or your existing resume, you’ll see a lot of stuff there already, pre-filled for you.
Here’s a sneak peek at the first draft it created for me.
I know it’s a bit small, so let me zoom it in a bit.
On the left, you’re going to see the personal details, work history, etc.
Then, on the right, you’re always going to see the preview of your resume in real time. The changes you make on the left are immediately reflected on the right.
That’s handy! No jumping in-between windows or any hassle like that.
#4 Fill in Your Details
To create your resume, make sure to enter the details for each section.
Notice that you can easily move things around in the editor by dragging and dropping the elements.
#5 Write with AI
You can use AI to write parts of your resume, too.
For example, in the experiences section, you can fill in your company name and job title, and then use AI to give you a better description.
#6 Change Titles with AI
Also, you can use AI to change your title to be more appealing if you’re after a specific role.
For example, when I typed Coder and clicked “AI Suggestions”, it gave me a bunch of better results.
#7 Find Certifications with AI
You can also use AI to find industry-specific, relevant certifications.
For example, if your resume is a software developer resume, you can look for certifications in your space with AI and fill in those that you’ve taken.
#8 Pick Hobbies with AI
Then, in the interests section, you can use the AI-suggested hobbies and interests instead of having to type them all in.
#9 Tweak Settings
Don’t forget to tweak the settings either.
Despite there being just one resume template, you can still do many things around here.
For example, you can do layout optimization.
You can reorder your resume sections.
You can choose a different font.
And of course, you can get those AI suggestions too!
#10 Purchase the License
Once you’re done, it’s time to purchase the AI-generated resume.
At the time of writing, the fee is $99, a one-time charge for lifetime access. No recurring fees like most tools do in this space.
#11 Can’t Afford It?
SheetsResume is awesome. If you can’t afford it, you have options:
Free memberships are offered to U.S. government workers affected by DOGE — contact team@sheetsresume.com.
Financial Hardship Support: If the $99 lifetime pass is unaffordable, email team@sheetsresume.com for a complimentary 7-day membership to help you complete your resume.
Vocational discounts are added during checkout for students, military personnel, teachers, and government workers.
I spent $39 on Headshot Kiwi AI headshots. To be honest, the results were not that good.
For the best AI headshots, try BetterPic AI. It’s officially ranked #1 on the above site.
You’ll get 10% off with code JALLI10.
Here are my Headshot Kiwi results:
Yeah, that’s not too good!
Disclaimer: This article is reader-supported. If you choose to pay for the tools listed in this article, I might earn a small commission at no cost to you.
My Results & Experience
That’s it for the short review. Now, let me dig deeper into the details. I will show you my result and also how these compare to the other AI headshot generators that I’ve used.
How to Use
Using Headshot Kiwi AI is supposed to be simple. Just sign up and choose a headshot AI photoshoot.
I purchased the $39 package to receive 120 AI-generated headshots. I think that’s enough to show if the tool works or not. Sometimes with the smaller package, you get way too few results to judge.
To create headshots, quickly read the instructions.
Now, here’s where it started to get tricky for me. When I uploaded my photos, it would silently reject those. It wouldn’t give any errors or anything. I had to come back many times to upload more images.
Also, this tool requires a whopping 13 images. That means you need 13 good-quality photos to begin with. If you’re like me, who doesn’t take that many selfies/images, that can be hard.
Once I had uploaded my images, all of a sudden, the whole site crashed.
It did this two times: Once when I logged in and once when I started to upload images.
Once I had finally uploaded my photos, I thought I’d be ready to get my headshots… But I was wrong. When I clicked “Start AI Photoshoot”, it didn’t do anything, even though I had just paid for the service.
I thought they had just robbed me, to be honest. I was a bit disappointed. There were no errors or warnings anywhere.
I had to debug it myself…
So I went back a couple of views, and there I noticed that I had just uploaded 11/13 images, even though I had done at least 20. There were still no warnings, though. I had to figure this all out on my own.
Once I had uploaded the photos for the 10th time, it finally started to create my headshots.
I came back 2 hours later, and the headshots were ready.
Before I show you the results, here are some real images of me so that you can compare:
Now, here are the AI-generated headshots:
To be honest, at this stage, I didn’t expect anything. But to my surprise, some of the images actually looked really good.
Here are some of my favorite images:
However, there was still a big problem: the image quality. The photos are just not big and sharp enough. No matter which photo I chose, it was always blurry or pixelated at a closer zoom. But on a small preview thumbnail, that didn’t matter. So perhaps these could still be good LinkedIn photos.
Then I also noticed that you can’t edit your photos. So if there are low-quality or failed images, there’s nothing you can do about them.
Here are some low-quality images:
Also, please don’t expect every image to look good. Out of the 120 images I got, I’d only say 8–10 are good. In most images, the teeth and lips are messed up, and the stare is weird.
Alternatives
Headshot Kiwi is not even close to being the best AI headshot generator. It felt like a tool that had been put together over the weekend and left there.
I recommend trying a headshot generator that’s actually up to date and constantly being developed.
The best headshot generator I’ve ever tested is BetterPic.io. Use JALLI10 to get 10% off.
Here are some of the results I got from BetterPic AI:
These are super good to my liking.
I’m much happier with these results compared to the ones from Headshot Kiwi AI — this tool is just in a different league.
The AI-powered edits are impressive. For example, here are some AI-edited photos I got from it:
I won’t get deeper into the details since I’ve made a separate video on BetterPic alone. You can check that here:
/media/2805e42303cee1f3252e4ec0cc59da06
Of course, this is not perfect either. But out of the 100 images, I’d say at least 30–40 are usable. All of them are high in quality. The edits are epic. And then there’s the human edits option, which lets you use a real human to edit your images based on your requests.
Hit “New AI Agent” to start creating your customer support AI chatbot:
#3 Pick Data Sources
Choose the data source (or data sources) for your AI agent.
This AI needs a data source — basically the info it’ll use to answer stuff.
In Chatbase, you can pick from:
Files: Upload PDFs, Word docs, or text files
Text: Just paste in whatever text you want it to know
Website: Give it a URL, it’ll scrape the content
Q&A: Add custom question-answer pairs
Notion: Connect your Notion workspace and sync pages
I went with the website option.
This means that the AI reads through my entire website and learns what it says on every single page.
It’s almost like a custom ChatGPT for your website.
Here’s the site I will use in this example. It’s called bloggersgoto.com—which is my blogging/SEO site where I teach blogging.
The reason I wanted to create an AI chatbot for this site is that I want to automate boring, repetitive questions that I get. After all, people could just find answers to these questions on my site.
To load your website as a data source, you need to include your sitemap. To do this, just enter the URL of the website you want to train this bot with.
If you want to do this for just one specific page, you can enter a link to the page in the Individual Link section. However, if you do this, anything that’s not found on that specific page is not included in the training data!
#4 Create Agent
Once you’ve specified your data source, hit “Create agent”.
This trains the AI chatbot based on the information found on the site.
#5 Test It First
You can always try the chatbot easily with the playground option.
When you ask questions of the chatbot, it will answer based on the information on the site you provided it with.
#6 Add More Data (Optional)
I tested my AI chatbot once and I didn’t like the answers that much. That’s because I had accidentally included just the homepage of my website as the data source.
To get better answers, I ensured the AI read all my pages on my website (there are over 140 blog posts there).
To do this, I entered my website URL in the Crawl Links and Sitemap sections.
As I did this, the AI started to go through all the pages on my website. It even shows you the links it has discovered.
After a couple of minutes, I started to get way better answers from the chatbot.
For example, here I asked the AI what should bloggers expect to make:
The AI chatbot gave a perfect answer based on one of my blog posts that I have published on the site. It absolutely nailed it.
This is epic!
I also wanted to know if the AI could answer a question about who is Artturi Jalli (that is, me).
Once again, the AI nailed it.
Without consuming my website, it obviously wouldn’t know the answer because I’m not a popular figure.
But because the AI had just read my entire website, it could easily find the answer.
#7 Check Answer Sources
By the way, if you want to get an idea where the answer came from, you can always click “Show sources”.
This way you can see from where the AI got the data and that it’s not hallucinating.
This is epic if you ask me.
So, just to recap, this AI chatbot was built in 5 minutes. Yet it remembers everything it saw on my website and gives a perfect answer.
But now, how do you use it? Can you customize the outlook? How can you add it as a chat bubble on a website?
No worries, I will show you all of that in just a second. But before we do that, let’s go through a couple of useful features.
#8 Check Analytics & Data
As the admin of your AI chatbot, you get to see your chat logs. This shows you all the conversations that your users have had with your AI chatbot.
You also get to see analytics, which shows you statistics on how many chats, messages, rated messages, and more have taken place.
You’ll also see from which corners of the world people have interacted with your chatbot.
Also, remember that your website is not the only source. You can add files, text, Q&A, and Notion files too. You can combine all of these to form an even more powerful AI chatbot.
#9 Create Actions
If your website or business has customer data or any other useful database, you can also connect that with ChatBase.
This way, you can manage your Slack conversations, Stripe payments, and all that stuff automatically with your customers in the chatbot.
Of course, you can also create custom actions too.
Just give it a name and description as to when the AI chatbot should call this action.
For example, if your user asks the chatbot to show invoice history, you can configure it to do so here.
Then connect the database/API to the action for the chatbot to fetch the data.
If you’re just creating a good old chatbot on a traditional website, you obviously don’t need to do all of this.
But if you have a lot of customers and data, configurations, and customizations like this can help.
#10 Publish
Once your AI chatbot looks good, it’s time to publish it. You can do this in the Connect tab. Just hit “Make Public” to publish your bot.
There are at least five different tools online that all use the name Clever AI Humanizer.
One ChatGPT chat even shows up with that name.
But based on the ads I’ve seen, I’m confident that this site is the real Clever AI Humanizer.
So let’s try it out.
Attempt 1
Let me test this.
I’m going to paste an AI-generated essay into Clever AI Humanizer now.
The tool is definitely fast. It gave me the result in just a few seconds.
Before I drop this into an AI detector, I want to read the output myself and see how it looks.
Here’s the full sample it gave me:
Global warming is among the biggest problems people now deal with. Rising heat around the world, vanishing glaciers, or wild storms aren’t far-off dangers anymore yet everyday truths. Nations everywhere need to move fast — so they can put real solutions into place without delay climate rules — like putting a price on pollution through fees or trade-style setups, more money going into green power options while tighter rules limit pollution output from transportation and industry. Public awareness drives might just help change how folks act across communities — using clear messaging that sticks. Just as crucial is working together across countries, since global warming doesn’t stop at borders but spreads beyond them needs people everywhere to work together. If we don’t do something now, nature might change in ways we can’t fix widespread hunger, people on the move, also rising financial burdens. So climate rules need to juggle saving nature with keeping economies running along with fairness in society to help create a decent life ahead for those who’ll follow.
Not going to lie, this is really bad.
It’s just a bunch of words pushed together.
Hard to read.
Way too wordy and confusing.
Pretty much a waste of time.
Here’s one sentence as an example:
Nations everywhere need to move fast so they can put real solutions into place without delay climate rules like putting a price on pollution through fees or trade style setups, more money going into green power options while tighter rules limit pollution output from transportation and industry.
Yep. That is one sentence with 48 words. I already think a 15 word sentence is long. This is on another level.
Things are not looking good for Clever AI Humanizer right now.
If you gave this to a teacher, they would spot it as AI in two seconds.
And there’s no chance you’d get real views with writing like this on social or search.
But anyway, let’s run it through an AI detector and see if it can fool one.
For this test, I’m using a tool called Undetectable AI. It runs several detectors at once and gives you an average score.
Here’s the result I got:
And just like I expected, it shows a high chance of being AI written.
So this tool doesn’t work.
It’s just another useless tool on the internet.
If the very first try fails this badly, what are the odds the next hundred won’t?
No point testing it any further.
This tech just doesn’t work.
Is It a Scam?
Here’s the part that’s even more worrying.
I made a video showing the “best AI humanizers” and how none of them really work, no matter what you try…
Yet that didn’t stop Clever AI Humanizer bots from flooding my feed with garbage comments like this.
Yes, these fake comments all try to hype it up and claim that Clever AI Humanizer is the best.
Honestly, those comments are what pushed me to make this video as a nice little thank-you for flooding my feed.
Why, Though?
Now the question is: why are there tools that clearly don’t work?
Well, it’s business…
Here are the numbers from the Semrush traffic report:
Here’s a clean rewrite in your style, with no intro line:
It shows that more than 1,400,000 people search for AI humanizers every month.
That is a wild number.
And even worse, a chunk of those people are willing to pay for these tools.
This whole space, even though the tech doesn’t really work, is worth hundreds of millions.
Even if most people don’t buy into it, there would still be hundreds of thousands who do.
So there’s a lot of money to chase.
That’s why you see so many startups, ads, and shady players jumping in.
My Take
Like I’ve said before, I don’t believe in AI humanizers.
I’ve tested a bunch of them, and none of them have been reliable.
Some might be a little better than others.
But even the better ones are still shaky.
And the worst part is that none of them make you sound more human.