I tried out the HeadshotPro AI headshot generator to see if it’s worth your time and money!
I’ll share my results, what I liked, what I didn’t, and the pros and cons of using it.
Here’s what happened!
Disclaimer: This post has affiliate links at no cost to you.
HeadshotPro briefly
HeadshotPro is a web-based AI tool that turns your selfies into sharp, professional-looking headshots you can use on LinkedIn, your resume, or social media.
It can place you in different business settings and outfits — even if your original selfie was snapped at home in pajamas.
This way, you skip the cost and hassle of hiring a professional photographer.
How to use it
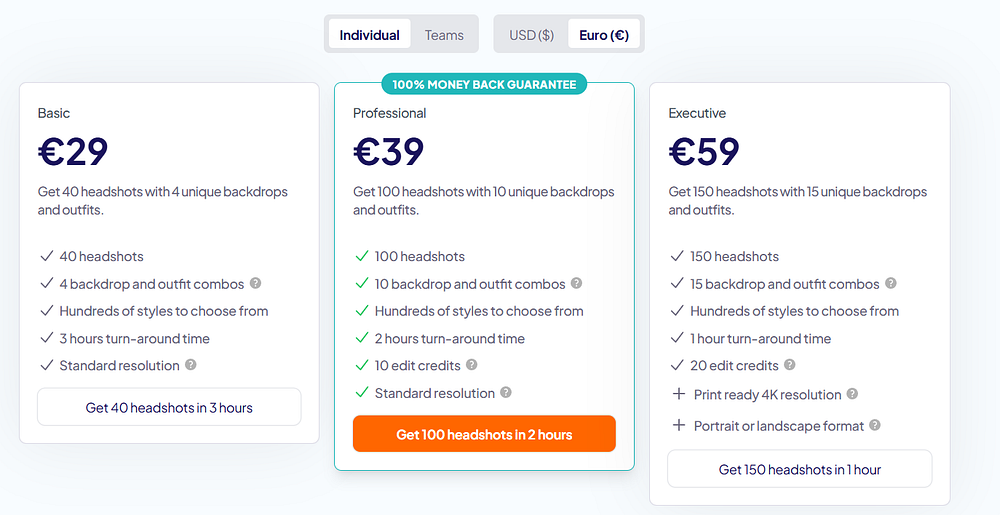
To create AI headshots with this tool, go to their website and pick a plan.
Now, let’s start creating your headshots!
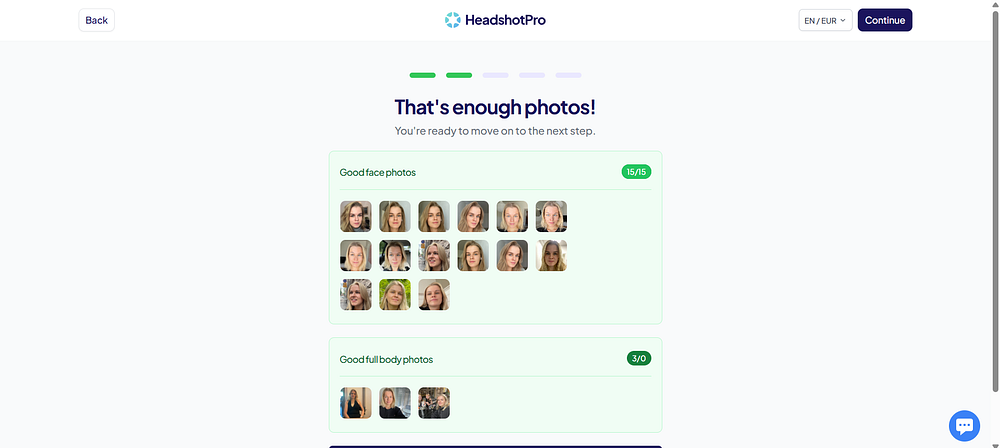
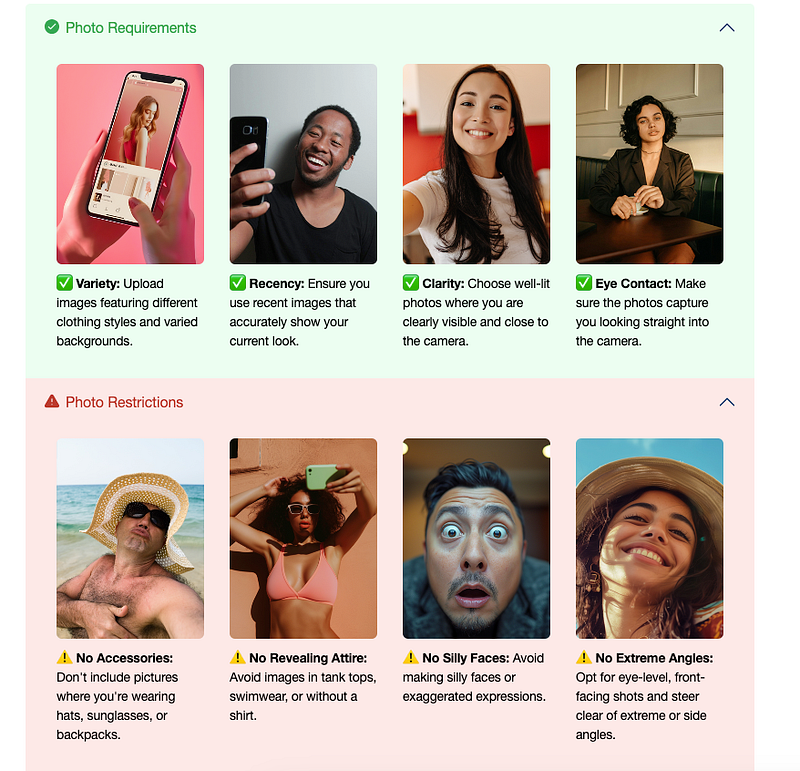
The first and most important step is uploading your selfies, because the quality of these photos will affect the results.
Pick selfies that really show you well — it’s worth taking a little extra time here.
HeadshotPro will also ask for some personal details, like your height, hair and eye color, and ethnicity.
Uploading 15 photos of myself was a bit tricky, since I don’t really post on social media and don’t have a lot of good selfies lying around.
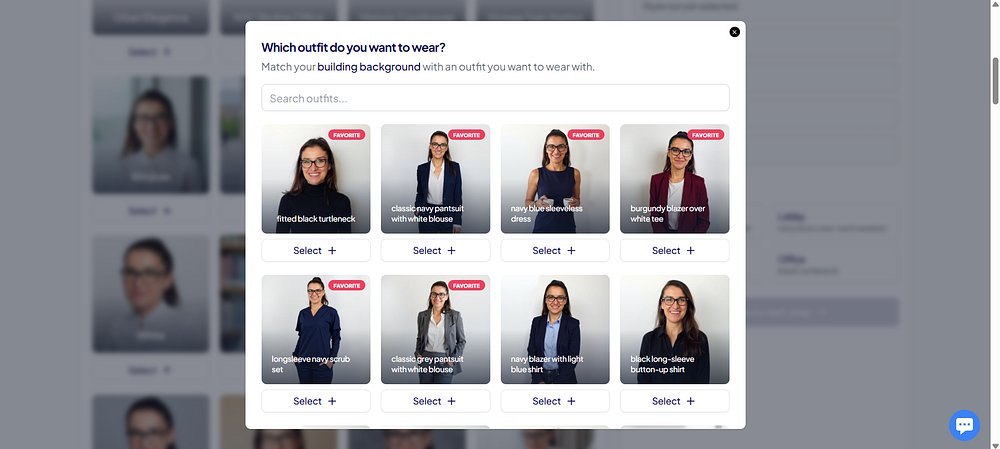
Next, you pick the background and outfit combinations for your headshots. How many you can choose depends on your plan. I had the Professional Plan, so I got to pick 10 different styles.
The “Choose for me” button in the corner was a lifesaver! It saved me time since picking all the combos by hand can take a while.
For me, the whole process took around 2 hours to finish. Pretty quick, if you ask me.
With the Executive Plan, the turnaround time is even faster — just about 1 hour.
Results
Now, let’s take a look at my results and what I thought of them.
When your headshots are ready, the tool gives a heads-up about “duds.” These are the shots that look off or make you look strange — pretty common with AI generators.
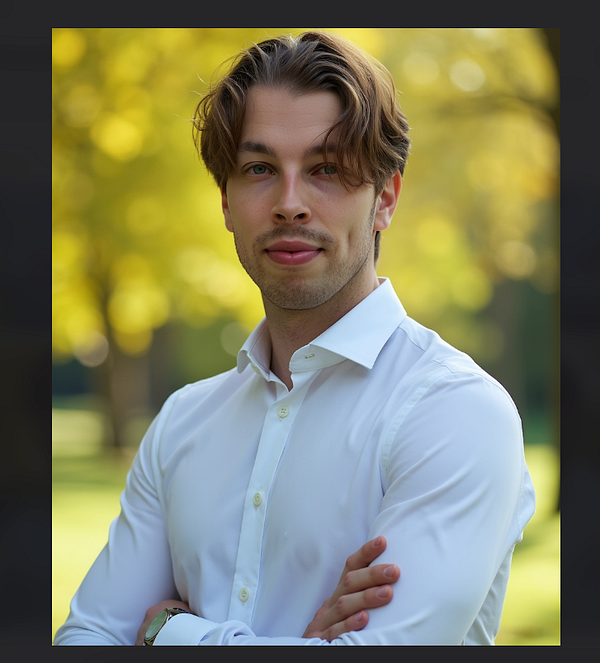
Here’s the real me — one of the selfies I uploaded. It’s a pretty recent one.
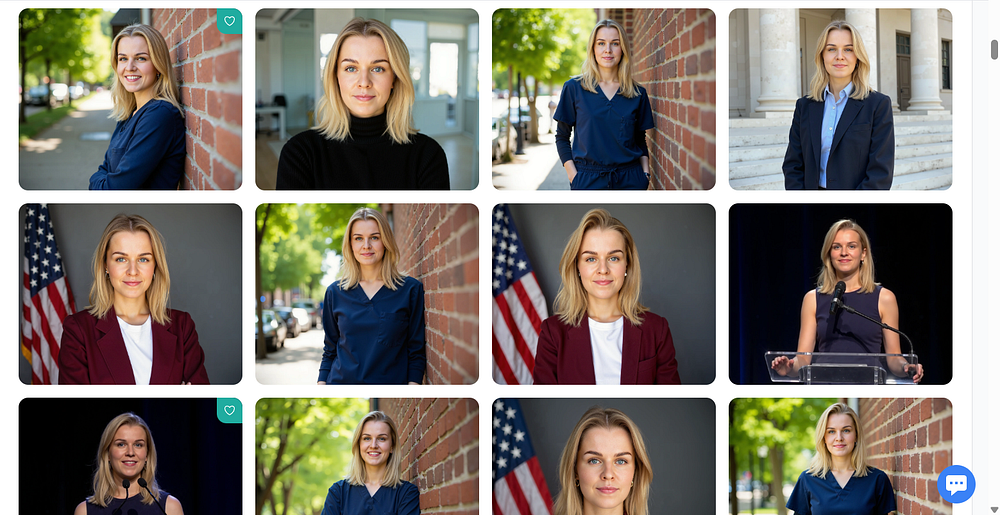
Overall, it turned out pretty well.
I used the “Choose for me” option for the backgrounds, which is why there’s a patriotic US flag behind me.
The full-body shots have slightly odd proportions, but my hair came out looking great.
The headshots are really polished — maybe even a little too perfect for my taste.
These ones are probably my favorites!
I have to admit, these look like “yassified” versions of me — kind of like I’m wearing a beauty filter.
I really like the preview feature, though. It lets you see how the headshot would look as your LinkedIn profile pic or email signature.
It really captures me with a calm expression, though a bigger smile — like showing my teeth — looks a bit off.
That’s probably because I didn’t upload many selfies with my teeth showing.
Edits
With the Professional and Executive plans, you get credits that let you edit and remix your headshots.
Let’s try changing my facial expression to something a bit happier or more cheerful.
It’s not perfect, but it probably would have turned out better if I’d uploaded more selfies with my teeth showing.
Next, let’s try making the background transparent!
I don’t know, I feel like I could have probably done this myself and gotten better results.
Still, it looks good as a small icon!
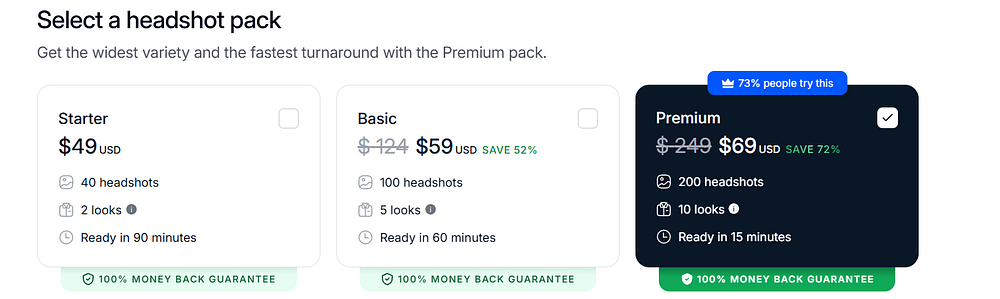
Pricing & Value for Money
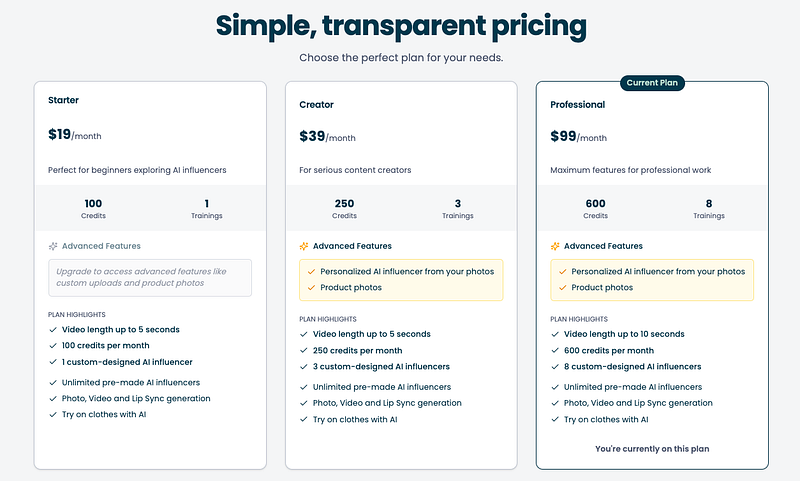
These are the current plan options HeadshotPro offers. I went with the Professional Plan.
They also have plans for teams.
If you’re not in the US like me, the price in euros ends up being higher because the exchange rate isn’t 1:1. So it’s better to pick the price in USD.
In my opinion, the Basic and Professional plans feel reasonably priced.
Go with the Basic plan if you just want a few good shots for social media and don’t plan to edit them later.
The Professional Plan is better if you want a larger set of headshots and maybe want to tweak them a bit.
Either way, it’s definitely cheaper and faster than hiring a real photographer.
Pros
Lots of background and outfit combos to pick from.
Easy-to-use features like “Choose for me” and the LinkedIn-icon preview.
Quick turnaround (about 2 hours with the Professional Plan).
Headshots look sharp and professional.
Very few had obvious oddities, like weird hand positions.
Didn’t make me look older.
Headshots look great as small icons.
Cons
Some shots feel a bit repetitive.
The edit feature isn’t that impressive.
Headshots are a little too polished for my taste — kind of like there’s a beauty filter on.
My final thoughts
ChatGPT said:
HeadshotPro delivered high-quality headshots in just about 2 hours.
You can customize the background and style yourself, or let the tool pick for you and save some time.
The headshots look professional, sharp, and well-lit, and most of them are very accurate. I’d definitely use them for LinkedIn or any other professional profile.
The tool didn’t handle other facial expressions very well, so some shots felt a bit repetitive. They also come out a little too polished. My hair looked great, though. The edit feature didn’t work that well for me — I tried making my expression happier and removing the background entirely, but the results weren’t perfect.
Overall, it’s a good, fairly affordable option if you want good-quality headshots for social media or your resume.
I tried Aragon AI for creating headshots to save you time and money.
In this post, I’ll share my results and let you know if it’s the best AI headshot generator out there.
Let’s dive in.
Disclaimer: This article has affiliate links at no cost to you.
👉 Check the updated list of the best AI headshot generators here.
My results
Aragon AI takes your selfies and regular photos and turns them into professional headshots.
Here are a few real images I uploaded to the service:
Here are the headshots Aragon AI generated for me:
I’ve got to be honest, these aren’t the best AI headshots I’ve seen. The poses look off, and they don’t quite look like me—kind of uncanny.
That said, there are still a few that are pretty close.
For example, this one turned out to be one of the best results:
Unfortunately, it still looks a bit tired and bored. It does resemble me, but something feels a bit off.
Here’s another one where I’ve done a side-by-side comparison of how I look in real life vs. what the AI made:
Here’s another one:
And here’s one more:
We’re definitely close. These results would’ve been amazing back in 2022 or 2021, but now, they still feel a bit too AI for me. The images do look like me, but there’s this uncanny, artificial vibe that I can’t ignore.
Maybe if I used these on LinkedIn, it wouldn’t matter much since people mostly see a tiny icon of the headshot.
One of the biggest issues with Aragon headshots is the weird hand gestures I sometimes get. Take this one, for example—it’s so awkward, it looks like I’m flipping someone off:
Also, if you look closely, the expression on my face is pretty intense. But again, this is a small detail—and it’s the main issue with tools like this.
The AI just isn’t quite there yet to make an image that looks exactly like you. At least not with Aragon AI.
Try BetterPic: The Best Aragon Alternative
Since I’m not a fan of the headshots from Aragon, I’ve got to suggest something else.
I’ve spent over $2,700 testing all these AI headshot generators, so you don’t have to.
My top pick for the best AI headshot generator is BetterPic.
BetterPic creates crisp, super-realistic images with lifelike skin, teeth, and eyes.
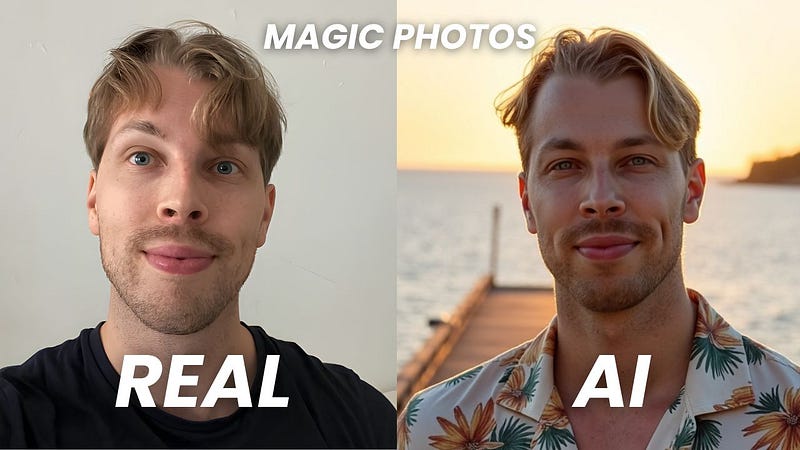
Here are some before-and-after AI headshots I got from BetterPic:
The first one is my LinkedIn profile picture when I wrote this post.
Also, BetterPic lets you make human edits to your images. You just pick an image, request changes, and a professional photo editor will handle the rest.
This way, you’ll get at least one perfect image of yourself with all the edits done. I’ve used this feature to remove a necklace from one of my photos.
Here’s the original headshot:
And here’s the edited one:
As you can see, the necklace is gone—perfectly!
This is something Aragon AI just can’t do. Even though it offers some basic edits, BetterPic clearly beats it in this area.
Speaking of edits, BetterPic also offers AI-powered edits, in addition to the human editing feature.
For example, here I created a bunch of images of myself in the same spot but with different outfits.
Pretty cool, right? The AI changed my clothes, but everything else stayed almost exactly the same.
Here are the editing options in BetterPic:
Pretty cool, right? You can let the AI fix bad images or even improve the ones you already have.
If you still want to give Aragon AI a try, let me show you how to use it.
First, go to this page. Click on “Create your headshots now” and sign up for the service.
Next, choose your age, gender, eye color, hair color, and ethnicity:
Then, choose a style you want your images to have.
Next comes the trickiest part—you’ll need to upload your images so the AI knows what you look like. Be sure to read the instructions carefully.
Make sure your photos are clear and that you’re keeping a neutral expression—no funny faces. Avoid using a bunch of similar shots taken all at once. Once you’re ready, just drag and drop your images into the box.
Confirm your details one last time and hit “Submit.” Then, just sit back and wait for the AI to process your photos.
This usually takes about 20–40 minutes.
Once the images are ready, you’ll get an email like this:
Click the link to view your pictures and enjoy.
Keep in mind, you can make some basic edits to your photos in Aragon. If something’s off, you can try adjusting it with those editing options. You can change the background, remove artifacts, upload a new background, and more.
However, after testing it, nothing happens when I click the “Edit” button…
But honestly, BetterPic is way better than Aragon AI.
Aragon might’ve been one of the first to enter the market, but it’s far from being one of the top tools now. Not even close, to be honest!
Fast turnaround: It took only about 30 minutes to get my AI headshots, while most other tools take 1–3 hours. If you need photos quickly, this is a big plus.
Impressive realism: Most of the headshots looked surprisingly real and professional. A few weren’t perfect, but most were lifelike and polished.
Built-in AI editing: You can make quick adjustments, like fixing stray hairs or lighting issues, without starting over. It’s an easy way to fine-tune your headshots.
More affordable than hiring a photographer: Compared to booking a professional session, this is much cheaper. You get edited photos in under an hour at a fraction of the cost.
Cons
Slightly artificial feel: Some images have a bit of an artificial look, like overly smooth skin or vacant expressions, which might be distracting if you want totally natural photos.
Pricey: At $30 or more for a set of headshots, it’s not the cheapest option. If you’re on a budget or only need one photo, it might feel a bit expensive.
Other tools may be better: While Aragon is one of the better AI tools, there are other services that offer similar or better results for the same price. It’s worth comparing.
To take home
Aragon AI is a solid AI headshot generator.
It’s quick, easy to use, and offers a good range of polished styles without the need for a studio or makeup artist.
I wouldn’t have thought this kind of tech would be available so soon back in 2020 or 2021.
That said, Aragon AI isn’t perfect. It’s definitely not the top AI headshot tool out there.
While it’s fast and simple, Aragon sometimes misses on facial details — like odd smiles, mismatched hair, or small artifacts. Plus, their refund policy hasn’t gotten great reviews based on what I’ve seen.
In comparison, BetterPic gives sharper results with a more accurate likeness and clearer features. They also offer a human editor to finalize your images!
That personal touch really makes a difference when you want perfect results.
So, while Aragon is great for fast, decent headshots, BetterPic is the better choice for top-quality images, and it’s not that much more expensive!
Just drag and drop your videos into the view, then start enhancing them using the different models on the right.
For example, I dropped a video where I’m throwing a disc golf disc.
At this stage, the video enhancement hasn’t started yet!
Instead, it creates a preview of the current frame with the selected model, showing what the video will look like once you apply this setup.
This is really helpful because video enhancement takes a while. You don’t want to wait 30 minutes only to realize you used the wrong settings.
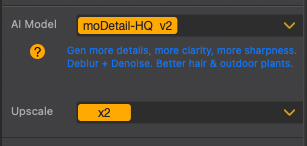
Speaking of enhancements, be sure to adjust the settings on the right-hand side.
For example, the default upscaling factor is set to 2X. This means it will double the size of the video while keeping the quality intact.
For example, with the settings above, the preview looks like this:
That’s handy! Now I can adjust the settings to see if it can improve even more.
For example, I selected a 4X upscaling factor, which means it will make the video much sharper and higher in quality.
But here’s what the preview looked like:
That’s just a bit too much in this example, so I’ll stick with 2X for now.
It really depends on the type of video you’re working with. For videos with people, the upscaling factor should probably stay low, like 1X or 2X. But for videos with scenery and no people, 4X might be just fine to get much sharper results.
However, the upscaling factor isn’t the only thing you should adjust.
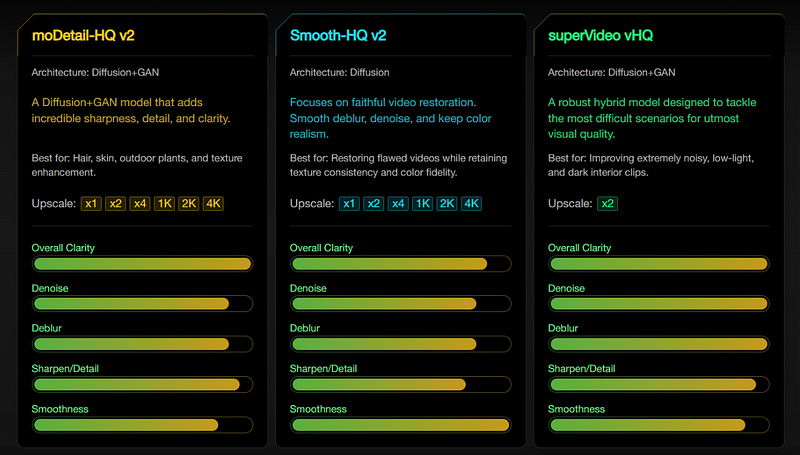
Remember, there are three video enhancement models in this tool.
You’ll find them on the right-hand side as well.
Here are the explanations for these models:
If you can’t see the image, here’s a table that summarizes the models:
Model
Architecture
Description
Best For
Upscale Options
moDetail-HQ v2
Diffusion + GAN
Adds incredible sharpness, detail, and clarity.
Hair, skin, outdoor plants, texture enhancement.
x1, x2, x4, 1K, 2K, 4K
Smooth-HQ v2
Diffusion
Focuses on faithful video restoration. Smooth deblur, denoise, and keep color realism.
Restoring flawed videos while retaining texture consistency and color fidelity.
x1, x2, x4, 1K, 2K, 4K
superVideo vHQ
Diffusion + GAN
A robust hybrid model designed to tackle the most difficult scenarios for utmost visual quality.
Extremely noisy, low-light, and dark interior clips.
x2
However, these are just words and numbers to me.
Let me show you some before-and-after footage to demonstrate what they actually do.
First, I adjusted my settings on the right to look like this:
Here’s the moDetail-HQ v2 model:
Here’s the Smooth HQ v2 model with 2x upscaling:
And here’s the SuperVideo vHQ model with 2x upscaling:
Pretty cool, right?
(I’ll show you the video clips in just a second, don’t worry!)
In each shot, you can clearly see the difference in video quality—especially when you zoom in closer.
Once you’re happy with the preview, select the time range (unless you want to enhance the whole video).
Just drag the sliders to find the clip you want to enhance.
If you set the range, don’t forget to click the “Add Task” button.
Then click “Export Current.” This will start the actual video processing.
At first, I was a bit confused since nothing seemed to happen, but then I noticed the status bar at the bottom of the view—it’s small but there.
Keep in mind, this process takes some time. Even for my 4-second clip, I had to wait 10–15 minutes for the AI to create the enhanced version.
If you’re short on time, you can use Turbo mode to speed things up, though it sacrifices some quality.
So far, I’ve just shown you some screenshots. Let me now show you a quick clip of these different models in action on the actual video. This should give you a better idea of how it works:
In this video, you’ll see all three AI enhancer models in action with different zoom levels.
As you can tell, it’s not anything wild. But it definitely improves the video quality, especially when you zoom in.
This screenshot sums it up perfectly:
It’s better, but not perfect, as you’d expect.
In addition to this one video, I enhanced a few stock videos to showcase the capabilities in different shots.
For example, here’s a video of a fireworks display in its original format compared to the enhanced version using the Aiarty AI video enhancer models:
Since it’s a nighttime video, you can spot some graininess and noise in the original clip. But the enhanced version clears up most of that.
Here’s another clip where you can clearly see how much the AI improves the video quality:
In this clip, the original quality is about 7/10. After enhancement, I’d rate it around 8.5/10, so it definitely improved. I used the superVideo vHQ model on a clip I found online.
And just in case you missed it earlier, here’s the midnight thunderstorm clip too:
It’s still not perfect, but the improvement after AI enhancement is noticeable.
I really like it! The tool is easy to use, offers a variety of models for different video types, and the results are great.
Aiarty AI Video Enhancer can really boost the quality and clarity of your videos.
It’s my favorite tool because it’s easy to use, delivers solid results, and is reasonably priced.
Just keep in mind, though, that this technology has its limits.
If a video is bad from the start, no software can fully fix it.
Think of tools like this as the icing on the cake: if your video is already a 7 out of 10, Aiarty might bring it up to an 8 or even 8.5. But you won’t turn a 3 into a 9.
I tested all the best AI resume builders. In this post, I will show you the winner, which is called SheetsResume.com.
It’s affordable, simple to use, and the story behind it is pretty fascinating.
Let me show you how it works and what kinds of results I got with it.
Disclaimer: This article has affiliate links at no cost to you.
1. Create Based on Your LinkedIn
To create a resume with Sheets AI, just head over to this page.
#2 Pick LinkedIn
Let’s use LinkedIn for the first example.
To create a resume from your LinkedIn profile, click on “Start with your LinkedIn profile” on the right-hand side.
Next, go to LinkedIn, visit your profile, and copy the URL.
Paste the URL into this view:
The SheetsResume AI will visit your LinkedIn profile, pull your information and experiences, and create the first version of your resume based on that.
#3 Open The Editor
Once the first version of your resume is ready, you’ll see a screen like this:
On the left-hand side, you can fill in the details the tool asks for, like your name, email, work history, education, and more.
On the right-hand side, you’ll see a real-time preview of your resume. This means any change you make on the left will show up instantly on the right.
That’s pretty neat because you don’t have to switch between windows or hit the refresh button.
#4 Fill in Your Details
For the best results, make sure to fill in your details for every section.
You can also move things around in the editor by dragging and dropping the elements.
#5 Write with AI
SheetsResume lets you use AI to write parts of your resume.
For example, in the experience section, you can enter your company name and job title, then ask AI to create a better description.
#6 Change Titles with AI
You can also use AI to make your title more attractive, especially if you’re aiming for a specific role.
For example, when I entered “Coder” and selected “AI Suggestions,” it gave me a list of improved options.
#7 Find Certifications with AI
You can also use AI to find relevant, industry-specific certifications.
For example, if your resume highlights your experience as a software developer, AI can help you search for certifications in your field and add the ones you’ve earn
#8 Pick Hobbies with AI
In the interests section, you can use the AI-generated hobbies and interests instead of entering them manually.
#9 Tweak Settings
And don’t forget to adjust the settings.
Even though there’s only one resume template, you still have plenty of customization options to play with.
For example, you can optimize the layout, reorder your resume sections, pick a different font, and even get AI suggestions.
#10 Purchase the License
When you’re done, you can go ahead and purchase your AI-generated resume.
Right now, the cost is $99, which is a one-time payment for lifetime access—unlike many other tools that charge recurring subscription fees.
#11 Download It
Once you’ve paid for the resume, you can download it and use it to land your next job!
That’s how you create a resume from your LinkedIn profile.
But if you’re not using LinkedIn, let me show you how to create a resume from scratch or based on your existing resume.
SheetsResume also lets you create your resume from scratch.
If you choose this option, be ready to spend some time building your resume.
You can always use AI to assist at every step, though.
For example, you can build your work history page by filling in the details and asking AI to complete it and make it sound professional.
Of course, if you don’t want to use AI, you can always create it the traditional way—just fill in the information and move on to the next slide.
Don’t forget about the AI suggestions. They can be helpful if you’re unsure how to describe your past roles, skills, interests, or anything else.
Can’t Afford It?
SheetsResume is great, but if it’s out of your budget, you’ve got options:
Free memberships are available for U.S. government workers affected by DOGE—just contact team@sheetsresume.com.
Financial hardship support: If the $99 lifetime pass is too much, email team@sheetsresume.com for a free 7-day membership to finish your resume.
Vocational discounts are offered at checkout for students, military personnel, teachers, and government workers.
A free DIY resume template, used by millions, is available at SheetsResume.com/resume-template.
👉 Try SheetsResume
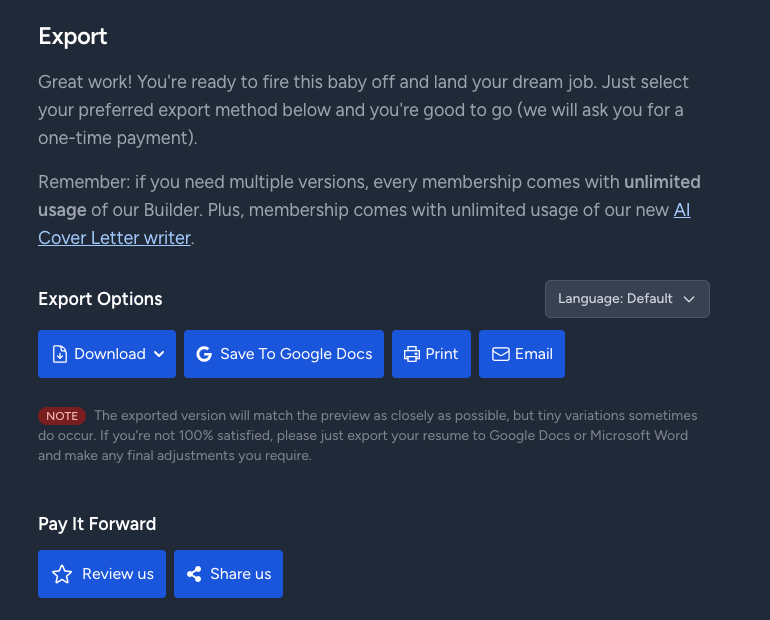
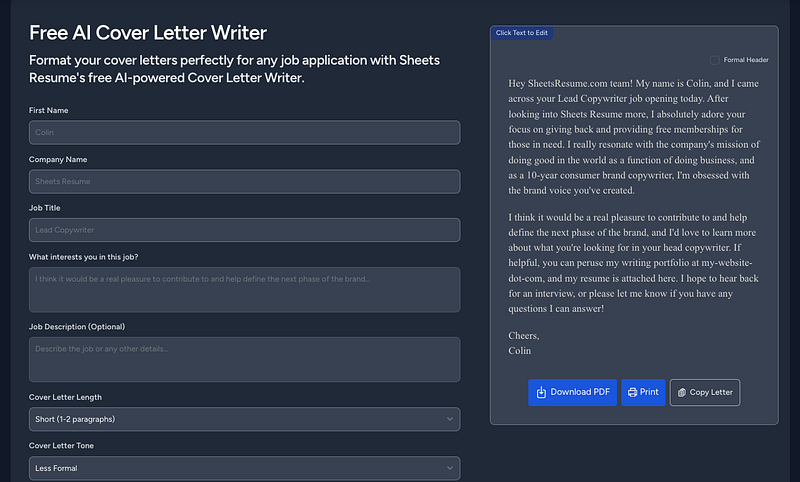
Write Your Cover Letter with AI
If you need a cover letter for your resume, you can create one with SheetsResume’s AI writer too.
Just select tools from the top right.
And choose the AI Cover Letter Writer, which is free, by the way!
I tested it, and the result gives you a solid starting point for the language, format, and layout.
However, as you can guess, with AI, the results can be a bit generic.
Make sure to add your personal touch to it to make it stand out and ensure everything is accurate.
You can imagine how many cover letters companies get where they can immediately tell it’s 100% AI-written. That’s definitely something you want to avoid.
Affordable lifetime access — One-time payment, no recurring fees
Easy to use — Clean interface, no design skills required
AI-powered writing — Quickly drafts experience and summaries
LinkedIn import — Build a resume in seconds from your profile
Real-time editing — See changes instantly as you type
Customizable — Rearrange sections and adjust the layout
Free cover letter tool — No extra charge for creating a cover letter
Cons
One resume template — Limited visual variety
No mobile app — Must use on desktop
Some AI suggestions feel generic — You’ll need to edit to make it stand out
Limited styling options — Fewer design tweaks compared to some other tools
Upfront cost — $99 might be steep if you only need one resume
Quick Tips to Make Your Resume Stand Out
Even if you’re using a solid AI resume builder like SheetsResume, a few small tweaks can make a huge difference:
Tailor Every Resume
Don’t send the same resume everywhere. Adjust your title, summary, and skills for each job. Most companies use software to scan resumes before a human sees them.
Example: If you’re applying for a Project Manager role, make sure it says “Project Manager” at the top and includes tools like Asana or Jira if mentioned in the job post.
Focus on Outcomes
Show what you did and why it mattered. Results stand out more than tasks.
Example: Instead of “Handled customer support,” write “Resolved 100+ customer tickets weekly with a 95% satisfaction rate.”
Keep It Clean
One page is enough for most people. Use clear headings, white space, and a simple font. No graphics or tables—many systems can’t read them.
Tip: Always save your resume as a PDF to keep the layout intact.
Highlight Relevant Skills
Put the most important skills and experience at the top of your resume. Most recruiters skim quickly.
Example: If you’re applying for a developer job, list programming languages and projects first, not hobbies.
Proofread Everything
Small mistakes can cost you interviews. Run spellcheck and read it out loud.
Tip: Watch for things like mixed date formats and extra spaces.
Customize Your Cover Letter
Even a short, specific cover letter helps. Use AI to draft it, then tweak it so it sounds like you.
Example: Mention something real about the company. “I admire [Company Name]’s work in renewable energy and would love to contribute to your next project.”
Disclaimer: This post has affiliate links at no cost to you.
My Experience
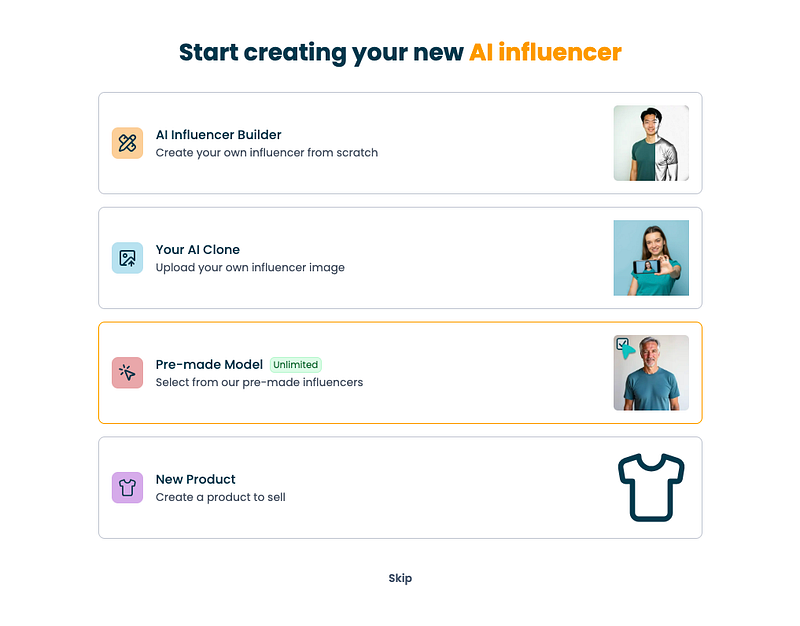
To get started, just sign up for The Influencer AI.
Next, choose one of the options:
With this tool, you can:
Create a custom influencer from scratch
Clone yourself and generate images of you doing anything
Use a pre-built model
Create a product to sell
In this guide, I’ll focus on the first two.
I began by building an AI influencer from scratch.
When I started, the tool asked me to set the characteristics of the influencer.
I gave the influencer my name and set traits to make it look like me.
Here’s the image it created:
I liked the result, so I clicked “Create AI Influencer” to get started.
It took around 4 minutes for the AI to build my influencer profile.
Don’t forget to refresh the page to see your influencer profile.
After your influencer is ready, you can start making content with it.
For example, I asked it to create an image of my influencer “chilling at the beach.”
About 30 seconds later, these were the results:
Pretty cool, right?
The images look just like my influencer, so the character stays consistent.
But I wanted a full-body shot.
To customize the images, you can upload a reference photo.
For example, I used one from Unsplash:
Then I asked the AI to make an image similar to the one I had in mind.
Here’s the result:
Here’s the full picture:
Pretty cool, right?
If the quality isn’t sharp enough, you can upscale the image to make it clearer.
Now let’s move on to the video generator.
The Influencer AI can make not just photos but also simple videos with your influencer.
To try it, click “Create new video” under the Videos tab.
To make a video, first choose a base image. The AI will then turn that image into a video as if the scene continues from it.
Here’s what I did: I picked one of the new AI beach images and asked it to make a 10-second clip of “man walking on the beach.”
I didn’t think this would work at all.
But I was wrong. Here’s the clip it made for me:
That’s really good. It looks realistic and well shot.
I also saw that you can add lip-sync to your clips, meaning your AI influencer can say anything you want.
To be fair, the lip-sync didn’t work that well. The tech still needs some work before it feels right.
So let’s leave this influencer for now, because there’s something even more impressive I had to try — the “Your AI Clone” feature.
With this, you upload a set of selfies so the AI learns what you look like. It then creates headshots and other photos that look just like you in any setting.
To make your clone, first enter your details. Then upload several images for the AI to use.
Here are a few of the images I uploaded:
Once your clone is ready, you can start making photos and videos of yourself. Pretty cool.
Here’s the first AI photoshoot I tried:
Pretty cool, right?
I did notice that some images don’t come out in great resolution. There are two ways to fix this.
First, you can use the upscaler tool built into The Influencer AI.
The downside is that sometimes the upscaled images look too smooth.
For example, here’s one I created and scaled up:
If you zoom in, you’ll see the skin looks way too smooth. Almost like a painting.
To fix this, you can use a tool like Canva to sharpen the photo with simple controls.
Honestly, I think the second option gives better results. It takes an extra 30 seconds, but it’s worth it.
If you’re posting on social media, you can also use the built-in editors there to sharpen your images.
Speaking of edits, The Influencer AI has its own AI editing tools you can use to tweak your photos.
To try them, click “Edit photo” on one of your images.
For example, I asked the AI to turn it into a sunset.
Here’s the result:
Pretty cool, huh? Though in this shot, it kind of looks like I spent the whole day in the sun without sunscreen.
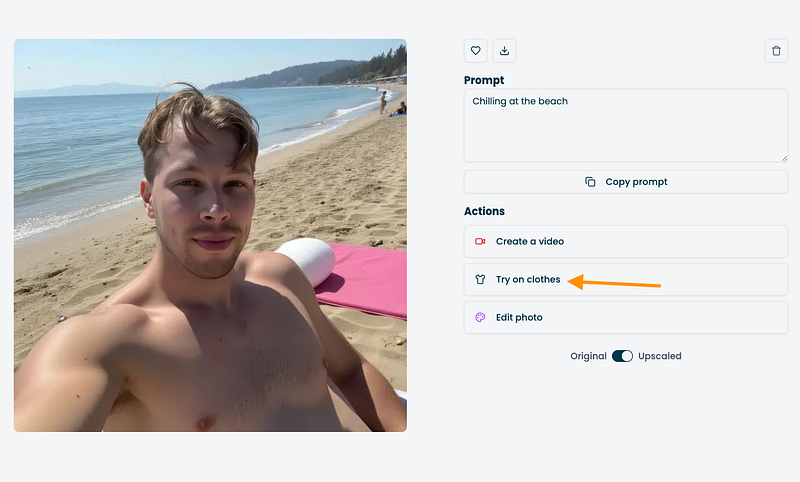
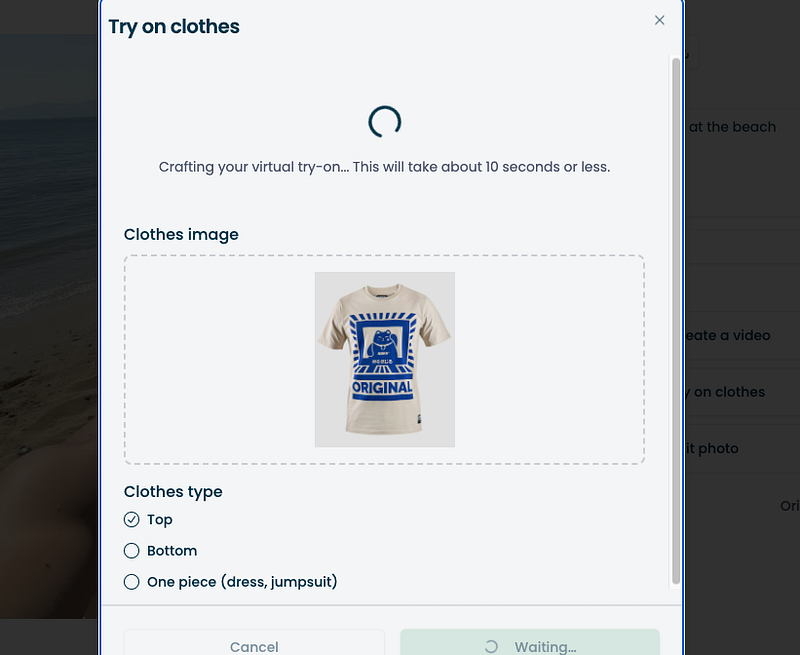
Another handy feature is “Try on clothes.” It lets your AI influencer or clone wear any outfit.
For example, I grabbed some clothing images from Unsplash:
Just upload a clothing image and the AI does the rest.
Here I uploaded an image of a cool-looking shirt:
But the tool told me I need my whole body visible to try it on.
So I chose a different image:
And here’s what I got:
That’s epic, right? At first glance, it looks just like the real piece of clothing. And the image looks just like me.
Now let’s test the AI video feature on my clone. This is the part I was most excited about.
First, the tool asks you to crop the frame for the video.
Next, set the video length and describe what you want in it.
For example, I made a 5-second clip of “me walking on the beach.”
Here’s the result:
I mean, come on — isn’t that incredible? A few years ago I wouldn’t have believed this was even possible.
Now let’s see how well the AI handles a more complex scene.
This time I tried making a video of me running on the beach with a bunch of dogs.
Here’s the prompt I used:
And here’s the result:
Well, that one failed.
At first it looks like I’m waiting for the dogs, but then my hair covers my face, and it seems like I’m facing forward and backward at the same time.
So yeah, complex scenes give the AI some trouble.
For the best results, it works better if the video just “continues” what’s already happening in the base image. That gives the AI the best chance to get it right.
For example, this beach clip turned out nice:
Still, even if you stick to that, the more movement and complexity you add, the less accurate the videos turn out.
For example, here are a couple of clips where I asked the AI to make a video of me throwing a disc golf disc.
Honestly, I have no idea what’s happening in those videos — but I can tell you I’m definitely not throwing a disc golf disc.
That said, I didn’t expect these tools to get this right yet. I’ve never seen them even come close. Maybe in a year or two they’ll handle complex stuff better.
For simple use though, The Influencer AI is solid. You can try on clothes, place yourself anywhere, and more. It’s way better than I expected.
Disclaimer: This post has affiliate links at no cost to you.
My Results & Experience
To try Elevenlabs AI voice changer, go here. It doesn’t even ask you to sign up to try it first.
To change a voice, just upload your audio and choose a new voice.
If the preview sounds right, you can sign up to download the file.
After you sign up, you get access to more voices in the library. Just click on “Voice Changer” to see them.
Upload your audio file into the box:
If you don’t already have a file, you can record clips right inside the editor. Just allow microphone access first.
And don’t worry about having a fancy mic. As you’ll hear in my clips, the tool cleans up background noise and makes the audio sound studio-quality.
After your clip is uploaded, adjust the settings:
Here’s what I changed in my test clip:
I picked the “Brian” voice.
I set “Similarity” to 100%. This way it kept my speaking style and little flaws, which is exactly what I wanted.
To apply the changes, just click “Generate.”
In about 10–20 seconds, the tool gives you the new clip with the voice switched.
Here’s a before-and-after comparison of my audio using ElevenLabs:
That’s pretty impressive. Better than I expected.
The free trial is also nice—no watermarks or weird audio stamps in the clips.
The only issue I ran into is that sometimes the tool mixes up words that sound alike.
It’s a bit annoying when it happens.
For example, in the clip above, it sounds like the voice says “Infer” instead of “Include.”
But it’s subtle, and maybe I just heard it wrong. Let me know in the comments what you think.
Anyway, let me show you a few more examples.
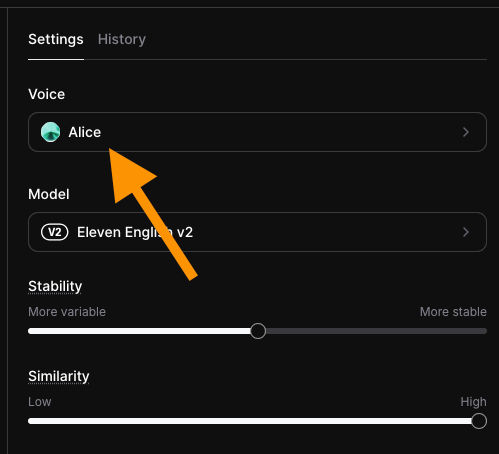
Next, I tried switching the voice to Callum.
Here’s the clip I received, side by side with the original voice:
Finally, I switched my voice to Alice.
Here’s the result:
Pretty cool, right?
It doesn’t feel like an AI voice because it keeps the natural flaws and little mistakes I make when speaking. If that wasn’t the case, I could just use a text-to-speech tool instead.
I’m honestly impressed with how good the results sound. Plus, the free version is generous and the tool is super easy to use.
Free ($0): 10K credits/month, 10 min TTS or 15 min AI, includes all basic features and API access.
Starter ($5): 30K credits/month, 30 min TTS or 50 min AI, adds commercial use, voice cloning, projects, and Dubbing Studio.
Creator ($22, $11 first month): 100K credits/month, 100 min TTS or 250 min AI, adds pro cloning, usage billing, and 192 kbps audio.
Pro ($99): 500K credits/month, 500 min TTS or 1,100 min AI, adds 44.1 kHz PCM output via API.
To Take Home
I didn’t realize voice changing with AI was already possible. I thought these tools only turned text into speech, not clone a voice from an audio clip.
That’s what makes this so interesting. The voices sound natural instead of overly perfect.
I tried several AI voice changers, and ElevenLabs was the best one for me. I recommend giving it a try.
Disclaimer: This article has affiliate links at no cost to you.
My Results: Quick Overview
Before I show you my overall experience, results, and more, here’s a quick list of the top AI headshot generators with my favorite images from each tool.
I picked the Expert plan so I could get the human edits on my headshots. I’ll cover that part next.
To get started, just enter your name, gender, ethnicity, eye color, and what you’ll use the headshots for.
Pick your favorite styles.
Pick all three options to get the best accuracy and variety. I suggest going with the recommended styles for headshots.
Before uploading, make sure to read the image instructions.
This step matters most, since it’s where you show the AI what you look like.
Think of it as training the tool so it can place you into different styles and settings.
Use photos with different lighting, outfits, and poses to give it the best idea of you.
Here are real selfies that I took. I use these with all the other tools on the list, by the way.
I just used regular photos from my camera roll that I’d taken over the years. The hardest part was digging up enough of them.
After I uploaded them, the tool graded the photos and removed the low-resolution ones. That’s really the “toughest” step, since it can take a bit to find enough good shots.
Once I had my set ready, it was time to create the headshots.
It took about 30 minutes to generate 100 images of me.
Here are a few of the results:
I still smile when I look at these, even after seeing them a bunch of times.
They’re that good—sharp, realistic, and spot on. I’m even using one on my LinkedIn.
Here are some more AI headshots:
Not every image comes out perfect. BetterPic even says so—most look great, some are just okay, and a few don’t work.
For example, one of mine had small artifacts on the face and teeth. Minor, but still noticeable.
The nice thing with BetterPic is you can fix those AI artifacts quickly and pretty accurately. It’s not magic, of course, and it won’t read your mind.
Just hit the BP AI Edit button.
You can also request a manual edit from the BetterPic team to make the photo look exactly like you.
Of course, you can’t expect miracles. But with a real editor, you can get much more done than with just the AI edits—or none at all, which is the case with most headshot generators.
That’s especially useful for teams who want consistent headshots.
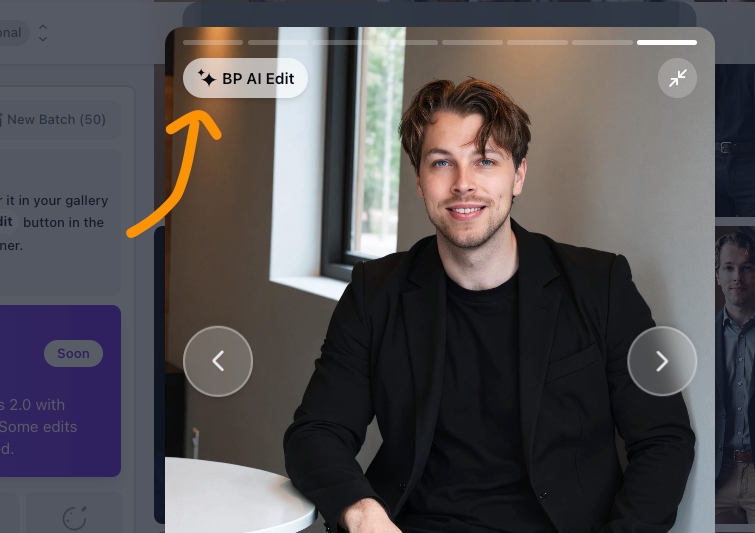
Here’s an example of one I got from BetterPic:
The photo looks good, but I’d like to swap the clothes.
With BetterPic, that’s easy thanks to its customization tools.
Just pick an image and hit BP AI Edit to change the outfit.
Next, select the Clothing option under AI edits.
For example, I tried a Christmas outfit:
After about 5–10 minutes, BetterPic gave me 4 versions of that headshot in Christmas-style clothing.
Here are the results:
Pretty cool, right? It’s the same photo as before, just in Christmas style.
I liked it so much I kept playing around. I asked the AI to put me in a dark suit and also in a doctor’s outfit.
Here’s what I got:
This is such an impressive tool.
The other customization options are great too. For example, you can expand your headshots. One of mine looked good, but it was cropped in too close for my taste.
To fix that, I just used the AI Expand option under edits.
It added extra space to the top of the photo, making it look better framed.
Pretty cool, right?
Honestly, this is the best AI headshot generator out there.
I like how versatile it is and that it lets you customize your photos.
You can also create headshots for your team. Just click your account in the top left, and right below that you’ll see the Team option.
The team feature is great.
From the Admin view, you can invite team members to create their headshots.
You can set one common style or let everyone pick their own. Once the headshots are ready, all the results show up in the Admin view.
This saves time since you don’t need to chase people for their photos.
There’s also a full guide on how to use the BetterPic team feature.
I really like BetterPic.
The biggest issue with many other generators is that the results are a 6/10 or 7/10, and you can’t fix them.
With BetterPic, that’s not a problem.
You can clean things up with AI edits—or even better, with Human Edits.
I really like BetterPic. The results look realistic, and it’s faster than most other headshot generators.
You also get solid customization and editing options—even manual edits from their team.
For me, this is the best. It’s the standard I’ll compare the others against.
That said, your own features can affect the results. Even with the top tools, I’ve heard of people running into issues. For example, one guy had long hair, but the AI kept giving him short hair in the photos—not ideal.
This tool also takes your camera roll photos and turns them into professional headshots.
The results are sharp and clean—close to BetterPic quality. Honestly, I could even rank it at the top. The downside is you can’t edit the photos. You can only view and download them.
Here’s what I got.
My Experience
First, let me show you how to use it in case you want to try it yourself. Then I’ll go over my results.
Start by picking the Personal Branding option to generate your images.
Then select your photo gallery from the dashboard:
Enter your details.
Next, upload your input photos.
Here are the ones I used:
Click Start Training.
This sends your photos to the “AI photographer” to learn from.
The AI takes some time to generate the headshots—about 45 to 60 minutes when I tested it.
You’ll get an email when your headshots are ready:
Then just enjoy your results.
Here are the results I got:
Pretty cool, right?
These look so realistic you’d never guess they were AI-made.
Here are more of the photos it created for me:
I really like the lighting and outfits in these shots.
The quality here beats any other headshot tool I’ve tried.
That said, a few photos made my forehead look taller than it is—but that might just be me noticing after years in the mirror.
There were also some small artifacts, like odd teeth or skin that looked too smooth:
But those flaws are minor—you probably wouldn’t even notice them.
Pros
Faster than most AI headshot tools (about 25 minutes vs. 1–2 hours).
Very realistic results with as few as 8 photos.
Simple, easy-to-use interface.
Editing options like background removal, eye color, and outfit changes.
Cons
A 25-minute wait might still feel long to some.
Occasional small flaws (weird eyes, imperfect teeth), similar to other AI tools.
Pricing
Basic: $29 for 30 headshots
Standard: $39 for 60 headshots
Premium: $59 for 120 headshots
⭐ My Grade ⭐
Realistic: 4.6/5
Customizable: 0/5
Waiting time: 4.0/5
Total: 4.3/5
To Take Home
These are definitely some of the best headshots I’ve seen. I highly recommend it.
The only drawback is you can’t customize the photos. That’s something you almost need with AI headshots. Because of that, HeadshotsByAI can feel a little overpriced, since other top tools give you similar results plus editing options.
Where it really shines is the lighting. Out of all the generators I tested, these shots had the best lighting. The images are also very sharp, which I liked a lot.
The main issue is you can’t fix the ones that miss. Some photos had blank stares, messy lips, or odd teeth.
Secta AI is a great headshot generator that turns your selfies into headshots in different styles.
You can choose anything from casual selfies to formal portraits.
And as a Finnish guy, I have to point out the Aurora Borealis style—I really liked those.
Anyway, let me show you how it works and what I got from it.
My Experience
First, let me show you how to create headshots with Secta AI.
Start by going to their homepage.
Right away, you’ll be asked to pick a plan.
Secta keeps it simple with just one paid option at $49.
There is a catch though—edits cost extra, about $5–$20 a month if you want them. (I’ll cover that part later.)
After you buy a package, set your preferences—things like gender, ethnicity, and hair color.
Pick the AI photoshoot styles.
Next, pick the types of headshots you want from the preview list. You can choose up to 20 styles.
Then comes the hardest part—uploading a bunch of photos of yourself for the AI to train on.
Here you’ll need to upload at least 20 photos, which is more than any other headshot generator I’ve tried. It can take a while to dig up that many.
One thing I liked is that it accepts HEIC images from my Mac. No need to convert them—just drop them in.
After you’ve uploaded your photos, move to the next screen.
There, you’ll be asked to pick your favorite photo:
Once you hit “Submit”, it starts creating your AI headshots. This process takes a while. For me, it took about 3 hours from submitting to receiving my headshots.
But you don’t need to wait. Just check your email, and once you see an email like this, your headshots are ready:
Pretty handy, right?
Now let me show you my results.
Here’s the first set:
Each set comes with 20+ images, so I ended up with over 140 headshots in total.
Here are some more from Secta:
Here are a few of my favorites up close:
Aren’t those amazing?
The aurora borealis one is my favorite—it not only looks like me but also feels like home.
Overall, just awesome.
This tool also lets you edit your headshots.
The edits aren’t free, though. You’ll need a monthly subscription, which was a first for me.
Most other headshot tools include edits for free or let you use credits. Here, it can cost up to $20/month.
For example, I tried editing one of the Northern Lights shots to put me in a red outdoor outfit:
After about 5 minutes, I got these results back:
These came out great! Let me zoom in—here are three sharp edits with the red outfit:
For comparison, here’s the original AI-generated photo:
These turned out so well that I had to try more.
This time, I asked for a light blue polo shirt:
A couple of minutes later, here’s what I got back:
Pretty cool! Here’s a zoomed-in version of one of the shots:
The only drawback is that edits can make the photos look a bit less realistic. Sometimes the edges look like they’ve been copy-pasted.
That said, the edits still let you change backgrounds, outfits, regenerate certain shots, and more.
Pretty cool, right?
Pros
Creates 140+ high-quality headshots
Wide range of styles, including the Aurora Borealis look
Simple $49 pricing, no confusing tiers
Works with HEIC images (great for Mac users)
Lets you set details like gender, ethnicity, and hair color
Email notification when your headshots are ready
Cons
Some photos come out odd or uncanny
Edits can’t fully fix the worst shots
Editing costs extra ($5–$20/month)
Needs 20+ photos to get started
Takes about 3 hours to generate results
No free trial or preview before paying
You’re asked to pick a plan right away
Pricing
For personal use, there’s a simple one-time fee of $49.
Companies and communities can pick from larger plans.
⭐ My Grade ⭐
Realistic: 4.6/5
Customizable: 4.7/5
Waiting time: 3.5/5
Total: 4.2/5
To Take Home
I really like my Secta AI headshots. The results were mostly solid.
With most headshot tools, only 5–10% of the photos are actually good. The rest aren’t very usable.
With Secta, about 20–25% of the shots came out good enough to use.
The editing features are also very complete, but the downside is they come with a monthly fee.
Try It On AI is one of the best headshot generators out there. The images look realistic, and it’s the fastest paid tool on this list.
You can make edits and customizations, and there’s even a human editor who can polish the final shots.
The only drawback is the price—you’ll need to pay more to get the best results.
Here’s what I got from it:
My Experience
To try it, head over to their homepage first.
I recommend going with the Professional plan—it gives you 100 headshots.
Read the instructions next.
Enter your details, then upload your selfies.
Uploads can fail if your photos are too small. If that happens, just pick a different one.
Next, choose your photoshoot styles. There are plenty of AI headshot looks to pick from.
Set your characteristics.
After the selfies are validated, hit Send.
When the AI finishes, you’ll get an email with your photos.
For me, it took only about 10 minutes—crazy fast. But are the results any good?
Here’s what I got:
What I like about Try It On AI is the variety in image sizes. Most other generators force one size, but here you get shots in different aspect ratios.
And these definitely look like me.
You can also edit your photos with AI. Just click an image to open it, then pick one of the edit options in the top left corner:
For example, you can change the background, remove things, re-generate images, and more. You can even turn one into a video.
Just make sure to save the email or catalog link—there’s no sign-in for Try It On AI, and that’s the only way to get back to your images later.
Pros
Cheaper than many other AI headshot generators
Simple to use—just upload selfies and wait about an hour
Realistic results that actually look like you
Good editing and customization options
Lots of variety in image sizes and styles
Most photos come out clean with little to no artifacts
Cons
Some shots may fail or not look like you
A few photos have a 3D-rendered vibe
Customizations aren’t the strongest, and if you use them wrong, you’ll waste credits
Pricing
Pretty cool—but what about the pricing?
20 headshots: $35
50 headshots: $49
100 headshots: $61
If you want a human to edit your photo, it’s $9 per image. Not bad at all.
⭐ My Grade ⭐
Realistic: 4.1/5
Customizable: 4/5
Waiting time: 4/5
Total: 4.2/5
To Take Home
Try It On AI is really good.
The results are some of the best I’ve seen, the speed is impressive, and you do get customization options.
That said, your mileage may vary. For me, it’s still not the very best—BetterPic is way ahead of the pack.
The biggest issue here is the user experience.
Honestly, it was rough. I felt stuck using the app with no alerts or warnings, and I couldn’t continue creating headshots. Before seeing the results, it felt like a waste of time and money. But after pushing through and finally getting the photos, I thought it was worth including here.
Magic Photos AI is one of the best tools I’ve tried for social media or dating profile pictures.
It’s less of a professional headshot tool and more of a candid photo generator.
That’s not how they market it, but that’s where it shines.
The lighting is good, the quality is clean, and most shots looked like natural selfies I’d post on Instagram.
Here’s what I got from Magic Photos AI.
My Results
First, let me show you how simple it is to use this headshot generator.
Go to their site, sign up, and start a new photoshoot.
Give it a name (use your own name) and set your gender.
Next, it’s time to show the AI what you look like. For the best results, make sure to read the instructions carefully.
Upload your photos by dropping them into the view.
The tool will run a quick quality check. If a photo is too low-res, the AI won’t accept it—otherwise, you’d risk distorted results.
Pick a plan:
I went with the $69 plan—it gives you 200 headshots, 10 styles, and the fastest turnaround.
Next, it’s time to pick your styles. Magic Photos has plenty to choose from.
After picking your styles, double-check everything on the final screen before generating.
Then just hit start.
On the highest plan, it takes about 15 minutes. With the cheapest one, you’ll wait around 90 minutes.
When processing is done, open your profile to see your headshots. You’ll also get an email once they’re ready.
Here are mine:
Aren’t those great? They really look like me. In some of the 10 styles I picked, it’s almost impossible to tell the difference.
One thing that threw me off at first—the previews have watermarks, even on a paid plan.
Don’t worry, they disappear once you download the files. The watermarks are just there to stop people from saving the previews and then canceling their plan.
Anyway, here are a few of my favorites up close:
All of these look realistic and actually like me.
With so many styles and photos, I ended up with at least 1–2 usable shots from each set of 10 styles. That’s solid, since many headshot tools only give you 0–5 good ones total. This one gave me at least 20.
You can also edit your photos. Just pick an image and click Edit.
Then choose what you want to edit.
For example, in the image above I swapped out my bright green tight shirt for something more subtle.
After about 2 minutes, here’s the result I got:
Much better! It’s the same headshot, just with a nicer outfit.
Before edits vs. After edits
Pros
Turnaround was about 15 minutes—one of the fastest tools I’ve tested.
Most headshots looked very realistic. A few had small quirks, but nothing major. In every style, I got at least 1–2 usable shots, which added up to 20 great headshots in my plan.
Even the top plan is under $69, still way cheaper (and easier) than hiring a photographer.
Cons
Some photos turn out bad or uncanny—no way around it.
Editing options are limited compared to tools like BetterPic, though it’s still one of the few that even lets you edit.
Pricing
Starter: $49
Basic: $59
Premium: $69
⭐ My Grade ⭐
Realistic: 4.0/5
Customizable: 2/5
Waiting time: 4.5/5
Total: 4.2/5
To Take Home
Magic Photos AI is a solid pick for profile pictures, dating images, and more.
Some photos look overly smooth or too polished, which makes them feel a bit AI.
But others came out so good I had to look twice.
The main drawback is editing. If a shot fails, you can change the outfit, regenerate, or improve the resolution—but there’s no human edit or try-on-clothes option.
Still, for Instagram selfies or profile pics in general, Magic Photos AI is worth a try. Some of the results are surprisingly spot-on.
InstaHeadshots is the best AI tool I’ve found for social media profile pictures.
It’s not marketed that way, but that’s where it shines. The results look good, the lighting is on point, and most of the shots came out as natural-looking selfies I could post on Instagram.
Here are the results I got from InstaHeadshots:
My Results
First, let me show you how to use InstaHeadshots. After that, I’ll share the results I got with it.
Sign up for the service. You can even use Google to skip a few clicks and avoid remembering another password.
Create a new profile.
Pick the plan.
Read the instructions for uploading selfies.
Upload your photos, answer a couple of quick questions, and wait.
For me, the results showed up in about an hour.
When they’re ready, just open your profile to view your images.
Click on a page that looks like this again:
And here are your AI-generated headshots:
You can’t edit photos with InstaHeadshots, but most of them come out so good that you don’t really need to.
Most of my results were selfies, probably because I uploaded a lot of selfies as input. Either way, they turned out great and are perfect for social media.
Here are some of them:
Here are a few more headshots I got from this service:
Those look pretty accurate. Hard to believe they’re AI and not real photos, right?
One thing that threw me off for a moment—the images show watermarks when you open them, even on a paid plan.
But the watermarks disappear once you download the images.
The watermarks are just there to stop people from generating headshots, saving them, and then canceling for a refund. Basically, they don’t want you to steal the photos.
Pros
Wait time was about an hour, which isn’t bad compared to the days or even weeks it takes with a real photographer.
Headshots look realistic. A few small artifacts, but nothing that ruins them.
Even the top plan is under $100—still way cheaper (and easier) than hiring a photographer.
Free option available. It’s slower, but good if you’re not in a rush.
Cons
Many images came out a little blurry, and some expressions looked blank. They seem fine at first glance, but feel artificial the longer you look.
Still a bit pricey, especially since many AI headshot tools offer free trials.
No in-app edits. If you want to tweak your photos, you’ll need another generator.
Pricing
Starter: $49
Basic: $59
Premium: $69
⭐ My Grade ⭐
Realistic: 4.0/5
Customizable: 0/5
Waiting time: 4.0/5
Total: 4.0/5
To take home
InstaHeadshots works well for social media profile pictures.
Some selfies look a bit too smooth and artificial, which gives away the AI factor. But others came out awesome and very realistic.
There’s a free version, though the wait time is long.
The downside is the lack of editing. Some photos are close to good but just slightly off, and you can’t regenerate them.
Still, if you want Instagram-style selfies made with AI, it’s worth a try. Some results are surprisingly accurate. The only reason it’s lower on my list is consistency—out of 100 images, I’d say only 5–10 were usable.
Headshot.Kiwi is one of the better AI headshot tools out there.
It’s quick, gives realistic results, and is fairly easy to use.
The drawback is you can’t tweak or customize the photos, which is why it’s not higher on the list.
Here are my results:
My Experience
To use it, first head over to their website and sign up.
I recommend the highest plan since it gives you 100 headshots.
Like I always say, some AI shots will turn out bad. But with dozens—or even hundreds—you’ll end up with plenty of good ones.
Just follow the steps on the site, and pay close attention to the image instructions.
That way you’ll get the best results.
Once you’ve gone through the rules, upload a batch of your photos to the generator:
Just use regular selfies or shots from your camera roll. They don’t need to be professional—the whole point is turning basic photos into pro headshots.
But I have to mention, the UX here is bad. Really bad.
Here’s what happened when I tried uploading my images:
It was also tough to start creating images because my inputs kept showing “errors.” The tool never explained what was wrong.
Once your images are uploaded and validated, click Start AI Photoshoot.
Then just wait—it takes under an hour for the headshots to be ready.
The tool doesn’t send a notification, so you’ll need to check back yourself.
Here are my results:
Some of these look great—good enough for me to use on social media.
That said, the tool still feels a bit like a weekend coding project. The UX is rough. It stalls, lags, and lacks the clear workflow that other tools have.
Even so, the results are solid. And while you can’t edit them, it’s still one of the better tools on the list.
Pros
Cheapest plan is slightly more affordable than most other generators
Fairly easy to use
Results look realistic
Lots of variety in the photos
Most shots come out clean with few glitches
Cons
Some shots miss the mark or look a little off
A few have a 3D or overly rendered feel
No editing options—you’re stuck with what the AI makes
All images are forced into the same size
Pricing
Starter: $29
Professional: $39
Executive: $59
⭐ My Grade ⭐
Realistic: 3.9/5
Customizable: 3/5
Waiting time: 5/5
Total: 3.9/5
To Take Home
Headshot.Kiwi delivers.
The headshots it made are some of the best I’ve seen.
Still, the lack of customization and the wait time keep it lower on this list.
The user experience is also rough. At one point, the tool crashed while I was uploading my photos, with no warnings or alerts. I had to figure it out myself, which gave me that “weekend project” vibe.
But the results were good—so it’s hard to complain too much.
Just be patient while creating and waiting for your headshots.
ProPhotos is another great AI headshot generator that I’ve tested.
It’s a very early tool in this space and one of the first ones I tested back almost two years ago.
To be honest, the results weren’t that good a year ago, but these days, they’ve updated to a better model and the results are really nice.
My Experience
First, watch the intro video on their page. (I’ll cover the same steps here too.)
Before you use the tool, make sure to read the instructions first.
Here are my real images that I sent for the AI to learn what I look like:
Pick your gender and eye color to help guide the AI.
Click Start and wait.
For me, it took about 30 minutes to get the images.
After the wait, I got this email letting me know the images were ready:
Here are my results:
These have a similar vibe to the ones I got from PortraitPal. I like them—super realistic, natural, and calm.
I could definitely use one of these on LinkedIn.
And to show you how far this tool has come, here are the headshots I generated just 8 months ago:
Those looked impressive back then—but today, they feel pretty basic.
Since then, ProPhotos has made big changes to their system, and now the images look super realistic.
Here are the new ones:
That’s a big improvement!
One downside is they removed the replicate feature, which is a bit disappointing.
Before, I could make similar shots like this:
But that’s no longer possible.
And since they haven’t added editing, this tool sits lower on the list.
All you can do here is view and download.
Now that I’ve covered a lot of headshot generators (and more are still coming), I want to point out one thing: your mileage may vary.
What’s #1 for me might only make your top 10—or not even rank.
That’s why I suggest picking a few tools from this list that you like, trying them, and asking for a refund if they don’t deliver. (Just make sure the tool you pick actually offers refunds.)
With that said, here are the pros and cons of ProPhotos:
Pros
Realistic, versatile headshots in different scenes
Reworking feature to refine images
Faster than many other tools
Accepts photos easily, no need to upscale first
Cons
Some shots didn’t resemble me as well as the top tools
A few came out low-res or with a slightly “robotic” look—but most were great
Pricing
Basic: $25
Premium: $55
Professional: $155
⭐ My Grade ⭐
Realistic: 4.5/5
Customizable: 0/5
Waiting time: 4.2/5
Total: 3.8/5
To Take Home
ProPhotos is an affordable AI headshot generator that turns your selfies into something sharper with AI.
Out of the 100 shots I got, I liked at least 10.
The lack of customization is a big drawback, but the results are strong—especially for the price. The tool has also made huge improvements over the past year.
The first time I tried it, the images looked bad and artificial.
Now, it’s one of the top 10 AI headshot tools out there—a big step forward.
As you can see on this list, AI-generated headshots usually cost a lot.
But I found a cheaper option that delivers results just as good.
It’s called PhotoPacks AI.
This headshot generator makes great headshots for only $19.
My Experience
To use this tool, first, you need to sign up for PhotoPacks AI.
Then, click “Get Your Headshots”.
Purchase the photo pack:
Answer a few questions about yourself so the AI knows who you are and what kind of headshots to make.
Next, choose the main style for your headshots. I picked a business style.
Next, upload your images to the AI.
Make sure to follow the instructions so you get the best-looking AI headshots.
Here are my images:
Then just wait for the AI to create your headshots. This can take a while.
This tool is a bit slow.
For me, it took around 4 hours to get my headshots. They say it can take up to 24 hours. You’ll get an email when they’re ready.
Here are a few AI headshots I got from PhotoPacks AI:
They look just like me! The shots are versatile, well-lit, and mostly perfect.
Here are a few more AI headshots I got:
This is my favorite business AI headshot from PhotoPacks:
On the flip side, don’t be surprised if some headshots don’t turn out great.
Here’s one of my least favorite ones:
Most of my headshots actually came out OK or even really good. There weren’t as many bad ones as I expected from a cheaper tool. I’d say the results are on par with other AI headshot generators.
Pros
Easy to use. Just sign up, answer a few questions, upload your images, and wait.
Realistic. The headshots look like you and feel very real, at least in my experience.
Cons
No edits. You can’t tweak the images. If one turns out bad, it stays that way.
Slow. It can take up to 24 hours to get your headshots, which is slower than most other tools.
Pricing
PhotoPacks headshots only cost $19.
⭐ My Grade ⭐
Realistic: 4.2/5
Customizable: 0/5
Waiting time: 4.0/5
Total: 3.7/5
My Take
I’m a fan of my AI headshots. Out of the 100+ I got, I found plenty that actually look like me.
These work great for resumes or professional profiles.
I wouldn’t use AI for big moments like weddings, but if you just want to look sharp online without a photoshoot, outfit planning, or awkward posing—it’s way easier.
The downside: it’s hit or miss, and you can’t edit the results on PhotoPacks. But since you get so many, you’re bound to find a few solid ones.
AI SuitUp is one of the best AI headshot tools, and it has a plan for under $30.
The only reason it’s not higher on my list is that you can’t customize your photos. Still, most of the results are good enough that you probably won’t need to.
Here’s a look at some of the images I got with it:
I’d go with the Professional plan since you get 100 headshots.
But you can try the Basic plan first—it shows you what the results look like, and the price doesn’t affect the quality.
Then read the photo instructions carefully.
Add your info and any details about yourself.
Upload your selfies. You can pick them from your phone’s camera roll—no need for professional shots.
Sometimes uploads fail if the images are too small. If that happens, just pick another photo.
The AI headshot generator will ask you to upload your best shot, which it will use as the main image.
After your selfie is validated, just hit “send.”
Wait an hour or two.
When the AI finishes your images, you’ll get an email letting you know they’re ready.
No need to hang around while the images generate. For me, it took about 60–120 minutes, so just close the window and check the email link when they’re ready.
Here are my results:
They definitely look like me.
You can use the like/dislike buttons to get rid of any bad images in the gallery.
Make sure to save the email or catalog link, since you can’t sign in to AI SuitUp. This is the only way to get back to your images later.
Pros:
Cheaper than most AI headshot tools.
Super easy to use—just upload selfies and wait about an hour.
Realistic results that actually look like you.
Lots of variety and versatility.
Most images have little to no weird artifacts.
Cons:
Some images might fail or not look like you.
A few have a slightly 3D or rendered look.
No customization—you have to work with what you get.
Pricing
That’s epic! But what about the pricing of this service?
Basic: $27 (Originally $59)
Professional: $37 (Originally $69)
Ultimate: $57 (Originally $99)
⭐ My Grade ⭐
Realistic: 3.9/5
Customizable: 0/5
Waiting time: 3/5
Total: 3.7/5
To Take Home
AI SuitUp is really solid.
The results are some of the best I’ve seen—definitely a top 10 AI headshot generator.
That said, the long wait and the lack of customization keep it a bit lower on my list this time.
Professional headshots can cost a lot, but I found a cheaper option that still gives really good results.
The tool is called GoStudio AI.
You can’t edit the headshots, but the results are solid—mostly realistic and sharp.
Here are my results:
My Experience
Here’s how it went for me. Spoiler: it’s really simple.
First, sign up on the GoStudio AI website.
Click on “Get Your Headshots.”
Then choose your style and gender:
Next, read the instructions.
GoStudio gives clear instructions to make sure your images meet their quality standards. It’s a good idea to follow them for the best results.
Next, upload your selfies so the AI can see what you look like.
Here’s what I uploaded:
At this point, I ran into some issues where a few of my images wouldn’t process. The UI would freeze completely, and I couldn’t move to the next step. It was pretty annoying. I had to try several times before it finally worked.
Once your headshots are uploaded, choose a plan.
I recommend going with the plan that gives you the most headshots. It gives you the best shot at getting the best results since most of the headshots won’t be great.
One thing I noticed with GoStudio is how simple it is—both in a good and bad way.
It’s good because you don’t have to worry about uploading 20+ images or filling out tons of personal details like with other tools.
But, it’s also more limited compared to the top AI headshot generators out there.
Now, let’s get to the results.
Here are the AI headshots I got from GoStudio:
When the results came in, I was pretty happy with them.
Here are a few more results:
The only issue is that these are pretty generic and lack depth compared to the top tools out there.
They all look almost identical. The aspect ratio is the same, the suit is nearly identical, and there’s no real variety. One of the images had me sitting, and a few had me in slightly different poses.
One thing I did like was that this tool didn’t create those fake, artificial-looking AI headshots. These actually look like real photos, which is a big plus.
Honestly, there’s not much to complain about, but it still feels basic and limited compared to the other tools I’ve tested.
Oh, and there are no edits or customization options.
So, you’ll have to be happy with what you get. That’s one reason this tool doesn’t quite stack up against the best on the list.
Pros
Super easy to use. Just a few steps from signup to getting your results.
Realistic output. In my case, they really looked like me.
Cons
No editing options. What you get is what you get. If something looks off, you can’t tweak it.
Slower turnaround. It can take a couple of hours before you get your headshots.
UI/UX issue. It took a while for me to upload my images to the tool.
Pricing
Standard ($24 one-time): 40+ headshots, 1-hour processing, 1 pack, 20 poses, great for resumes.
I ended up with a lot of usable shots. They turned out way better than I expected, honestly.
The smaller plans were also affordable—one of the cheapest AI headshot generators I tested.
These are perfect for things like your resume, LinkedIn, or other online profiles.
I wouldn’t use them for big moments like engagement photos, but if you want to look sharp online without hiring a photographer or planning a whole shoot, this gets the job done. No awkward posing or outfit planning needed.
It’s not perfect, and a few photos might miss the mark, but you get so many that at least a few will work.
The Multiverse AI is one of the OGs in the game. It was one of the first AI headshot generators I tried.
For just $29, you can create amazing AI headshots. Plus, it lets you customize the images by giving the AI a prompt on what you want.
It’s the only tool I’ve tried so far that lets you do this.
Let’s check out the results!
My Experience
To get started, go to this page and click “Get your photos.”
You’ll see a view that prompts you to add images of yourself.
Don’t take a series of selfies!
Upload your images.
I’ll be using the same ones across all the AI headshot generators on this list to compare the results.
As you can see, these are pretty close-up headshots or selfies.
The Multiverse AI has an editor that lets you crop the images. Go through each one and crop them according to the guidelines.
One issue I had, though, was that the AI headshot generator complained about almost every image I dropped into it. That’s because the images were too small.
Drop an image into the Multiverse AI editor again.
Do this with every image until you have 12 images.
If you don’t have this many images, take some in different scenes with your mobile device. Don’t upload a series of selfies!
Enter your email to get notified when the images are ready (and specify your gender.)
Then it’s time to hit “Upload” and wait.
For me, it took about 60 minutes for the AI to create the images. You can close the window since everything happens online, and you can even turn off your computer after this step.
Once the AI finishes, you’ll get an email like this::
Here are my results:
That’s awesome!
These look totally real to me. The one on the far right might not be as spot-on, but the two on the left? I’m amazed!
Here are some of the real photos I uploaded:
The resolution and lighting aren’t perfect, but the AI still nailed my facial features and put me in those professional images.
Here are more AI-generated headshots of me:
There are a ton of these images—about 100 AI-generated professional headshots in total.
You’ve got to give this a try, especially with the AI custom feature that lets you tell the AI what you want in your images.
After creating your images, you can check out the custom page at themultiverse.ai/custom/.
Pros:
Realistic headshots that look professionally taken.
A variety of images in different settings.
Perfect for a CV or LinkedIn profile.
High resolution with no “robotic” or “AI” look.
Cons:
60+ minutes of waiting time.
Some artificial vibe in the images, especially with newer models.
Most of my images weren’t ideal for the AI to analyze.
No free trial.
Pricing
The Multiverse AI costs $29.00.
⭐ My Grade ⭐
Realistic: 3.5/5
Customizable: 4.2/5
Waiting time: 4.0/5
Total: 3.5/5
To Take Home
This one lets you tell the AI what kind of images you want to create of yourself.
As far as I know, it’s the only AI headshot generator that lets you make customizations like that. That’s why it’s high on the list. However, the results aren’t as great as the best tools out there.
But like I said before, results can vary. They’ve clearly put a lot of work into developing the AI, so I wouldn’t be surprised if the results improve next time I try it in a few months.
Aragon AI is an AI portrait generator that’s perfect for LinkedIn and other professional network profile photos.
It also lets you customize your images.
Let’s see what it came up with using my images.
My Experience
First, go to the homepage and sign up.
Click on “Create Headshots.” This will kick off the headshot generation process.
Answer the questions, like your age:
Choose the main style—there are 3 options. I went with the business casual style.
Upload your images to the tool.
But first, make sure to read the instructions.
Upload your real selfies. These are the images I used as my inputs:
Review your details and double-check everything:
Submit the photos and wait.
In about 30 minutes, Aragon AI will send you an email letting you know your headshots are ready.
Here are the headshots I got:
They look good to me, but nothing too wild compared to what the other tools did.
Here are more images the AI created for me:
If you’re not happy with some of the images, you can click the Edit button to make adjustments with the AI.
I’d say 80% of my headshots with Aragon are so realistic, even my friends couldn’t tell they weren’t me.
Pros
Realistic, sharp, high-quality results.
Faster than most AI headshot generators.
The refreshed AI creates even more realistic images.
Lots of editing features that other platforms don’t offer.
Cons
Some poses look off. I prefer the ones where I’m just standing or sitting, not the ones with hand movements.
A few photos look unrealistic or morphed, but that happens with most AI headshot generators.
Pricing
Starter: $35 for 20 headshots
Basic: $45 for 60 headshots
Premium: $75 for 100 headshots
⭐ My Grade ⭐
Realistic: 3.0/5
Customizable: 4.2/5
Waiting time: 4.0/5
Total: 3.3/5
To Take Home
Aragon is great—definitely one of the best for customization.
That said, the AI headshots felt a bit “overfitted.” I ended up making weird hand gestures, and I didn’t look quite as much like myself compared to the other tools on this list.
That said, your experience might be different. It’s still worth checking out.
Portrait Pal turns your selfies into professional AI headshots.
This AI headshot generator is super easy to use. Just upload your photos, wait a bit, and get 100 great images.
It creates vintage-style headshots with lots of variety.
Let’s check them out!
My Experience
To use this tool, sign up first.
Then start creating your images. Just specify your characteristics, like gender, age, and so on.
Next, upload some images of yourself.
This helps the AI learn what you look like to create your portrait. But before uploading, be sure to read the instructions.
Use only clear images. Make sure there’s no one else in the frame, and avoid making silly faces. Remember, the AI needs to learn what you look like from these pictures.
This helps the AI understand your look in different contexts.
Just drop your images here like this:
Wait for your images to be generated.
You’ll get an email once they’re ready.
Here are the images I got:
That’s pretty cool, if you ask me.
These have very few artifacts and blemishes, unlike most of the other tools I’ve tested.
This is by far the best AI headshot generator out there.
Pros:
Fast (30–45 minutes vs. days or weeks with a real photographer).
Highly realistic results.
Wide variety of images with different scenes, lighting, and outfits.
Portrait Pal lets you create super-realistic images. I love my results—lots of different styles and poses.
Definitely recommend it! Especially if you’re into vintage style.
But the issue is that perhaps it’s a bit stuck in time. This tool was really great a year ago, but now the model is not the best anymore. Also, this tool doesn’t let you edit your AI headshots.
Fiverr is a platform you’ve probably heard of—it’s one of the most popular and trusted freelance sites.
But you might not have heard of the Fiverr AI headshot gigs, right?
On Fiverr, there are photo editors who use their own AI headshot generator tools to create photos of you. You can then ask for revisions and give feedback to improve the images, all for the same price on the same gig.
The only downside is that it’s not super fast. For me, my gig took about 6 hours, and if I remember right, it’s usually 24 hours or more by default.
My Experience
Let me show you my results with Fiverr AI headshot makers.
Just remember, this isn’t an AI headshot tool—you’re hiring a person to use one for you.
I hired a person named Ghanou K, since he looked like the most promising headshot maker.
To create headshots, pick a freelancer with expertise in the area. You can search for AI headshots on Fiverr to find them.
Once you’ve chatted with your freelancer, they’ll send you a custom offer.
You can either accept or reject the offer. For me, the headshots cost 23€, about $25.
Once I accepted the gig, I sent my real images to the headshot creator:
Then the gig started.
The next day, I came back to check my results. Here’s what I got:
Pretty epic, right? But when I zoomed in, the results were a little blurry and not super realistic.
No big deal.
I just asked my freelancer to create new ones and fix the old ones.
Revisions available on Fiverr
I told him what I need:
I waited a couple of hours to get my new headshots:
These are way better! Now I’ve got a bunch more to choose from. There are AI action figure headshots, winter style headshots, celebration shots, and even fan headshots.
Love it!
Pros
Real humans work on your headshots.
Revisions if you’re not happy with the results.
Good, realistic results that look pretty close to you.
Cons
This isn’t an AI headshot generator—it’s a real person working on your headshots. This might be a bit inconvenient for some.
The results are really good (at least for me), but not the best. Your experience may vary.
Pricing
Pricing can vary a lot depending on the creator. Some will do it for $10, others for $50. I’d recommend checking the headshot maker’s ratings and choosing based on that.
⭐ My Grade ⭐
Realistic: 4.4/5
Customizable: 3/5
Waiting time: 1/5
Total: 3.5/5
To Take Home
I like Fiverr AI headshots. They offer good value for the money. However, it’s a bit slow, and since you’re working with a real person, it’s not exactly an AI headshot generator.
The results aren’t the best out of the bunch, but they’re still definitely worth trying. Especially if you want customizations and a professional touch!
Next, we have ChatGPT. Since March 2025, you can upload images of yourself to the chat, and ChatGPT can modify them.
This makes it a solid AI headshot generator.
My Experience
ChatGPT is free, and on the free plan, you can create 3–5 headshots per day.
In that sense, it’s the best free AI headshot generator out there right now.
The AI doesn’t edit your images directly. Instead, it regenerates one that looks like you.
I’ve been impressed with the image quality and customizations. However, the results don’t always look exactly like me.
Just drop your image into the view, tell ChatGPT to turn it into a professional headshot, dating profile pic, or social media photo.
It only takes about a minute or two (or even less when it’s less busy) for the AI to create your headshot.
Here’s one of my results:
I like it!
But honestly, this doesn’t quite look like me. And I’ve heard others say the same thing.
The headshots are sharp and customizable, but there’s something off. The tricky part is that people might tell you the ChatGPT-generated ones are the best, but then you might not like them at all.
I have that issue with the headshot above.
The image is sharp, the lighting’s good, the clothes look great, but to me, I don’t look like myself at all. I’ve seen myself in the mirror too many times.
What’s cool about ChatGPT headshots, though, is that you can customize them to be whatever you want.
You can either create a new image based on the messages and chats you’ve already had.
Or, just click on your headshot to edit it directly.
These edits are amazing. No other AI headshot generator even comes close. You can do whatever you want here.
For example, I asked ChatGPT to place me rowing on the surface of Mars.
This could be a funny social media post (well, it would’ve been, if people hadn’t flooded the web with AI-generated stuff).
Just a heads-up: the AI doesn’t technically edit your photos.
It recreates everything while trying to keep it as realistic and untouched as possible. That’s why, if you ask for multiple versions in the same chat, the accuracy starts to slip.
Pros
Free for a couple of headshots per day.
Super easy to use—just tell the AI what you want, and it does the rest.
Customizations are insane, limited only by your imagination.
Cons
The results can look generic and similar. Once you’ve made 10–20 headshots, you’ll notice the same boring patterns repeating. If you make that many, you’ll instantly spot when someone used ChatGPT for their social media headshots.
Limited to a couple of images per day. If you’re only using ChatGPT for AI headshots, the cost might be a bit much.
Even the paid Pro plan is limited—only 10–20 images per month. That’s pretty restricted.
Pricing
⭐ My Grade ⭐
Realistic: 2.8/5
Customizable: 4.9/5
Waiting time: 5/5
Total: 3.4/5
To Take Home
I think you should try ChatGPT for headshots. If you like the results, there’s no reason to buy an expensive headshot package.
However, if you’re not satisfied with the results, I recommend trying one of the dedicated tools on the list.
The next AI headshot generator on my list is ProfileBakery.
Just a heads-up: this one’s one of the last paid AI headshot generators on the list, and you can definitely see it in the image quality, which is noticeably worse than most of the tools here.
But the upside is that it comes with a happiness guarantee.
Anyway, let’s see how it works.
My Experience
First, head over to their homepage and click on “Start now.”
The input image instructions are pretty clear, though:
Here are some of the images I used. These are real photos of me:
Drop the images to this view:
This AI headshot generator also asks you to add a “baseline image.” This will be the basic facial expression for your output photos.
Make sure to pick one where you’re smiling if you want a lot of smiles in the final images.
Once you’ve chosen your images, you’ll need to wait. For me, it took about an hour, but for some, it could take 3–4 hours.
You don’t have to sit around and wait, though. Just close the window, and the email system will notify you once your images are ready.
Once the email arrives, you’ll find your AI images in a shared Google Drive folder.
For some reason, it feels a bit odd that the images are in a shared drive folder… The other AI tools I’ve used have private built-in libraries. But anyway, let’s check out the image quality.
Here are my favorite images:
The results are decent. The more I look at them, the more I get a 3D character vibe.
Feel free to check the original images and decide for yourself! 🙂
Pros:
Realistic, professional-looking output images.
Lots of variations in clothes, poses, and backgrounds.
Built-in image improver features for fixing minor AI issues.
Cons:
Fewer images compared to other tools.
The UI feels a bit like a weekend project, but the results are surprisingly good!
HeadshotMaster.io is a free AI headshot generator that turns selfies into professional photos.
It offers a variety of styles for resumes, LinkedIn, and more, with no sign-up required and a focus on privacy.
This tool is similar to the paid headshot generators on this list since it creates new images that look like you. The main difference (besides being free) is that it only needs one image of you and returns just 4 AI-generated faces.
My Experience
First, you’ll need to answer a few simple questions, like gender, age, hair color, eye color, ethnicity, and so on.
Upload an image. You can upload up to 4 images.
Wait for a couple of minutes.
After that, you’ll see a bunch of AI-generated headshots of yourself.
Here are my results:
You can view more results on the left-hand side.
For example, here are a few more headshots of me:
That’s pretty cool, especially since it’s free. But let’s be honest—it doesn’t look exactly like me. The closer you look, the more it feels like a 3D-rendered character.
Pros
Fast: Results in just a couple of minutes.
One image: You only need to upload a single image, which is way easier than AI headshot generators that need 10–20 photos.
Semi-realistic: The AI produced images that resemble me.
Cons
3D vibe: The images look more like 3D renders than real photos.
Out of place: Some images look completely off, robotic, and not like me.
Here’s another free AI headshot generator worth checking out: Vheer.com.
It’s an AI platform, and the headshot generator is just one of many tools they offer.
But I was surprised to find that this is one of the best free AI headshot generators, especially since I hadn’t heard of it before.
My Experience
Creating your AI headshot is super simple.
Just head over to their website, then upload your image to this view:
Here’s the image I used.
Next, tweak the settings on the right.
You can choose one of the styles on the list to get headshots that suit your taste.
Notice how you can use custom prompts to tweak your AI headshots even more.
Another great feature is that this tool lets you choose the aspect ratio for your headshots.
Once again, this isn’t common in AI headshot generators. Usually, the images are either square or 9:16, and you can’t adjust them.
I gave it a try with a couple of attempts and styles.
Here are my results:
This first result really surprised me. I expected it to be bad. To be honest, it’s not the best and definitely not on par with the paid headshot generators. But it’s decent, especially when you look at it from a distance.
I’ll show you what the problem with this tool is in just a second, but let’s check out a couple more free AI headshots first.
Here’s another AI headshot I created for free with Vheer.
And here’s another:
Now, let’s dive into the issues with this tool: Even though it’s free and easy to use, the quality just isn’t there.
Let me zoom in a bit closer.
Do you see the problem yet?
If not, let’s zoom in a bit more:
Here you can see that while it looks exactly like me, the image just isn’t realistic at all. To me, it looks like a 3D-rendered character—or maybe a wax model from one of those wax museums.
This is a common issue I always run into with free AI headshot generators.
They’re fast, which makes them cheap or free to use, but the results look like this. Yes, if you look from a distance, it’s not too bad. But a closer look? It only takes a couple of seconds to see it’s all fake.
Pros
Totally Free: No cost at all.
Very Fast: Just about half a minute for results.
Great Results: This free AI headshot generator is one of the top choices I’ve tested right now. The results look realistic from a distance.
Cons
Not Very Realistic: The likeness falls apart when you look closely. From a distance or on a small icon, it looks realistic. But the closer you get, the more you get that 3D character vibe.
Limited Input: Since it only uses one image, the output lacks accuracy.
Free Is Bad: As I’ve said many times on the channel and in my blogs, free AI headshot generators just aren’t there yet. Not even close.
Next up is HeadshotPro, a background-swapping tool that uses AI to detect edges and remove you from the image.
The concept is simple: upload your photo, and this “AI headshot generator” quickly turns it into multiple professional headshots with different backgrounds.
Like PFPMaker, which I’ve mentioned in earlier articles, it doesn’t create a new face—it just enhances your existing photo with new backgrounds.
My Results
Here’s my favorite before-and-after shot it created:
The lighting looks accurate and realistic.
But honestly, it’s all luck. The AI didn’t adjust my face lighting—it just matched it with a great background from the catalog.
More Results
You can get more similar results by choosing a background from this view:
This isn’t exactly a headshot generator since it doesn’t create your face. Instead, it uses AI to remove the background and replace it with a new one.
With a variety of pre-made backgrounds available, the process is quick, and you can easily try different options to find one that fits your image.
One downside is that the backgrounds are pre-built, meaning the AI doesn’t generate new ones every time you hit “generate.” So, it’s more of a background remover and changer than a true headshot generator.
PFPMaker is an AI tool that helps you create professional profile pictures by changing the background of your images.
It’s free and faster than other tools since it doesn’t create new images but just removes the background and swaps it with a pre-built one.
Technically, it’s not a headshot generator. But with powerful AI tools for background removal, enhancement, and template customization, PFPMaker lets you improve existing images—perfect for something like a LinkedIn profile picture.
My Results
Here’s the before-and-after shot I got from PFPMaker:
My Experience
Using this AI is easy and fast.
First, upload an image of yourself:
That was fast as it only took 15 seconds to create the AI headshots.
Here are the results I got:
Like the previous “AI headshot generator,” this one isn’t a real headshot generator—it’s more of a background changer.
Still worth experimenting with, though.
By the way, you can make edits to your images to match the color better.
To do this, click on one of the images to open the editor view. The customizer can help adjust the background to match the lighting of your skin.
Pricing
Free!
I haven’t graded these background generators since they’re technically not AI headshot generators.
But I have to spoil the party here—the position on this list is well-deserved. This AI headshot generator creates images that don’t look like me at all.
The only reason I’ve included it on this list is that it ranks really high on Google for the “AI headshot generator” keyword, and a lot of people are using it, but getting a misleading idea of the current state of AI headshots.
In reality, this is one of the worst ones I’ve tried.
Let me show you my results.
My Results
Canva’s headshot maker is easy to use. Just open Canva, go to Apps, and search for AI headshot generator.
Upload an image, choose your gender, and wait:
After about 10 seconds, you’ll get an AI-generated version of yourself.
Exciting, right? Let’s see what mine looks like…
Here it is:
Umm… I hope I don’t look like that in real life. That’s just terrible. It looks like one of those 2010 Instagram pics where people piled on every filter available at the time.
Honestly, it’s a waste of my time.
This would’ve been cool 5 years ago, but now it feels so outdated.
Canva is usually awesome, don’t get me wrong. Some of the graphics on this post were made with Canva.
But the problem is, they sometimes release apps just to rank high and capture traffic to convert into monthly users.
If there’s no demand, they stop developing these tools—like this headshot generator.
Pricing
Free
⭐ My Grade ⭐
Realistic: 1.0/5
Customizable: 0/5
Waiting time: 5/5
Total: 1.1/5
To Take Home
This was just one of the Canva AI headshot apps, so if you use Canva a lot, make sure to try out more of them.
I’m pretty sure they all use a free API to create the headshots, so don’t expect anything too crazy.
Bonus 2: The Face-Swap Strategy
Let me show you a clever trick with which you can also create headshots for free and have more customization over your work.
In short, this strategy involves ChatGPT and FaceSwapper.
The idea is here:
Create an image of a person with AI.
Take a selfie.
Swap your face with the AI-generated image.
Repeat until you find a good image.
Enjoy!
For example, here’s an image I created with ChatGPT.
This is a good base image. But it doesn’t look like me at all.
Next, I will merge the face from that image with my actual selfie.
Upload the AI-generated image as the “Original image” and use your selfie as the “Face image.”
Wait for about 60 seconds.
And there’s your result:
That’s pretty cool! It looks a lot like me, at least. To improve the headshots, consider taking more selfies and testing those. Also, spend some time on the ChatGPT input.
Quick Summary Table
To cap it off, here’s a table that summarizes the best AI headshot generators in one go!
#
AI Headshot Tool
AI Headshot Maker
Key Features
Editing Available
Free Option
1
BetterPic
✅
Realistic results, editable, final touch by human editors
✅
❌
2
HeadshotsByAI
✅
Sharp, well-lit, realistic headshots
❌
❌
3
Secta AI
✅
140+ headshots, Aurora Borealis style, HEIC support
✅ (paid plan)
❌
4
HeadshotPro
✅
Customizable, speech headshots, high quality
✅
✅ (bg swap)
5
Try It On AI
✅
Social + professional headshots, video headshots, customizable
✅
❌
6
Magic Photos AI
✅
Candid, selfie-style photos, fast turnaround, editable clothing styles
✅
❌
7
InstaHeadshots
✅
Great social media-style headshots, realistic selfies, fast turnaround
❌
✅ (long wait)
8
Headshot.Kiwi
✅
Less uncanny, realistic images
❌
❌
9
Prophotos AI
✅
Affordable, professional look, suit styling
❌
❌
10
PhotoPacks AI
✅
Budget-friendly, good results
❌
❌
11
AI SuitUp
✅
Affordable, similar results to top tools
❌
❌
12
GoStudio AI
✅
Realistic, simple to use, affordable, no customization
❌
❌
13
The Multiverse AI
✅
Customizable with prompts, legacy tool
❌
❌
14
Aragon AI
✅
Realistic, customizable, OG tool
✅
❌
15
Portrait Pal
✅
Vintage-style, soothing headshots
❌
❌
16
Fiverr AI Headshots
❌ (Human-based)
Freelancers using AI for headshots
Depends on gig
❌
17
ChatGPT
✅
Upload your image to generate headshots
✅
✅
18
Profilebakery
✅
3D-like, somewhat artificial
❌
❌
19
HeadshotMaster.io
✅
Best free tool with decent quality
❌
✅
20
Vheer.com
✅
Free, fast, decent results from a single image, aspect ratio customization, basic prompts
❌
✅
21
AIEase
✅
Fastest, no signup required, low quality
❌
✅
22
HeadshotPro (Free)
❌ (BG tool only)
Background-swap tool, not full generation
❌ (bg only)
✅
23
PFPMaker
❌ (BG tool only)
Background changer with customization
✅ (limited)
✅
24
Canva
✅
Easy prototyping, improving tech, AI headshot apps available
✅ (basic)
✅
Interesting Observation
I just noticed something funny about AI headshot generator companies…
Please, have a look at the landing pages of these three different free AI headshot generator pages:
1: Fotor AI headshots:
2: HeadshotMaster AI headshots:
3. Supawork:
Looks pretty similar, right? Yet, they’re three completely different tools!
Clearly, these companies are using a common templates with which they can build their own AI headshot generators that do the exactly same things as others.
So please be careful. Don’t pay for something you can already get for free somewhere else.
Just a quick thought. Just something funny I noticed.
Any Good Free AI Headshot Generators?
A lot of people search for free AI headshot tools. I get asked about them all the time too.
Here’s the truth: the best headshot models today need serious tech and expensive computing power.
That’s why good headshots cost money. At least for now.
When you see tools offering free headshots, they’re usually built on smaller or older AI systems. That’s why the results often look off — maybe the face shape is wrong, the lighting looks fake, or the quality just isn’t there.
You get what you pay for.
Even ChatGPT, which is probably the closest thing to a free AI headshot generator right now, has limits. You can make a few images a day, and they’re decent, but still nowhere near paid platforms.
The paid tools run on much bigger AI models, and those need powerful GPUs that cost real money.
So while free tools are quick and fun to try, they usually don’t hit the level you’d want for professional use.
If you need a good LinkedIn photo or a business profile picture, a paid AI headshot generator is worth it. If not, just know the free ones give mixed results.
Before you go…
AI headshot tools are impressive, but don’t expect them to be perfect. They don’t always get it right.
The way they work is simple: the AI is trained on tons of photos, and then it creates headshots from the images you upload.
It’s fast, cheap, and a lot less stressful than booking a photographer.
But sometimes the photos can look a little off. Too smooth, too stiff, or just not quite like you.
That’s where Betterpic makes a difference.
It’s not just fully automated. It also gives you the option of human edits.
For me, that makes it the best AI headshot tool right now.
To wrap this up, here are a few quick tips for getting the best results with AI headshots:
Tips for Getting the Best AI Headshots
Upload high-quality photos — Clear, sharp images give the AI the best chance. Blurry or pixelated shots won’t work well.
Use good lighting — No heavy shadows or dark rooms. The clearer the photo, the better the output.
Keep a neutral expression — A relaxed face or light smile works best.
Avoid heavy filters or makeup — These can throw off the AI.
Upload different angles — If the tool allows, use both straight-on and angled shots for more natural results.
Check the background — Clean and simple backgrounds help the AI focus on your face.
Be ready to edit — No AI is perfect. Pick tools like Betterpic that let you tweak things after.
Follow these steps and you’ll end up with the best results possible.
Spread The Message!
AI headshots are taking off fast in the US and China. But in much of Europe and other regions, people haven’t really caught on yet.
Here’s what the Google Trends area chart looks for this trend:
These tools are really handy, but most people still don’t know they exist.
So if this helped you, share it around! No reason only the US and China should have slick LinkedIn photos — everyone should.
Personally, I love my AI headshots. For business, I don’t see them as “cheating.” They’re just a smart way to save time and money.
The Problem with AI Headshots
I’m not saying AI headshots will land you a job or a date. Not at all.
For me, it’s more of a fun experiment and a way to save time.
Some people love them. Some people hate them. I get both sides.
I wouldn’t use AI headshots to fake big life events like weddings or parties.
But for business? That’s where they shine. It really doesn’t matter what you look like anyway.
Why pay thousands for a photographer, makeup, and clothes, when AI can do it for a fraction of the cost and stress?
That’s why I’m a fan. I’ve got decent pictures on my phone, but I’ll never take the time to hire a photographer. With AI, I can get headshots done in minutes, and they look good enough.
Of course, I see why people don’t like them.
They aren’t real. AI always adds little details that don’t belong to you. In that sense, the photos are “fake.”
But honestly, regular headshots are just as fake. You never actually look like that in real life either.
The bigger issue is that AI headshots can feel generic. If too many people start using them, it will be obvious they’re AI-made.
That could lead to a shift where people prefer natural selfies, which might lower the value of professional headshots.
Or maybe people will skip profile photos altogether since they can be faked so easily.
Hard to say.
But here’s what I know: AI headshots are awesome. They’re new, cheap, fast, and not everyone is using them yet. Definitely recommend it!
I’ve been using Thinkific for over a year and have launched and sold two courses on it. Now I’ll walk you through how Thinkific works from a course creator’s point of view.
Course Creation Tools
Thinkific has a generous free plan you can get started with. Use the above links to activate it.
After signing up, you can start creating your course.
Just click the “+ New Course” button:
Next, you’ll pick a course template. This is one of the things that makes Thinkific stand out. It gives you a range of clean, professional designs to choose from.
For now, I’ll go with the blank template.
Now it’s time to create chapters.
On Thinkific, the structure is simple:
Courses contain Chapters
Chapters contain Lessons
For example, your first chapter could be an introduction. Inside it, you can add lessons like who you are, what to expect, and so on.
Here’s me setting that up:
After adding lessons to your chapters, you can choose what type of content to use.
You’re not limited to just video, text, or quizzes—there are a lot more options.
I was actually surprised by how many there were. When I made my first course, I thought it would just end up being one long video.
One feature I really like is being able to add extra materials to lessons.
For example, if you have a video lesson, you can scroll down and attach more content.
This could be notes, thoughts, or corrections if you missed something in the video. You can also add downloads. (In my blogging course, I added templates for students to grab.)
One thing that bugs me with video lessons is the file size limit and how long it takes to preview them.
It makes sense since the platform has to process each video before it can play, but it can still feel confusing.
Sometimes it takes 30–60 minutes before your video shows up. Until then, you can’t even watch the lesson.
My tip: compress your videos first and bulk upload them to the library. Just give them clear names so you know which is which.
You can use HandBrake to compress your videos.
Another feature I like in Thinkific is adding quizzes for students. It’s a simple way to keep them engaged. You can drop these quizzes in as their own lessons.
Just type your question, add the answers, and pick the correct one.
Almost forgot—you can drag and drop lessons and chapters in the course editor. This lets you organize your course any way you like, without having to build it in a fixed order.
A cool feature to try out is Thinkific Apps (integrations). These third-party apps let you extend what Thinkific can do. If something’s missing, you can usually find an app to fill the gap.
The downside is that these apps aren’t cheap. Many of them cost about the same as the Thinkific Standard plan. That’s a lot to pay just to add one extra feature on top of everything Thinkific already gives you.
Still, if you really need it, it might be worth it.
Customizable Website
What about building a website for your course?
Because you don’t just need a page for your lessons—you also need a real course site, right?
Thinkific makes that easy. It comes with a landing page builder so you can create a solid course page. The ready-made template gives you a good starting point.
Let’s test it out with my sample course:
Here’s the default course page that Thinkific generated for my sample course:
As you can see, it already looks pretty good and works right out of the box.
You can always add your own touch, but the structure is solid. It shows the course name and has a clear CTA to enroll.
Scroll down and you’ll see more elements to help promote your course.
You can change the theme of your course pages by clicking “Theme Settings” on the left.
From there, you can update colors, fonts, images, and more.
The only issue I ran into is that it changes the theme for all your courses, not just the one you’re working on. I learned that the hard way when I accidentally changed the look of all three of my courses.
Overall, the site builder is super easy to use, and I recommend just jumping in and trying it out.
You can add new sections to your page with the “+ Add Section” button. Building your course site really is that simple.
For example, let’s add a counter at the bottom of the page to help drive sales.
It’s a common but powerful trick. Just click “Add Section” and search for “Counter.”
Here it is:
You can set the duration by clicking the counter and adjusting the settings on the left.
That’s the main workflow with the site builder:
Search for an element
Click to add it to your page
Drag it where you want in the editor
Edit the content and settings in the left panel
This makes it super easy to use. Just pick an element and edit it with the simple controls.
The only drawback is the lack of customization.
It’s not a dealbreaker, but you’ll notice it pretty quickly.
For example, I find LearnWorlds and Teachable (covered later) a bit stronger in this area.
One thing I wanted, for instance, was to show a strikethrough on the original price next to the discount price, like this:
But Thinkific doesn’t let you do that. Not a huge issue, but it’s such a common feature that it would be nice if they added it.
Marketing and Sales Tools
Once your course is ready (and your landing page is set up), the next step is marketing.
This is important—people won’t just find your page and buy. You need to promote your course with offers, funnels, and other tactics.
And no surprise, Thinkific has tools for that too.
For example, you can make one lesson free as a preview, and then lock the rest behind a paywall.
You can also create promo codes for your course. I’ve used them myself, and they work well.
You can even limit discounts to the first 10 sign-ups (or any number) to add scarcity and make the offer more tempting.
Analytics and Reporting
Once you start getting students, you can track things like transactions, revenue per user, total revenue, and more.
Some of these come with the Standard plan, but for deeper analytics you’ll need to upgrade to a higher plan.
I’m not a big fan of putting detailed stats behind a paywall.
That said, I only have 2 courses and can already see all the key analytics I need, so I don’t really have much to complain about. 🙂
Student Management and Support
Last but not least, Thinkific lets you manage, communicate with, and support your students.
For example, you can track your students’ progress.
Who’s stuck?
Who hasn’t started yet?
Who’s finished the course?
And more.
You can also build a community inside Thinkific around your courses.
And when students finish a course or module, you can reward them with a certificate.
Preview
Before launching your course, double-check that everything looks good.
Thinkific makes this easy—you can enroll in your own course as a student to see exactly how it works.
One of my favorite things about Thinkific is how it handles all the technical stuff for you—organizing, tracking, and viewing lessons.
It keeps track of progress, lesson numbers, chapter numbers, and more.
That’s the big advantage of using Thinkific.
Without a platform like this, coding all these features into your own course would be a huge challenge.
Sure, you could just share a private link to a long video, but if you want to track progress, accept payments, build a landing page, and more—you need a tool like Thinkific.
I definitely recommend giving it a try, especially now that you can get my free deal here.
Pros
Thinkific is a complete platform. As you’ve seen, it packs in everything you need for a smooth course experience.
Everything is handled in one place. You can design, build, edit, host, market, and sell your course all from the same platform. There’s even a community feature where you can chat with your students.
Websites — Thinkific doesn’t just build courses and landing pages. You can also create a simple website to showcase all your courses. The customization is limited, but it’s very easy to use.
Progress tracking and analytics — See how students are interacting with your content, track their progress, and step in if someone is stuck.
Payments — Handles payments, refunds, sales, coupons, and all the technical stuff for you.
Support — I’ve sent multiple questions to their team, and they’ve always responded quickly—even with me in a different time zone.
These are just some of the good things I like about Thinkific. Sure, you could host a course without a platform like this, but it would quickly become way too inconvenient.
Cons
Limited customization — The basics are covered, but if you want more tailored options, you’ll feel restricted. For example, I couldn’t adjust the original price on my landing page.
Expensive apps — If Thinkific doesn’t have a feature you need, you can often find it through an integration app. The problem is, most of these apps are pricey.
Occasional downtime — When I first started, my account went down for days without warning because I hadn’t uploaded a tax document. My students had no idea what happened. A simple notice in the UI would’ve saved a lot of confusion.
Before I show you my own results with LearnWorlds, here’s a quick overview of its features:
Unlimited courses — Create and manage as many paid courses as you want.
Interactive videos — Add quizzes and interactions inside videos.
Assessment tools — Exams, quizzes, and certificates are all included.
Live classes — Host live classes and webinars.
Customization — Customize the course player, website, and even build a mobile app.
Marketing tools — Integrates with email marketing, lead generation, and affiliate programs.
Analytics — Track learner progress with detailed reports.
Scalability — Handles high volume or corporate use, with dedicated support.
My Experience
I’ve tested LearnWorlds thoroughly as a course creator, and now I’ll share my experience with it.
I’ll also give you a quick tour so you can see what the platform is like.
Getting Started
Unlike some premium platforms, LearnWorlds gives you a free trial without asking for a credit card.
Just hit “Get started for free” on their homepage.
To start the free trial, just sign up.
Next, you’ll create your school. This isn’t the same as a course—your school is the main hub with a website, course library, and more.
I named mine Blogging School. You can also customize the website URL here. If you leave it as is, it’ll just use your school’s name.
It takes about 10–15 seconds for LearnWorlds to set up your school’s workspace.
After that, you can pick a template (or theme) for your school.
Be sure to answer the setup questions as best you can. It’ll help tailor the platform to your needs.
Once you’ve answered the questions, you’re ready to create your first course.
Tip: I suggest booking a call with LearnWorlds. The platform has a lot of features, and it can feel overwhelming at first—especially if you’re just starting out.
Here’s your School Dashboard:
This is the main dashboard where everything happens. You can check stats, create courses, view reports, run marketing, customize your site, and more.
But let’s start with the main thing—course creation.
Creating a Course
Making a course in LearnWorlds is pretty straightforward. Just click “Create course.”
Next, give your course a name. I called mine Blogging 101—an intro to blogging for my Blogging School.
And don’t forget to add a thumbnail image for your course!
Next, set a URL path for your course. This makes your course link clear when you share it with others.
Here’s something I didn’t notice on other platforms.
When you set your course access, if you pick anything other than “Draft,” your course goes live immediately. So keep it in Draft if you don’t want people joining while you’re still building it!
When I finished my sample course on LearnWorlds, I started looking for a launch button. Then I realized it had already gone live before I even built it…
That’s different from other platforms I’ve used. Not a big deal, but worth keeping in mind.
If your course is paid, you’ll also set the price here.
Besides setting a fixed price, you can also add a discount and show the original price with a strikethrough.
It’s a great feature because it helps boost sales, and surprisingly, many platforms don’t let you do this. (I still haven’t figured out how to do it on Thinkific, even though it feels like a basic option.)
After that, it’s time to build your course content. To speed things up, let’s use AI again.
Unlike Teachable, this step asks you to fill in some details carefully. That way the AI doesn’t go off track.
For example, you can choose the content types, sections, number of activities, and more.
Once you’ve filled everything in, the AI will generate your course. It takes about 30 seconds. After that, you’ll see a screen like this:
Scroll down and click “Insert” to add the outline to your course.
If you want to change the order of the lectures, just drag and drop them in the view.
One thing I noticed right away is that the AI didn’t create descriptions or text for the lectures. It only named them and put them in order.
To add or change content, just click the pen icon and write your own descriptions.
Don’t forget to save.
At first, I got a bit lost because I couldn’t find how to upload a video to the lectures. Then I realized it’s under the “Settings” tab.
You can use Vimeo, YouTube, or other platforms, or just upload your own video.
To upload your own, select “From course video library.”
This part is a bit of a hassle. It takes you out of the course outline and into the library page. Then you have to upload the video and wait quite a while—sometimes tens of minutes—for it to process.
You can’t use the video in your lectures until the upload and encoding are finished. I didn’t like this because it means I have to remember to come back later and add the video I already uploaded.
Once the upload is done, you can get back to your course editor through the “Course outline” section on the left.
Next, you can add a cover image for your section.
It’s optional, but I recommend doing it—it makes your course look more engaging and professional.
If you don’t have your images, pick one from a library like Unsplash:
After that, you can move on to other parts of your module.
Right now my course is only videos, which isn’t the best format. You should mix in some interaction too.
That’s where activities come in.
There are dozens of activities to choose from.
One thing I couldn’t find was quizes, though.
Since a quiz wasn’t available, I made a small text assignment for my students instead:
This is where I started to see how versatile the platform is.
You’re not limited to just adding a question and answer—you can also format it in different ways.
When your activity is ready, you can preview it from the top right.
This lets you see the activity the same way your students will.
You can even complete the assignment yourself (or any activity you’re previewing).
Pretty cool, right?
That’s how you create course content in LearnWorlds.
I won’t go through every single activity type here—you can test those out on your own.
Let’s move on to the course layout.
Editing the Layout
One of the best features in LearnWorlds is that you can fully customize your course layout.
Once your content is ready, just pick “Course page layout” from the left menu.
Then just click an element to edit it. You can drag it around, change fonts, colors, and more.
After customizing my page, I noticed LearnWorlds gives you more control than other platforms I’ve tested.
It has more options, more advanced settings, and the editor itself is just better overall.
After you adjust the layout, click the Preview button to see your changes.
Here’s how my simple sample page looks now:
Yeah, it’s not perfect, but I’m just testing things out.
And while we’re on layout, you can also change how your course player looks. Just go to Course Settings > Course player and pick the layout you like best.
There’s a lot more I could show you about customizing the course page, but no need to turn this into an e-book. The controls are simple and intuitive—you’ll figure them out quickly.
Let’s move on to some other useful features.
Useful Features
LearnWorlds gives you a detailed dashboard with real-time insights about your course. You can see revenue, student numbers, assignments, and more.
You can also open the course insights tab to track student performance. This becomes really useful once you have a good number of students enrolled for a while.
Publishing the Course
When it comes to publishing, you might be surprised to see your course is already live.
I was looking for a “Launch” button, but when I typed in my course URL, it was already published.
This happened because I set a price for the course, which made it public. So keep that in mind!
Luckily, my sample lessons without content weren’t visible—they were set as drafts automatically.
If you want to publish your content too, just go to the course outline, click the module, and set it to “Paid.” That makes the materials live.
Do this for all the lessons you like.
Website
Now that your course is created and published, let’s look at the website side of LearnWorlds.
When you sign up, the first thing you create is an e-school. That’s where all your courses live, and it also comes with a website for them.
To get to your site, go to the “Website” section in your school’s main dashboard.
From there, you can customize your website. For example, you can pick a design and change it up.
Here’s my school site using a Tropic Lake color palette and Poppins as the font:
Just like with your course page, you can edit your website too. Click on elements and adjust them until they look and say what you want.
You can also add new pages to your site—and even blog posts if you have that feature enabled.
There are page templates as well. Like I said, this platform really covers everything. You could even build a full website with it if you wanted to.
Marketing
And of course, there are marketing features too. For example, you can (and should) set up a sales funnel for your courses to boost sales.
You’ll also find solid funnel templates to pick from. These are proven to work for course creators in different industries.
To take sales up a notch, you can set up an affiliate program. Your students can promote your courses and earn a commission for it.
Community
Next are the community features. Instead of setting up a Slack channel or WhatsApp group, you can build the community right inside LearnWorlds.
It works almost like a mini Slack. You get threads, notifications, spaces, hashtags, formatting tools, and more.
For example, here’s a space I set up called Testing, where I’m creating a poll for my students:
Pretty cool, right? You can do everything in one place.
And it’s not just in the browser—you can also use the mobile app.
With so many features, you might wonder how to keep it all organized.
The answer is simple: the main dashboard. That’s where you’ll see quick stats, notifications, and all the important stuff in one view.
Pros
LearnWorlds has more features than any platform I’ve tested. Honestly, I think it’s even richer than Teachable.
The free 30-day trial is great. It’s not a watered-down plan—it’s the real basic plan, and you get a full month to try everything.
You can use it to build a full e-learning setup. You’ve got a school with a website, links, landing pages, marketing, support, analytics, payments—everything in one place.
The course pages and websites are very customizable. More than I’ve seen on other platforms. The trade-off is that it makes the platform harder to use and the learning curve steeper.
Cons
The interface isn’t as smooth as other platforms. For example, if you upload a video, you have to wait for it to process before you can use it. Then you need to remember to go back and add it. Also, my course was published before I realized it, which I didn’t like.
It’s harder to get started. With so many features, things aren’t always well organized. It even took me a while to figure out how to upload a video.
Too many features for beginners. This can be both good and bad. If you’re just making one or two courses for a YouTube community, it’s overkill. But if you want to build a full school, this platform is perfect.
Teachable is an online course platform that lets you create, market, and sell courses. It comes with all the basics you’d need to run a course successfully.
But is it really worth the hype? Does it actually deliver?
I’ve tested Teachable (along with other similar tools), and now I’ll share my review.
Let me show you around.
Key Features
Before I walk you through Teachable, here’s a quick look at its key features:
Course builder — Easy drag-and-drop interface for creating and organizing courses.
Customizable templates — Professional templates you can brand your own way.
Multimedia support — Upload videos, audio, PDFs, and more.
Payments — Built-in payment processing with support for multiple currencies.
Student management — Enroll students, track progress, and engage with them.
Marketing tools — Email campaigns, affiliate programs, and other built-in features to drive sales.
Analytics — Track sales, student progress, and course performance.
Now, let me share my own experience and results!
My Experience
I launched and sold two courses in 2023–2024 using Thinkific.
But now I’m curious about other platforms and want to test them out to see if I’ve been missing anything.
So let me show you how Teachable works—and what I think about its features, usability, and more..
Getting Started on Teachable
To get started with Teachable, just sign up for the free plan.
On some platforms, the “free” plan isn’t really free. You just give your email, and then they immediately ask for your credit card. Honestly, I can’t stand that.
But with Teachable, that’s not the case. I was surprised to see there’s an actual free plan you can play around with.
When you sign up, Teachable first asks you a few questions about your goals.
Getting started on Teachable is that easy. After this step, you can jump right into creating your learning products.
Creating a Course
Choose your product next.
I wanted to try the Online Course option.
So far, everything’s been super easy. Less than 30 seconds after signing up, I was already making my first course. Pretty awesome!
Teachable has set up every step to be clear and make sure you don’t skip anything important.
For example, this is where you pick your course thumbnail (if you have one).
You can even use their crop tool to make it fit just right.
There it is!
Next, you can set a price for your course.
There are plenty of options here. Honestly, anything you’d want is probably already on the list:
I went with a one-time payment.
After that, you can set the price, name, subtitle, and description that appear on the checkout page:
Once you’ve set the course name, image, and price, it’s time to start adding content.
Since it’s 2025, there’s an AI option. I’m not super into it, but let’s give it a try for fun.
After this, it takes around 30–60 seconds for the AI to make course content drafts. (If you’re starting from scratch, there’s no waiting.)
Working with Your Course
Once the content is ready, you’ll see your course dashboard for the first time.
This is the main view where everything happens—creating content, marketing, and helping your students.
Before I can launch my course, there’s a lot to take care of.
First, let’s check out the curriculum. Keep in mind, this was all made by AI, and I haven’t changed a thing yet.
If you want to move a lecture around, just click the six dots on the left and drag it where you want.
Now, let’s start adding and editing the course content.
Adding Course Content
For example, here’s the text the AI created for the “Why Blogging Is Important in 2024” section:
I have to admit, the AI content is a bit generic and boring. If I wanted to publish it as-is, I’d need to rewrite most of it.
At the same time, I like it because it gives me a starting point. I already have a full course outline, so no staring at a blank page.
That said, you’re not stuck with just text (obviously).
Open a lesson and scroll down—you’ll see the Add Content button:
This lets you add all kinds of content to your course—videos, audio, quizzes, media, code samples, and more.
For example, here I’m uploading a lesson in the Video Content section:
One thing to note: the free trial only lets you upload up to 10 videos.
After uploading your video, it needs some time to process so the size is smaller but the quality stays good. You can leave the page while it’s working.
Depending on how long your video is, this could take an hour or two.
One neat feature that a lot of platforms don’t have is custom thumbnails for your videos.
This is great because eye-catching thumbnails help make sure your students actually watch the lessons and don’t skip around.
It also lets you control how your course materials look.
On the topic of looks, every lecture has a Preview button in the top-right corner:
This lets you see the lesson just like your students would.
For example, here’s how my course looks at the moment.
I think this is a great feature because it shows what the course really looks like. You can check that everything works the way you want for your students.
Now, let’s add more content to the course:
For example, I think quizzes are a great way to check what students have learned. I always include them in my courses.
On Teachable, adding a quiz is really easy. Just type your question, select the correct answer, and hit save.
Now, let’s get into some of the more practical stuff on Teachable.
Useful Features and Widgets
Here are some of the most useful features you should know about.
(I won’t cover everything—otherwise this would turn into an e-book.)
Before you launch your first course, it’s a good idea not to leave it on a blank profile. You can use Site > Bios to add a profile picture and a short description about yourself.
This way, when potential students visit your profile, they get an idea of who you are, what you do, and why they can trust you as a teacher.
If this is your first course, be sure to check out the Get Started tab on the left:
Here, you’ll find video tutorials, other products, and tools to set up and organize your school.
The next one you don’t want to skip is the Theme tab (also on the left side).
Here, you can set your course Logo, Thumbnail, and Favicon.
For example, here’s what I made:
You can also pick your color scheme and fonts.
Once you’re ready, just hit Preview to see your course. Here’s mine, for example:
If you don’t like the random URL Teachable gives your course, you can change it in the Domains tab.
This lets you get a custom domain for your course. Instead of something like artturi-jalli-s-school.teachable.com, you could use artturijalli.com/courses/ or something similar.
One of my favorite features is giving students discounts.
You might think it’s complicated, but it’s really not. On Teachable, it’s easy—just go to Site > Coupons and create a discount.
You can set discounts to expire at a certain time, limit how many are available, or create any kind of scarcity offer for your course.
You can also track how well your coupons are doing—see how many have been used and how many are left.
Speaking of tracking, go to Site > Breakdown to check how your courses are performing.
This view shows your total sales, any partner sales, and more. You can also see your daily earnings.
Student Engagement Features
Finally, let’s look at some ways to engage your students and build a community.
To see a list of all your students, go to Users > Students.
This doesn’t just show your students—it also lets you set up an affiliate program so your students can promote your course. That can be an extra income stream for them, but that’s a whole other topic.
One neat feature is the Coaching widget. You can use it from the Coaching tab on the left menu.
It lets you track student progress, keep notes, send messages, and a lot more.
Doing all this without a tool like this would be messy and inconsistent.
On the topic of student engagement, you can also create a community. This makes it easy to communicate with your students.
You can set up shared spaces for FAQs and different discussion topics.
You could use Slack or WhatsApp for this, but I think Teachable gets it right—everything happens in the same place where students learn.
Actually, that’s kind of the whole point of Teachable. Learning, coaching, communication, reports, billing, sales, marketing—it’s all under one roof.
Going Live
Now that I’ve covered most of the key features, it’s time to launch your course.
If you have a big audience waiting, one thing to do is customize your sales and post-purchase pages.
You can do this right in the main course view by scrolling down a bit.
You can click the links to open and view the pages:
For example, here’s what my sales page looks like:
To make changes, just click Edit sales page.
Here, you can rearrange things and change text, fonts, images, and more.
For example, here I’m editing a text section that’s way too long for my taste:
Once you’ve finished all your edits, it’s time to launch. Just scroll back up and click Launch your course.
And just like that—your first Teachable course is live!
Honestly, this is a really awesome platform. You can do everything in one place, and the controls are super easy and intuitive.
The AI features are fun, but let’s be real—they won’t do all the work for you. You still need to put in most of the effort. 🙂
Also, remember that when you’re just starting out, you don’t need all the bells and whistles.
Focus on building a loyal audience first and sell your course to them. Once you have hundreds of students, then you can start thinking about order bumps, CRO, affiliate programs, coaching, and all that extra stuff.
Pros
Everything in one place: Teachable has all the tools you need for creating, marketing, and managing a course. Honestly, there are almost too many options for new creators, but that’s also kind of nice.
Generous free trial: You can create a course and even market it (with some limits). Most platforms don’t offer anything close to this.
Super easy to use: It’s as simple as setting up a social media profile. Everything is organized well and flows smoothly.
Affordable pricing: Even the most expensive plan is under $200/month. Other platforms usually charge double or triple for the same features.
Makes sense: Community, marketing, sales, student support, progress tracking, coaching, secure payments—it’s all in one place. You don’t need 10 different tools to run a course.
Cons
Can be overwhelming: With so many features, it’s easy to get lost, especially if you’re just starting out. But honestly, that’s kind of a good thing too. 🙂
AI content isn’t perfect: The AI drafts need lots of editing and fact-checking, so you might be better off starting from scratch.
Limited customization: You can pick landing pages, logos, and colors, but there are still some obvious limits.
Free plan is limited: The free plan is nice to try things out, but it won’t take you far because of the restrictions.
Pricing
Free: $0/mo
Basic: $39/mo
Pro: $119/mo
Pro+: $199/mo
To Take Home
Teachable is an excellent platform for creating online courses.
What I love is that it brings together everything you need to run a smooth and successful course.
You can host, edit, manage, promote, sell, engage with students—basically everything you’d want for a solid online course.
If you’re just starting out, don’t get overwhelmed by all the features. You won’t need most of them until you have hundreds of students. 🙂
Khan Academy is an educational platform offering free resources and courses on a wide range of subjects.
But you can’t create and publish your own courses directly on Khan Academy.
Instead, the platform provides content made by its team of experts. You can use these ready-made courses to build learning paths and programs for your online school.
So, if your goal is to teach as easily as possible, Khan Academy is great. All the content is already there—you just organize it for your students.
Before I show you how I use Khan Academy, here’s a quick look at its key features:
Extensive Course Library: Covers a wide range of subjects and education levels.
Video Lessons: Clear, high-quality tutorials that are easy to follow.
Practice Exercises: Interactive problems with instant feedback.
Personalized Learning Dashboard: Tracks progress and offers customized learning paths.
Mastery System: Ensures students understand concepts before moving on.
Teacher and Parent Tools: Resources for assigning lessons and monitoring progress.
Accessible and Free: All content is free and works on multiple devices.
Test Preparation: Offers resources for standardized tests like the SAT and ACT.
My Experience
As I mentioned, Khan Academy is completely free for both students and teachers. That makes it very different from platforms like Thinkific or Teachable, where the focus is on selling courses at a high price.
I’ve been watching Khan Academy videos on YouTube for over a decade, and I’ve learned a ton of math, physics, and chemistry from them. It’s a reliable platform that truly puts students first.
Since everything is free, all the course content is accessible without any cost.
Now, let me show you how it works.
As a teacher on Khan Academy, you can use their ready-made courses, track student progress through personalized dashboards, and assign lessons.
To get started, just sign up as a teacher:
Create a class.
Give it a name:
Next, choose how students will join your learning path:
I chose a link:
After creating a class, it’s time to add courses. Just click the Add Course button in the class banner.
Then it will suggest courses based on the name of your class. You can also search for other courses. Make sure to watch them first to see if they’re a good fit.
There’s a wide selection of courses to choose from:
You can add as many classes as you want.
You can also name your class.
Once you’ve pulled together the course content from the library, you can assign it to your students.
This will put the content into each student’s assignments section.
From there, you can track their scores using the interactive dashboard:
You can add new students to your class manually too.
In the top-right corner, there’s a class code you can share with anyone. Students can use this code to join the course.
Pretty simple, yet really versatile, right?
You can’t create your own course content, but you can use expert-made materials.
From there, you can put together your courses however you like. Add or remove students, assign work, track progress, and more.
I like this approach. Instead of spending hours creating content, I can just use a platform like this and focus on teaching.
Non-profit and generous: I love Khan Academy. I learned math from them back in high school and even university. It’s amazing that a platform like this exists to make learning possible for everyone.
Easy to use: Just sign up as a teacher (or student) and assemble a course from the available content.
Transparent: You can see how your students are performing on lessons, projects, and assignments.
Versatile content: Tons of lessons and courses to choose from, covering different skill levels and ages.
Cons
Limited to Khan content: You can’t create your own course material—you have to use what’s already there.
Non-profit focus: If you’re looking to make money from courses, this isn’t the right platform. Platforms like Thinkific or Udemy are better for selling and promoting your own courses.
Pricing
Khan Academy is completely free.
Take Home
I love Khan Academy. It’s a simple platform with ready-made courses you can add to your classes. You can manage students, track progress, and organize learning paths—all for free.
Udemy is a platform where teachers can share their skills with people all over the world.
It works on a revenue-sharing model, so you earn money based on how many students take your classes.
You might make less per student compared to selling your own course, but you can reach a much bigger audience.
The platform is easy to use, and there’s a supportive community to help you along the way.
Let me show you how it works!
Key Features
Pay-Per-Course Model: Students buy individual courses, so you earn directly from each sale.
Extensive Course Catalog: Tons of topics like business, tech, personal development, and more.
Flexible Learning: Students can go at their own pace with lifetime access to courses.
Global Marketplace: Reach learners from all over the world.
Instructor Revenue Share: Earn a cut of each sale, with different revenue share options.
Promotional Tools: Marketing features to help boost your course visibility.
Course Engagement: Quizzes, assignments, and Q&A keep students active and learning.
Multi-Device Access: Courses work on computers, tablets, and smartphones.
Offline Viewing: Students can download lessons for offline use via the app.
Instructor Resources: Guides and support to help you create and improve courses.
My Experience
Here’s my take on Udemy and how it feels to use it.
To get started as a teacher, just go to the Udemy website and click “Teach on Udemy.”
Unlike Skillshare and some other platforms, Udemy lets anyone start right away. You don’t need to apply or wait for approval to begin creating courses. Of course, your courses still go through a review process, but I think it’s much smoother this way.
Next, just click “Get started.”
After that, the platform will ask a few questions about the courses you want to create.
Be as accurate as you can. Don’t exaggerate your audience or past courses. If you haven’t created any courses before, that’s totally fine.
Once you’ve filled out the questions, click “Create Your Course.”
Next, choose whether you want to create a Course or a Practice Test.
Give your course a title:
Then specify a category:
This will open the course creation view, where you can start building your course.
This is your task list—you need to complete each step before submitting your course for review.
The most important part is the course content.
Udemy lets you add lectures, quizzes, coding exercises, tests, and assignments. To do this, just open a section and click “+ Content.”
Next, pick the type of content you want to add.
By the way, you can see your course from a student’s perspective anytime. Just click the “Preview” button in the top-right corner.
This is super useful because it shows exactly what your students will see. Every solid course platform should have something like this!
Now, back to adding content. For a lecture, you can upload downloadable files, pull from your library, or link to external resources (including code).
Exactly! Udemy makes adding quizzes very intuitive. After you click “Add Multiple Choice”, you can:
Type your question.
Add multiple answer options.
Mark the correct answer.
Optionally, give explanations for correct/incorrect answers so students learn even if they get it wrong.
This is a great way to reinforce learning and keep students engaged after each lecture.
Don’t forget to pick the correct answer.
Here’s what the quiz looks like from a student’s view:
Pretty useful, right?
You can also make assignments for your students. Just fill in the basic info, add instructions, questions, and answers.
Okay, that’s enough for the course content.
That’s a solid list of features for a basic course. You’ve got videos, files, code, assignments, quizzes, and more.
That’s plenty to create a course that teaches in different ways and covers everything well.
But the course isn’t ready just yet. You still need a landing page.
It might sound tricky, but Udemy makes it really simple. They have a template—you just upload an image and fill in a few fields, like I did here:
Then, you can preview the course page. This is what it looks like for me:
Pretty cool, right? If you’ve ever looked for info online, you’ve probably seen a page like this on Udemy. It looks nice and familiar.
The problem is, since it’s Udemy (not your brand), all pages look the same no matter who makes the course.
That’s a big drawback. You’re building Udemy’s brand, not your own.
After that, pick a price tier.
Write some course messages.
When you’re ready, click “Submit for Review.” This will send your course to Udemy’s content team to check it.
The review usually takes 2–5 business days.
Overall, I liked Udemy. It’s simple to use and easy to get started. Plus, it’s free to start making courses!
But it does have its limits.
First, you’re basically working for Udemy. You only get a small cut of the earnings, and you’re building Udemy’s brand, not yours. That’s a big drawback if you want to grow as a creator and make a name for yourself.
Second, the customization is limited. You get the basics—quizzes, assignments, videos, written content, and code—but not much beyond that. Platforms like LearnWorlds give you way more features.
Still, it’s simple and effective, so the limits aren’t all bad.
Easy to use. It only took me 10 minutes to create a basic course on Udemy. Of course, I still need to add the content, but it’s super easy to get started.
Promotion. Udemy has a huge reputation and audience. It pushes your courses to a wide crowd. You don’t need a big following to succeed.
Cool landing page. The platform lets you create a nice-looking landing page, which is instantly recognizable because of Udemy’s reputation.
All the essential features. You get the basics—videos, assignments, quizzes—making the learning experience fun and effective. Plus, since it’s not packed with extra features, it’s easy to pick up.
Takes care of the hassle. Udemy handles payments, promotions, and all that so you don’t have to worry. You can start even without an audience or experience.
Cons
Limited earnings. You’ll only earn from how much time paying members spend on your course. If you sold your course on your own, you could make $100–$1,000 per course. But on Udemy, it might just be a few dollars per student.
Limited customization. Other platforms offer more features—like custom landing pages, community tools, and plugins. Udemy is simple and to the point, though.
Limited pricing options. With platforms like Thinkific, you can set your own price. On Udemy, the pricing is limited to a few default tiers (up to $199 for my course).
Pricing
Teaching on Udemy is free!
There are no upfront costs or subscription fees to become a teacher.
Start creating on Udemy
To take away
Udemy is a great option for teachers who want to reach a global audience without having to build one themselves.
Even though you might earn less per student, reaching more people can make up for it.
The platform is simple to use and has a supportive community, making it a solid choice for anyone wanting to teach online.
Podia is a solid all-in-one platform for selling courses, memberships, and downloads.
But it’s more than just a course platform. It also gives you the tools you need to start making sales. You get features for building your website, marketing, and managing customers.
Let’s take a look at how it works and what it really offers.
Analytics: Track sales and customer behavior with detailed analytics.
My Experience
I’ve spent quite a bit of time testing Podia. Let me walk you through how it works, what it offers, and how it compares to other platforms like Thinkific or Khan Academy.
Podia is awesome because you can sign up for free and start creating courses right away.
Not every course platform lets you do this. Most either require payment or an application to get started.
After you sign in, this is what you’ll see:
To start a course, just click on the “Create a product” section. (As you can see, there are plenty of other options to pick from too.)
Then pick the Online course:
Next, you’ll see a details page for your course. From here, you can add lessons and create new sections for your course:
Give your course a proper name:
Set the availability:
Give it a price:
And so on.
When adding content, you’ve got a few options:
Text
Embedded content
Quiz
Coaching
Files
For example, here’s what a quiz looks like. You can give it a name, ask a question, and choose the correct answer.
Or, here’s what the coaching looks like:
In the coaching section, you can link your Calendly (or any similar calendar tool) so your students can pick a time to meet with you without the email back-and-forth. Pretty cool, right? Most course platforms don’t offer this.
The course text editor is pretty solid too. It has basic formatting options, so your text chapters or lessons won’t be just long walls of text. You can organize your content with lists, bold, italics, and more.
After adding your course content, you can edit your course landing page. This is where you’ll sell your course.
It lets you pick colors from popular color palettes.
Here’s what my empty landing page looks like:
It’s nothing too fancy, but it has all the key elements and colors set up. If you had to code this from scratch or use a different platform with no landing page templates, it’d take forever.
You can customize the pages with basic settings, like changing colors, fonts, buttons, links, and media.
When you’re ready, just click “View product” to check out your course.
This gives you a preview from the perspective of an enrolled student. It’s a really useful feature.
Once your course is live, you can share a link to it like this:
So that’s how course creation works on Podia. It’s simple and covers all the basic features. But it’s a bit limited in terms of customization. For instance, the LearnWorlds platform lets you do a lot more than what you can on Podia.
But creating a course is only half the battle. You also need to sell it. This is where Podia really stands out.
You can set up email campaigns to warm up your leads and potential students on your email list.
Create a campaign by clicking “Start campaign.”
Pick a name and set the condition for when you want to send it to your subscribers.
There are email templates you can pick from. But honestly, these days, it’s best to stick with a simple text template. It’s straightforward, relatable, and works well. No need for flashy colors or crazy formatting—that’s the old-school approach.
Here, I’m adding titles and preview text to my emails:
Email marketing could honestly use its own tutorial—it’s a lot to cover if you want to do it right. But let’s keep it brief.
Once your course, landing page, and emails are set up, you can start tracking your analytics. This lets you see how many emails you’ve sent, how many people opened them, and more.
You can also encourage your students to buy sooner by offering limited-time coupons, like 20% off for May 2025.
I haven’t created any coupons yet, but basically, you just need to choose a coupon name, set the sale amount, pick an expiry date, and decide on a limit (optional).
Last but not least, you can build a community around your learning content. This is pretty common these days. You can create topic pages and membership sites.
Once your customer base grows, you can try affiliate marketing. This means your students review your products and earn a small commission automatically whenever they make a sale through their affiliate link.
This is awesome, and again, not something every platform offers. Depending on your niche, a solid affiliate program can really boost your course sales.
So, I’d say Podia is a solid platform with lots of great features, from creating and selling courses to building a community of engaged students.
But after reviewing a bunch of platforms, you might be wondering what sets Podia apart from the rest.
The difference is simple:
For one, unlike Udemy, which is a marketplace, Podia gives you full control over your branding and customer relationships.
On the other hand, compared to platforms like Thinkific, Podia is more of an all-in-one solution with built-in email marketing. With Thinkific, you need to rely on a third-party email service.
But there’s definitely some overlap too!
Podia shares many features with platforms like LearnWorlds and Teachable.
Pros
All-in-One Platform: Podia has everything you need for course creation, digital downloads, memberships, and email marketing.
Easy to use: The platform is simple. Sign up, start creating your courses and landing pages, and sell. It’ll take time to build and grow your audience, but the technical side of things is as easy as it gets.
No Transaction Fees: Unlike some competitors, Podia doesn’t charge transaction fees on any plan.
Customer Support: Podia’s customer service is top-notch—quick, helpful, and always ready to assist with any questions.
Cons
Limited Customization: There are fewer design customization options compared to some competitors, and content options are pretty basic.
Basic Reporting: The analytics and reporting features could be more advanced, but this isn’t a big deal when you’re just getting started.
Limited Community Features: The tools for building a community aren’t as strong as on other platforms. You might be better off using Slack or another third-party service for that.
Fewer Integrations: Podia has fewer third-party integrations compared to some other platforms.
Pricing
Free Plan: $0/month
Starter Plan: $4/month
Mover Plan: $33/month
Shaker Plan: $59/month (first year pricing, then $75/month)