Author: Artturi

  • 6 Best Tennis Line-Calling Systems of 2025

    6 Best Tennis Line-Calling Systems of 2025

    Tennis has entered a new era of precision.

    From professional tournaments to club matches, smart technology now helps players, coaches, and umpires make confident decisions and gain deeper insights into performance.

    Line-calling and smart net post systems are leading this shift toward accuracy and data-driven play.

    Below is a full overview of the best systems available in 2025 and how each one works.


    What Is a Tennis Line-Calling System?

    A line-calling system, also known as an electronic line-calling system, uses cameras, sensors, and AI software to determine whether a ball lands in or out.

    The technology tracks the ball’s flight, calculates its trajectory, and produces real-time results.

    Many systems also record video, generate statistics, and provide training data that help players analyze their game.


    1. Baseline Vision

    Origin: Europe
    ITF Approved | Portable Device
    Discount Code: LEO1

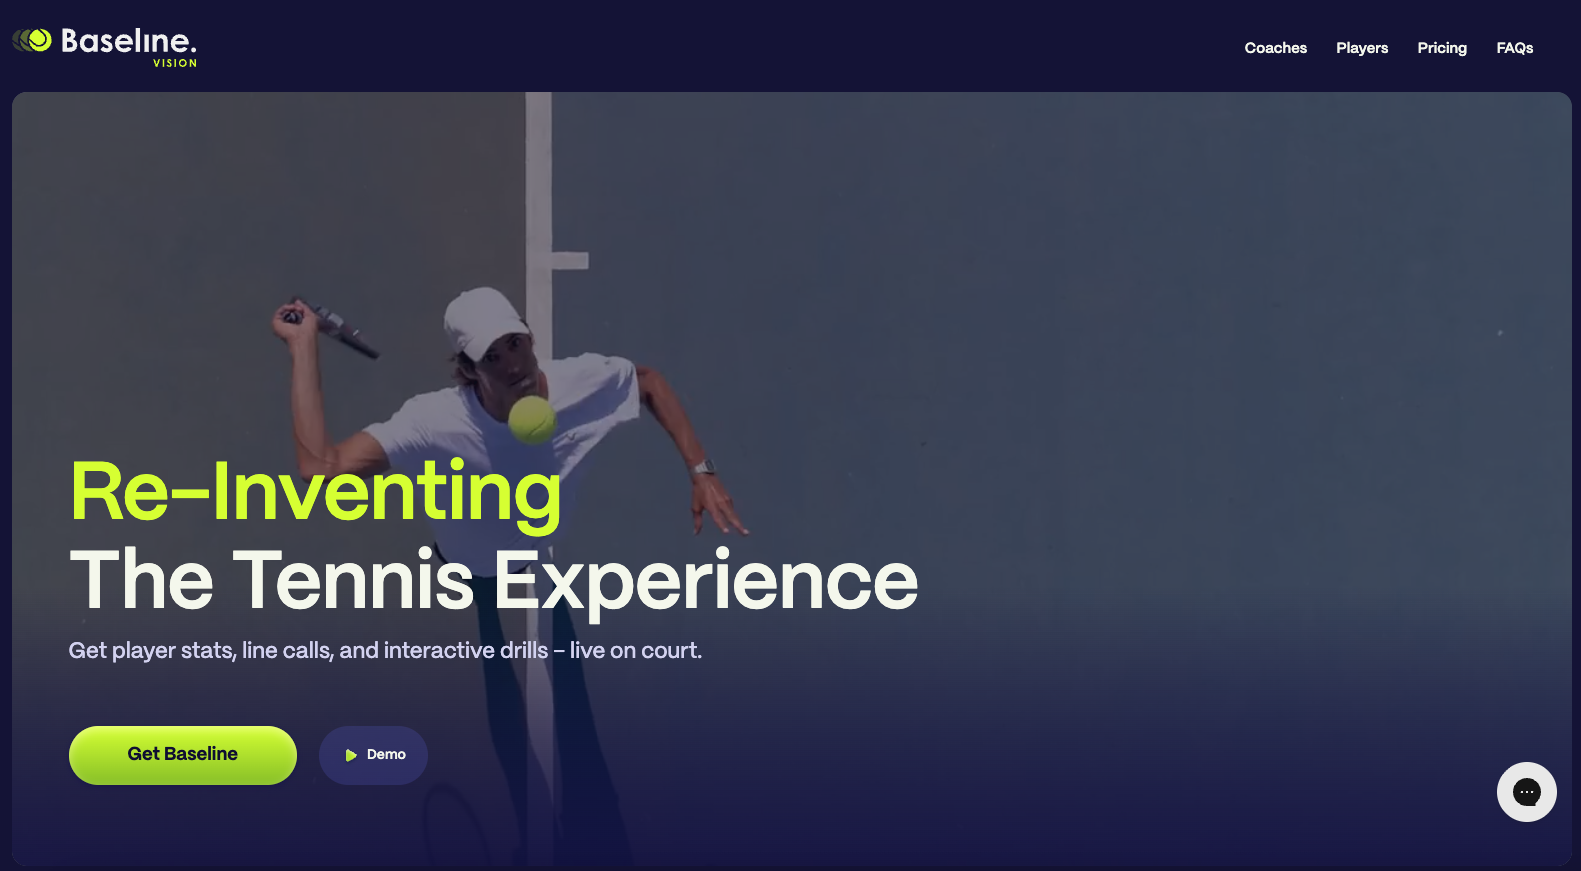
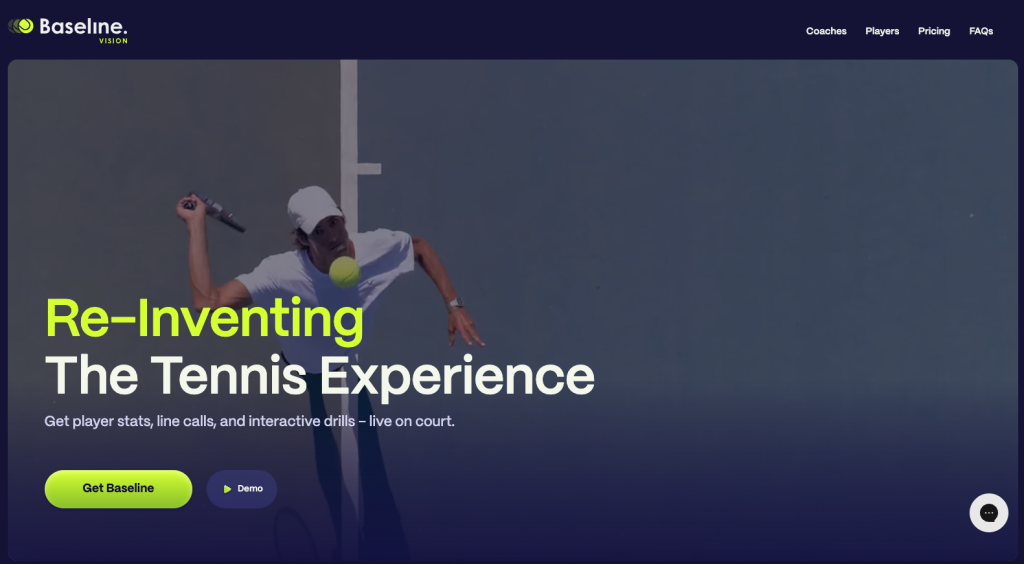
    Baseline Vision leads the new wave of portable, AI-based line-calling devices.

    Designed for convenience and precision, it brings professional accuracy to club and recreational players without complicated installation.

    The system includes two high-definition cameras, LED panels, and speakers on both sides of the unit, all connected to a dedicated mobile app.

    Core Components

    • Two Full HD cameras (60 fps) capturing both sides of the court
    • LED indicators and audio cues for line calls
    • Built-in AI processor that analyzes live video in real time
    • Detachable battery, LAN and USB ports, and carrying case
    • Mobile app for line calls, video replays, and player statistics

    Key Features

    Baseline Vision delivers automatic line calls, performance tracking, and video replays through its AI engine.

    The Baseline app also includes fun and competitive modes like Deeper and 2-Minute Challenge, where players can test shot depth or consistency.

    The unit sets up in minutes and automatically tracks every point and rally.

    Players can then review data such as shot placement, ball speed, and footwork inside the app.

    Summary:
    Baseline Vision is compact, precise, and ideal for anyone who wants professional-grade line-calling with accessible pricing. It combines simplicity, smart features, and reliable accuracy in one portable device.


    2. Hawk-Eye

    Origin: United Kingdom
    Used by: ATP, WTA, and Grand Slams

    Hawk-Eye is the original leader in computer vision for tennis. It uses ten high-speed cameras positioned around the court to track the ball’s movement. Each camera captures the ball from a different angle, and the system triangulates these frames to calculate the ball’s exact path.

    This process produces the “Shot Spot,” the familiar replay used in professional tournaments to confirm line calls. Results appear almost instantly and are used by umpires, broadcasters, and players.

    Summary:
    Hawk-Eye remains the benchmark for reliability and precision at the highest level. It is built for professional competition and not designed for general club use.


    3. Zenniz

    Origin: Finland
    Availability: USA and Europe
    ITF Approved

    Zenniz offers one of the most complete smart-court systems available. It includes a smart net post with integrated cameras, microphones, LED displays, and a touchscreen interface. It also features a baseline camera, mobile app, and online dashboard for coaches and tournament organizers.

    Key Features

    • Dual Tracking Technology combining visual and audio detection
    • Automatic in/out display on the net post screen
    • Player statistics covering movement, rally depth, and shot speed
    • Video highlights and live streaming
    • Interactive training drills with instant feedback

    How It Works

    Zenniz uses 30 microphones positioned around the court to capture impact sounds and player movement. Four synchronized cameras then track the ball’s visual flight path. By merging these two data streams, the system builds a complete digital model of the court for precise calls and advanced analytics.

    Summary:
    Zenniz blends accurate line-calling with coaching and training features. It is practical for both competitive play and personal practice sessions, offering high value for clubs and players who want more than just line calls.


    4. FoxTenn

    Origin: Spain
    Professional Use

    FoxTenn takes a different approach from other systems. Instead of predicting where the ball landed, it records the exact frame of contact when the ball hits the court. The system uses more than 40 high-speed cameras synchronized with laser scanners, capturing up to 2,500 frames per second.

    Measurements

    • Ball and player speed
    • Bounce position and height
    • Ball trajectory and angle
    • Player hitting zones

    This combination of optical and laser technology allows FoxTenn to deliver unmatched accuracy, even in challenging conditions such as low light or fast surfaces. It is the system of choice for many professional tournaments and broadcast productions.

    Summary:
    FoxTenn focuses on absolute accuracy rather than estimation. It is designed for the professional circuit and is not aimed at recreational players.


    5. Wingfield

    Origin: Germany
    ITF Approved

    Wingfield turns any traditional court into a smart court with its Wingfield Box, a replacement for one net post that houses two high-speed cameras. An additional baseline camera can be added for a TV-style perspective.

    Its AI system, known as Walter, recognizes players and tennis balls from the video feed and continues to improve its accuracy through self-learning.

    Key Features

    • AI-based ball and player tracking
    • Automatic video recording for matches and training
    • Easy setup that requires only power and an internet connection
    • Integration with national ranking systems in Germany
    • Mobile app with smart filters and match statistics

    Wingfield gives players access to their recordings and detailed analysis directly through its app. Clubs can use the data for official match validation and player development.

    Summary:
    A flexible and intelligent net post system that brings certified match tracking and professional analytics to any court.


    6. In/Out

    Origin: USA
    Portable and Affordable

    In/Out is a small, wireless line-calling solution designed for everyday players. It consists of two sensors: one attached to the net post and another placed near the baseline. The system connects to a mobile app and provides immediate line calls and replays.

    Highlights

    • Automatic line calls with high precision
    • Built-in touchscreen for reviewing shots
    • One to two hours of battery life
    • Cloud-based AI coaching and statistics
    • Data export options in CSV and JSON formats
    • Optional training drills and match streaming

    How It Works

    The sensors detect court lines and ball impacts, creating a virtual map of the playing area. Players can review footage on the device itself or in the app after play.

    Summary:
    In/Out offers accurate line calls and essential match data at an affordable price. It is ideal for players who want a lightweight and portable option that works anywhere.


    Final Thoughts

    Line-calling and smart-court systems have moved from the professional stage to everyday courts around the world. Hawk-Eye and FoxTenn continue to define accuracy at the elite level. Zenniz, Wingfield, and Baseline Vision bring those capabilities to clubs and training environments, while In/Out provides a practical, portable option for casual players.

    Among these, Baseline Vision stands out in 2025 for its balance of precision, portability, and accessibility. It gives players a professional-grade experience without the complexity or cost of larger systems.

    Smart technology is now a part of tennis at every level. Whether you compete on the tour, train at your local club, or just want a fair call on match night, there is now a solution that fits your game.

  • Udio Review (2025): The Best AI Music Maker?

    I tested the Udio AI Music Generator and will go over its main features, along with the pros and cons.

    I’ll also explain the usage rights for the music you create with it.

    Let’s get started!

    Disclaimer: This post contains affiliate links at no extra cost to you.

    How to Use It and My Experience

    Go to their website by clicking here.

    Then just sign up with your email or Google account to access the Free trial.

    I decided to go with this randomly generated username — it looked interesting enough.

    After signing up, you’ll be taken straight to the dashboard, ready to start creating.

    Making songs is based on text prompts — you just need a short description of the song and its style.

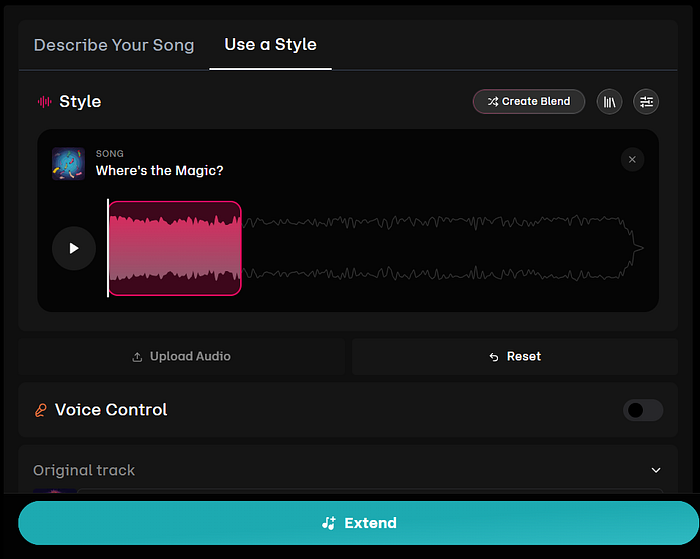
    You can also upload your own audio if you want.

    The song can be made with your own lyrics, no lyrics at all (instrumental), or you can let the AI write them for you.

    ChatGPT said:

    Open the Lyric Editor from the “Custom” menu to add your own lyrics.

    You can also use the “Write for me” option to let the AI create the lyrics, then edit them manually afterward.

    Most settings are locked behind paid plans, but you can still make some small changes with the free trial.

    The “Lyric Timing” option lets you control where the lyrics appear in the song.

    You can also adjust the track’s duration or set it to Auto.

    Other options, like Lyric and Prompt strength, let you decide how much they affect the final song.

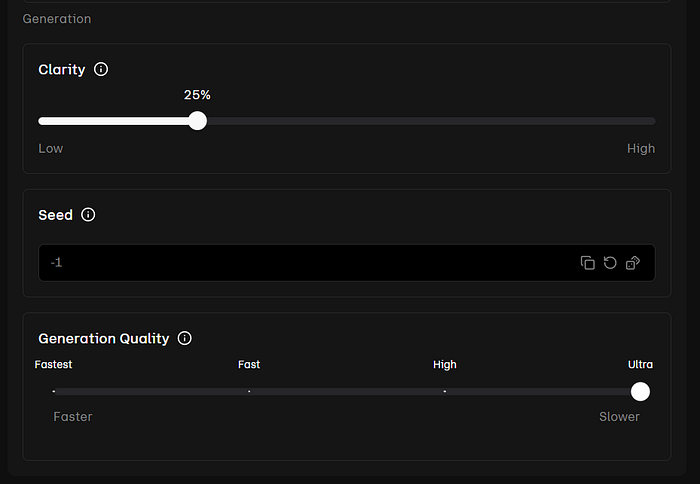
    Under “Advanced settings,” you can adjust Clarity, which controls how clearly the instruments are separated and how clean the audio sounds.

    You can also change the Seed, which is a number that influences the content and structure of the generated track.

    Here are the final results — two tracks from completely different genres, both fully made with AI.

    The first one is an 80s garage punk song with the prompt: “A song about socks disappearing in the wash, 80s, punk rock.”

    The second one is a hyperpop song about killing houseplants. Prompt: “A song about a houseplant that you killed, electronic pop, female vocals”.

    The lyrics are pretty simple and a bit vague, but that’s mostly because my prompts were too.

    The tracks came out catchy and matched the prompts well.

    You can listen to the sample tracks I made by clicking the links below.

    Pros

    • Easy to use
    • Free trial available
    • Commercial rights included with the paid plans
    • Songs can be generated with vocals

    Cons

    • The free plan is very limited
    • Tracks felt like they lacked personality
    • Information about commercial rights and ownership was hard to find

    Pricing

    Here are the current pricing plans of Udio.

    • Free: $0/month
    • Standard: $8/month
    • Pro: $24/month

    Usage Rights

    Content made with the Pro and Standard plans can be shared on social media and uploaded to platforms like Spotify.

    It just needs to be free of copyrighted material, and you must credit Udio.

    You fully own the music you create with Udio.

    To Take Home

    Udio AI is a tool that lets anyone create music using AI.

    Its goal is to make music creation simple and open more creative options for everyone.

    You can generate a song with just a short text prompt or a quick description of the style you want.

    You can also upload your own audio, add your own lyrics, or let the AI take care of everything.

    Once the track is ready, you can make small adjustments to fine-tune it.

    I think Udio works best for beginner and intermediate users.

    More advanced producers or musicians might find it a bit limited.

    Overall, it’s a straightforward and reliable tool for creating AI-generated music.

  • Mubert AI Music Generator Review 2025

    AI isn’t just about writing anymore; it has entered the music industry, too. You can now generate your own songs in seconds.

    I tested Mubert AI Music Generator and will show you some key features, as well as pros and cons. I’ll also disclose the usage rights for your generated music.

    Disclaimer: This post contains affiliate links at no extra cost to you.

    How to Use It and My Experience

    Here is how to get started with Mubert, it’s very easy. Go to their website and sign up using your email, Google, or Facebook account.

    I went with the Free plan, and my review will be based on that.

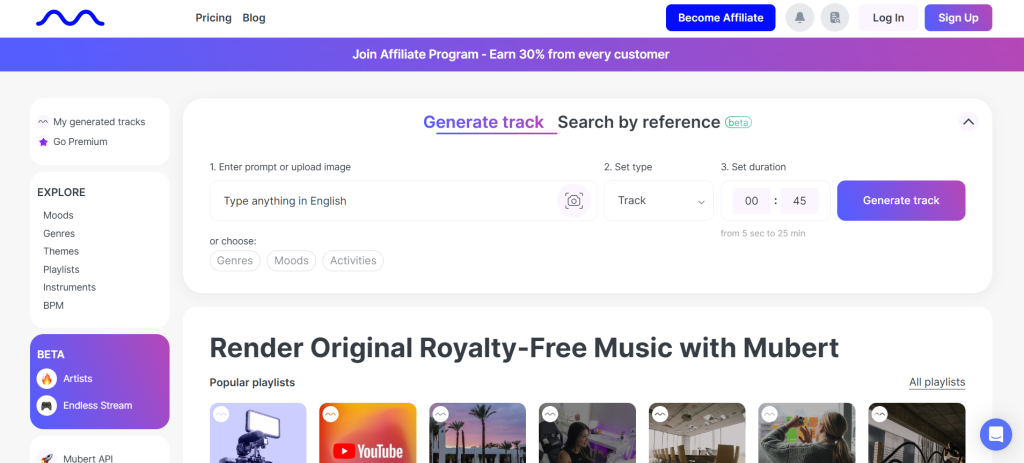
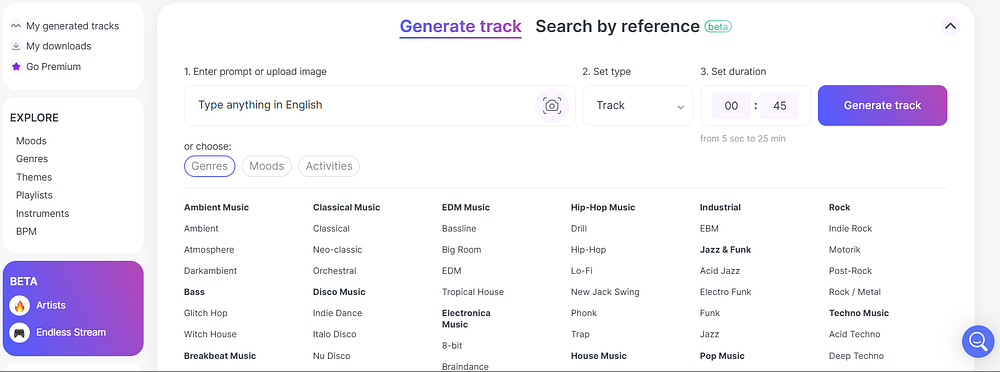
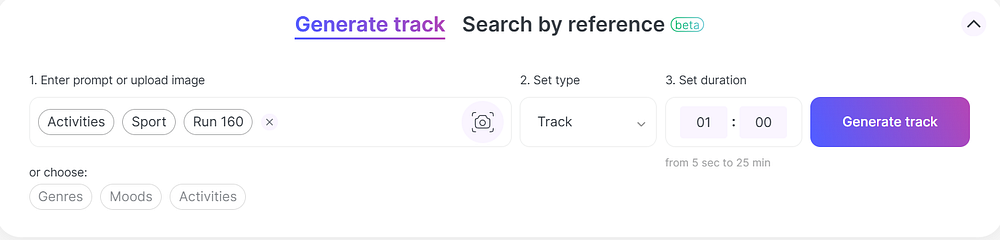
    This is the dashboard for generating music. The tool works on a text-to-music prompt principle. You can also create tracks by choosing the genre, mood, or activity the track is meant for.


    An interesting addition is the Image-to-Music feature, where you upload an image from your device. The tool analyzes the visual elements and turns them into musical parameters, for example, bright and bold colors might produce sharper sounds with a faster tempo.

    Mubert has four different generation modes under “Set type”. Track mode is the most native and the best for generating full-length songs and tracks, jingle mode generates a short, up to 40 seconds long tracks. Loop mode creates tracks that are looped and work for short-form social media posts. Mix mode allows creating long-form content.

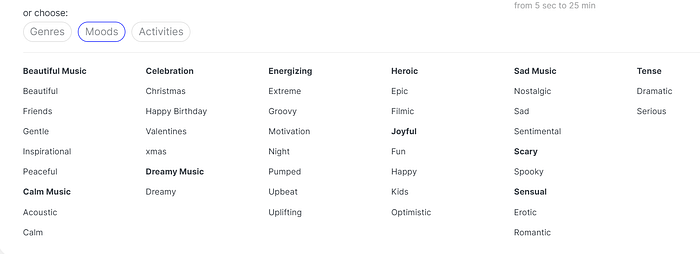
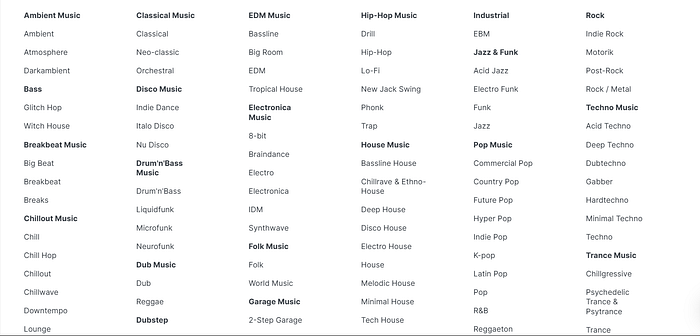
    Here are snippets of the Moods and Genres available for selection.

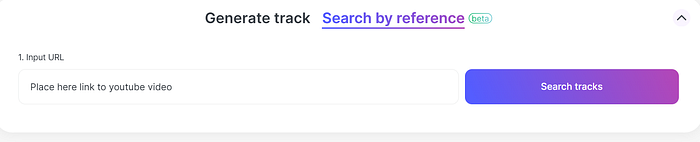
    The “Search by reference” feature allows you to insert a YouTube link of an existing song and find matching tracks from Mubert’s database. To me, this felt like copying at first, but what it actually does is analyze the musical elements of the linked song and then find AI-generated tracks with similar qualities from Mubert’s library.

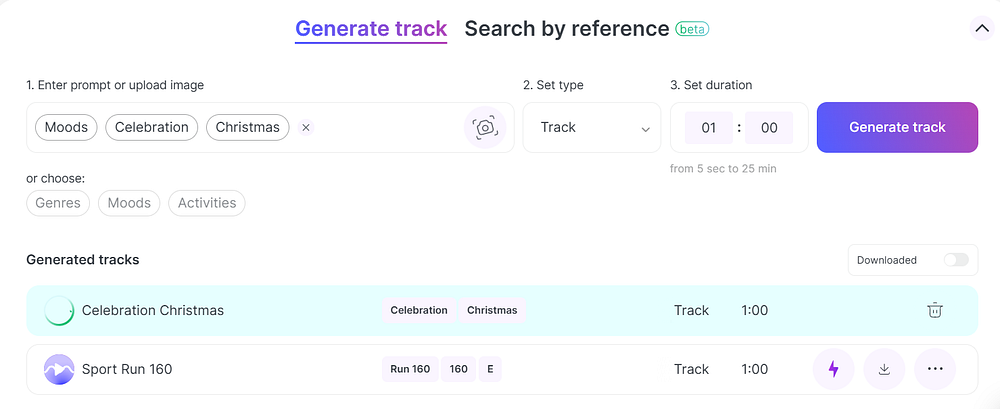
    Here are some example tracks I generated with Mubert.

    The first track is generated by choosing a mood “Run 160”. I set the duration to 1 minute, but apparently, you can generate a song up to 25 minutes long.

    The other one was created by picking an activity “Christmas”.

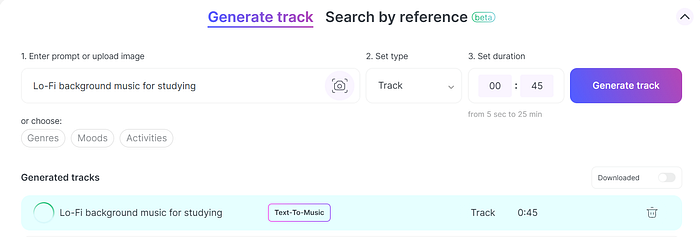
    Then I tried the text-to-music prompt and prompted “Lo-Fi background music for studying”.

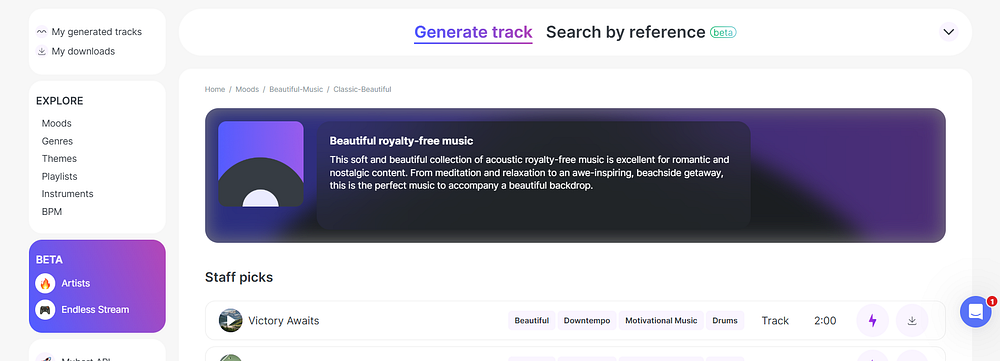
    If you don’t feel like creating music yourself, you can find tracks from Mubert’s library. Under the “Explore” menu, you can search tracks with different moods, genres, and whatnot.

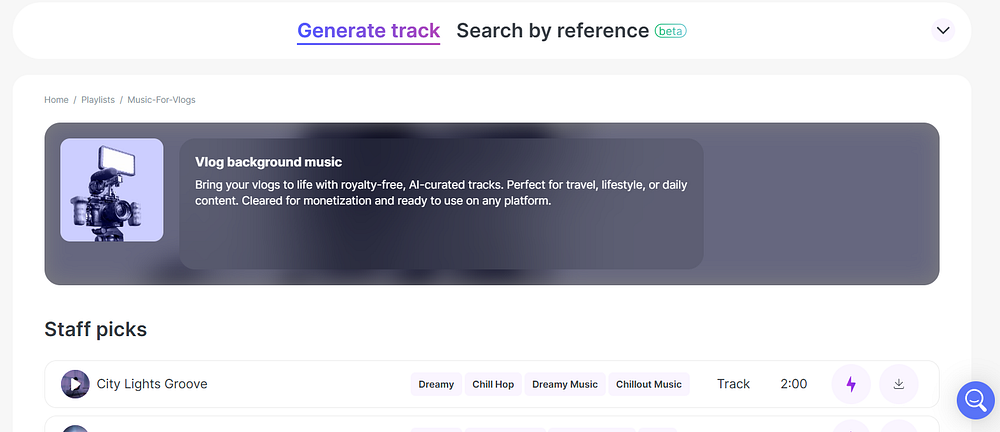
    You can also explore different playlists, like “Music for vlogs” here.

    With the Free plan, an audio watermark “Mubert” is added to the tracks. It’s quite distracting and makes the tracks created with the Free plan unusable for anything. The watermark should be removed upon downloading the track to your device.

    You have virtually no control over the composition of the tracks generated, other than genre and duration. There are no vocals, but the tracks work well as background music.

    Here is an example track I created, Lo-Fi background music for studying. It would be an okay track, but in the middle of it, there’s a very distracting noise.

    Pros

    • Easy to use
    • Large selection of moods and genres
    • Image-to-music is a fun feature
    • Good for background music

    Cons

    • Only instrumental, no vocals
    • Limited editing options
    • Audio watermark with the Free plan

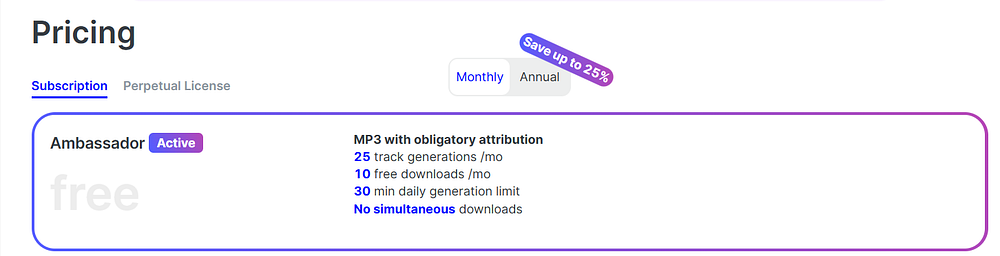
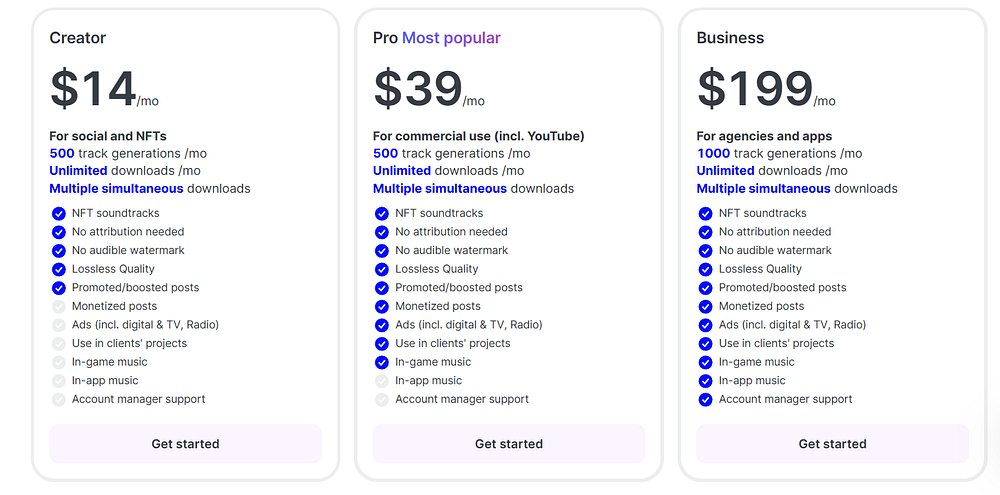
    Pricing

    Here are the current pricing plans of Mubert.

    • Ambassador: $0/month
    • Creator: $14/month
    • Pro: $39/month
    • Business: $199/month

    Usage Rights

    In short:

    With the free Ambassador plan, you can use generated music to your own personal, non-commercial purposes. You need to credit copyright to Mubert with link and a hashtag. The Creator plan allows you to use music for boosted content.

    For monetization and commercial use, you need to purchase the Pro plan. Content created with Mubert cannot be distributed to Spotify or other platforms.

    To Take Home

    Mubert is an AI-powered music generation platform. Mubert Render allows content creators to generate soundtracks that fit their content’s mood and audience. Mubert Studio and Mubert API are platforms for developers and artists and they come with more advanced settings and allow monetization of the generated products. My review is based on the free Ambassador plan of Mubert Render.

    Generating tracks with Mubert was very easy and relatively fast. Creation of tracks is either text-prompt or other description-based, or you can choose from an extensive list of genres, moods, and activities. The generated tracks, on the other hand, were mediocre at best. I didn’t have a chance to test out the paid plans of Mubert; maybe the experience is better with them.

    In my opinion, Mubert is an easy-to-use and basic tool for creating background music or just to play around with tracks.

  • Profile Bakery Review (2025): Affordable AI Headshots

    Profile Bakery Review (2025): Affordable AI Headshots

    I tried the Profile Bakery AI headshot generator to see if it’s worth your time and money.

    In this post, I’ll show what I got and give my honest thoughts on the tool.

    Disclaimer: This post has affiliate links at no cost to you.

    What is Profile Bakery?

    Profile Bakery is an online AI tool that turns your selfies into professional headshots you can use on LinkedIn or your resume.

    It saves you the time and hassle of hiring a photographer. You just pick 6–15 selfies that show you best, and the tool does the rest.

    If you want to tweak the headshots a bit, there’s even an editing feature built in.

    How to Use It

    To use Profile Bakery, go to their website and click on “Start now”.

    Upload your selfies and try to follow the photo guidelines the tool gives you.

    I really suggest picking your best selfies carefully, since they have a big impact on how accurate your headshots will be.

    Pick the style you want for your headshots.

    I chose the business style because I wanted headshots that would look good on LinkedIn or a resume.

    Pick a package based on whether you want a bigger set of headshots with more variety or a smaller set.

    You are also given the opportunity to make additional purchases here

    Your headshots are being created, and you’ll get an email when they’re ready.

    It usually takes about 30 minutes.

    My Results

    Here are some of the headshots I got!

    Overall, I ended up with some pretty good ones. I also liked that there was a lot of variation in poses and lighting.

    Some inaccurate or unflattering headshots that distorted my face were included, but this is the case with all AI tools. Just ignore those.

    This one was my favorite.

    It looks accurate and professional, perfect for a business setting like LinkedIn.

    My hair does look completely fried, though.

    Edits

    Profile Bakery has an AI editing feature that lets you make changes to your headshots.

    You can use prompts, change the background or clothing, or improve the image quality.

    I tried out a few of these features myself.

    Here, I wanted to change my outfit to something more professional.

    Next, I tried the “Face Improve” feature and uploaded one of my real selfies for reference.

    I wasn’t sure what to expect, but this definitely wasn’t it.

    I made a few text-prompt edits here, though my prompts were probably a bit too vague.

    The tool also has a “Quick Suggestions” option with ready-made prompts.

    I tested the edit on one of my real selfies.

    Pricing & Value for Money

    AI Mini — $24

    • 30 pictures, 4 styles
    • Delivery in 30 mins
    • Includes CV & cover letter tools, resume check, LinkedIn analysis, change clothes, career prompts

    AI Regular — $29

    • 60 pictures, 8 styles
    • Delivery in 30 mins
    • Same extras as Mini

    AI Pro — $49

    • 96 pictures, 12 styles
    • Delivery in 30 mins
    • Same extras as Mini & Regular

    You can also buy extra credits for editing, either with a one-time payment or through a monthly or yearly subscription.

    Pros

    • Fast turn-around time, even with the Mini plan
    • A lot of editing options
    • Mini and Regular are affordable

    Cons

    • The editing feature seems to affect image quality
    • The edits weren’t that great
    • Signing in and accessing your gallery again was somewhat difficult if you had signed off at some point

    My Final Verdict

    Profile Bakery works really fast, and it’s pretty affordable compared to other tools.

    It also has plenty of editing options if you’re not completely happy with some headshots and want to make small changes.

    I got some good headshots overall. The edits I tried weren’t great, though, and I probably wouldn’t use them.

    Rating: 3.9/5

  • Best AI LinkedIn Headshots? Magic Photos AI Review

    Best AI LinkedIn Headshots? Magic Photos AI Review

    I tried the Magic Photos AI headshot generator so you don’t have to.

    In this post, I’ll show my results and give my honest review of the tool!

    Disclaimer: This post has affiliate links at no cost to you.

    MagicPhotos in brief

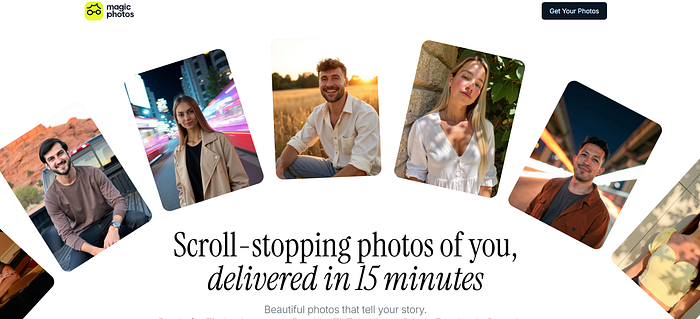
    MagicPhotos AI is a headshot generator that uses your selfies and turns them into high-quality headshots in different settings.

    It can do this in as little as 15 minutes.

    Unlike other tools I’ve tried, MagicPhotos focuses on more casual headshots.

    These are great for social media, dating apps, or even a relaxed resume.

    How to Use It

    I’ll show you how to use the tool first.

    Go to their website and login.

    Click on “Create a new photoshoot” and enter your info.

    Next, upload your selfies.

    The AI uses these to learn what you look like, so take a moment to pick your best ones!

    Follow these requirements to get the best headshots.

    Next, choose your pricing plan.

    This decides how many headshots and styles you’ll get.

    After uploading your selfies, it’s time to pick the background styles for your headshots.

    The list is long and covers a lot of options.

    And you’re all set!

    I picked “The Fire” plan, and it generated my headshots in about 15 minutes.

    I barely had time to get up and grab a cup of coffee.

    My Results

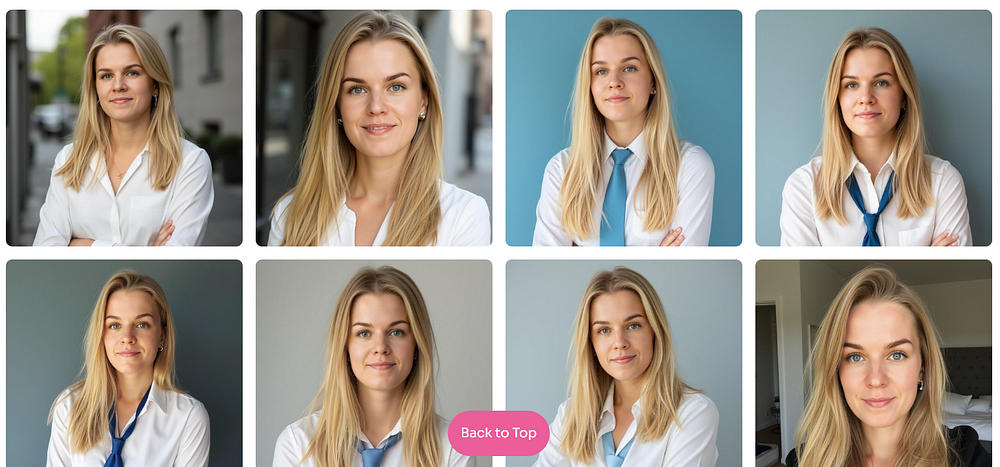
    Okay, here are the results I got.

    I tried picking very different background settings and lighting, just to see how they would turn out.

    The watermark will be removed from the images upon downloading!

    I have to say… I’m impressed!

    These look really natural, even with different poses and lighting.

    Some of them even look like real photos of me.

    The tool captures my facial expressions and even small details, like stray baby hairs.

    Especially the Alps one—I’m pretty sure my family wouldn’t be able to tell if it’s AI-generated or a real photo.

    The problem with these backgrounds is… I can’t really post a picture of myself skiing in the Alps when I’ve never been there.

    Still, I really like these!

    And, as always, you’re not going to love every headshot.

    Just ignore the weird-looking ones, like these.

    Edits

    MagicPhotos also has an editing feature.

    It can generate a new headshot based on your instructions.

    For example, I really like the picture below, but I want to change the outfit since the current one isn’t something I’d wear.

    Just click “Edit” icon.

    And here are the results.

    Not too bad! The edit looks pretty smooth and didn’t seem to hurt the image quality.

    On a side note, I personally don’t like the clothing styles these AI tools offer, and I wouldn’t wear them in real life.

    Still, having the option to change the outfit is a nice bonus!

    Besides changing outfits and fixing blemishes or other imperfections, you can also change the background.

    Here, I tried turning the original urban city setting into a daylit room.

    The result looks pretty good! The headshots didn’t change much, and the quality stayed intact.

    I’m trying to stay objective, even though I really dislike the outfit.

    Pricing & Value for Money

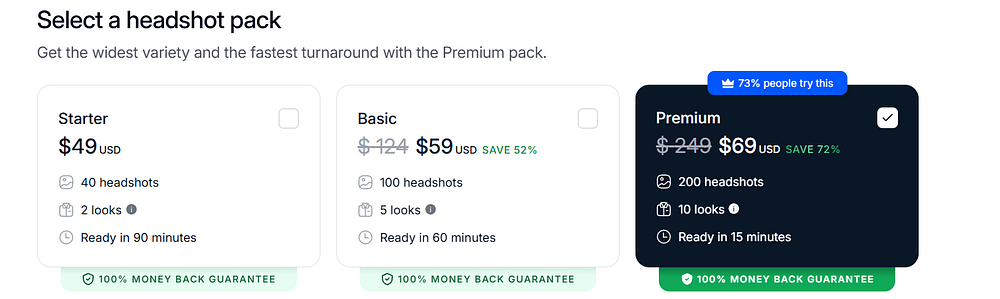
    Here are the current pricing plans for MagicPhotos.

    Each plan comes with a money-back guarantee if you’re not happy with your headshots.

    • The Spark — $49
    • 40 HD photos
    • 2 styles
    • Ready in 90 minutes
    • The Flame — $59
    • 100 HD photos
    • 5 styles
    • Ready in 60 minutes
    • The Fire — $69
    • 200 HD photos
    • 10 styles
    • Ready in 15 minutes

    Pros

    • Very accurate, good-looking headshots
    • Different poses and lighting
    • Lots of background styles to choose from
    • Customization feature
    • Fast turnaround—about 15 minutes

    Cons

    • More expensive than some other tools
    • Editing feature is a bit limited; a human edit option would be nice

    My Final Verdict

    MagicPhotos is a really high-quality tool for making a set of headshots.

    My headshots turned out great and almost look like real photos of me.

    The tool also has an edit feature if you want to change your outfit or the background.

    Honestly, I think this is one of the best tools I’ve tried so far!

    Rating: 4.4/5

  • GoStudio Review (2025): The Best AI LinkedIn Headshots?

    GoStudio Review (2025): The Best AI LinkedIn Headshots?

    I tried out the GoStudio AI headshot generator so you don’t have to.

    In this post, I’ll share what I think and show you the results.

    Disclaimer: This post has affiliate links at no cost to you.

    GoStudio AI in brief

    It’s an AI headshot generator that turns your selfies into professional-looking headshots.

    No need to hire a photographer or schedule an appointment.

    You can tweak your headshots with the AI edit feature, or just use them as they are for LinkedIn or other professional stuff.

    And you can do all of this from home. Pretty convenient, right?

    How to Use It

    To use this tool, first, go to their website and sign up.

    Click on “Get your headshots now.”

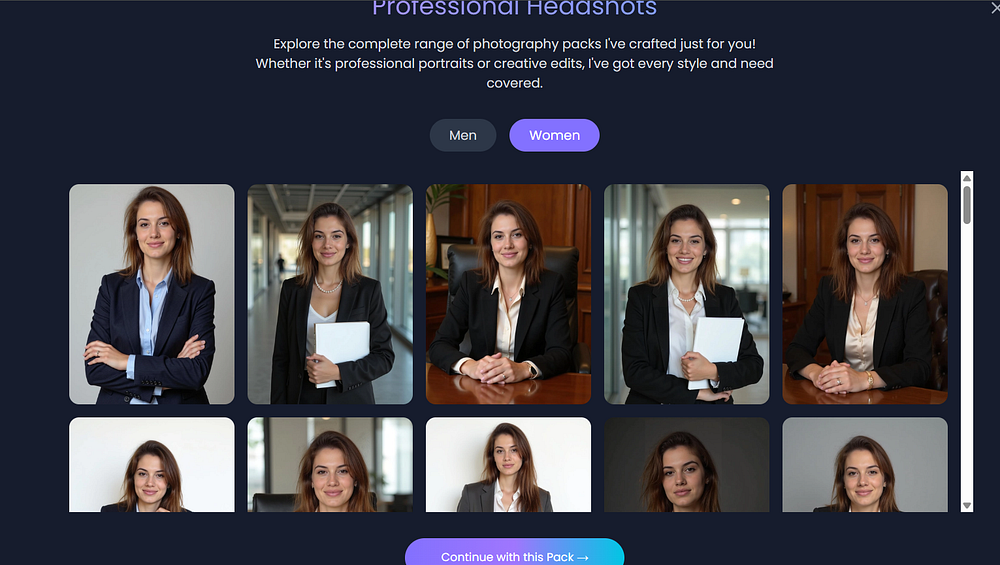
    I picked the “Professional Headshots” pack because I wanted headshots that would work for LinkedIn or other business settings.

    Choose the gender you want for your headshots.

    Next, upload your selfies.

    Follow the instructions carefully.

    I recommend taking a moment to pick your best selfies, since they’ll affect how good your headshots look.

    Review of the Results

    Here are my results!

    I think they look good, even though the AI made me a brunette.

    The face looks really accurate.

    I also like the power pose.

    These look really realistic and capture my facial expressions well.

    The full-body images below are spot on, even though I didn’t upload any full-body selfies.

    The results include a mix of body types.

    Unlike some tools, these don’t look over-polished.

    Next, I’ll show you what happens when I change my hair to blonde using the edit feature.

    Like with any AI generator, some images might look off or a bit uncanny.

    Your face could look distorted or not like you at all.

    Just ignore those.

    Edits

    GoStudio AI also has an AI image editor and an AI image generator.

    With 5 credits, you can create new images from a text prompt.

    This image was made from my prompt.

    Pretty good!

    The hair looks right—I asked for “blonde, shoulder-length hair.”

    Here, I wanted to change my black outfit to a white blouse.

    Not too bad, I’d say!

    Everything else in the image stayed the same, which is great.

    Pricing

    Here are the current pricing plans.

    They have one monthly subscription (the Basic plan) and two one-time payment options.

    The Pro plan is best if you want a set of high-quality headshots.

    • Basic ($19/Monthly subscription): 20+ headshots, 45-min processing, 1 pack, 10 poses. Renews every month.
    • Pro ($24 One-Time Payment): 30 headshots, 15-min processing, 20+ poses and backgrounds.
    • Custom ($49 One-Time Payment): 2-day delivery, custom brand look, human editor.

    Pros

    • The AI edit feature actually works.
    • The images are very accurate, especially the face.
    • Good variety in the headshots. Some show my hair up, behind my ears, different lengths, etc.
    • Fast turnaround time.
    • Affordable, with several pricing options—from one-time payments to a monthly subscription.

    Cons

    • Some images came out grainy.
    • The UI could be better. The edit feature was a little confusing at first.

    My take

    I was really impressed by how accurate the headshots were.

    I also liked the full-body images, even though it felt like the AI was just guessing since I didn’t upload any full-body selfies.

    Either way, I got some that I liked!

    The pricing is pretty reasonable compared to other tools.

    There’s also an AI edit feature and an AI image generator, which worked well.

    With other tools, edited headshots often come out bad or unusable, but mine turned out good here.

    Some headshots were low quality and a bit grainy, but overall, it was a good experience!

    Rating: 4.1/5

  • PhotoPacks AI Review (2025): My Results

    PhotoPacks AI Review (2025): My Results

    I tried out the Photopacks AI headshot generator, and in this post, I’ll give you my honest review to save you time and money.

    Let’s dive in!

    How to Use it

    Using PhotoPacks AI is simple. Let’s go through the steps.

    Go to their website and sign up.

    Pick the Headshot Package and buy it.

    Now you’re set to choose your desired styles and set your characteristics, like preferred gender.

    I went with the Headshot package.

    Now for the most important step—uploading your selfies.

    These photos decide how good and accurate your headshots will be, so it’s worth taking the time to pick the best ones.

    Guidelines for good selfies
    The tool even scores your selfie quality

    The tool will email you once your headshots are ready.

    You can close the tab and come back later.

    For me, it took about 3 hours.

    During busy times, it might take longer depending on the queue.

    My Results

    Here are my results.

    Overall, I like how natural they look.

    The AI made my hair look full and nice, and the lighting is very flattering.

    These are my favorites!

    I prefer the headshots that look the most accurate, not the ones that just make me look extra polished.

    As always, some headshots will look a bit off or have that uncanny valley vibe.

    Just ignore those!

    Pricing

    The Headshot package costs $24 and gives you over 100 headshots with 20 different background and outfit styles.

    The tool also offers a money-back guarantee if you’re not happy with your headshots.

    ChatGPT said:

    Pros

    • Headshots don’t look too artificial
    • Flattering lighting with a nice variety
    • Got some really good and accurate shots I’d use on social media
    • Easy to use
    • Affordable compared to other tools

    Cons

    • No customization options
    • Can take up to 24 hours to generate headshots (though usually faster, some tools are quicker)

    My Verdict

    PhotoPacks AI gave me good-looking, accurate headshots in about 3 hours for a fair price.

    It doesn’t have editing or customization features, but my favorite shots were already good as they were.

    Having the option to change backgrounds or outfits would be a nice addition.

    Using AI to generate your professional headshots definitely saves the time and hassle of booking a real photoshoot.

  • InstaHeadshots Review (2025): Best AI Profile Picture Generator?

    InstaHeadshots Review (2025): Best AI Profile Picture Generator?

    I tried out the InstaHeadShots AI headshot generator to see if it’s worth your time and money.

    In this post, I’ll show you my results, what using it was like, the pros and cons, and more.

    Disclaimer: This post has affiliate links at no cost to you.

    InstaHeadShots in brief

    InstaHeadShots is an AI tool that turns your selfies into professional-looking headshots.

    It saves you the time and hassle of hiring a photographer or booking a studio.

    You can pick from different styles and backgrounds to fit your personal or professional look.

    In about an hour, your new headshots are ready to use on LinkedIn, social media, or anywhere else you need them.

    How to Use It

    Let’s go through how to use InstaHeadshots to create your AI headshots.

    Create an account (I used my Google account) and start your profile by answering a few questions.

    Next comes the most important step—picking your selfies.

    Take some time to choose the best ones that really show who you are.

    These will decide how good and accurate your headshots turn out.

    Here are the photo requirements to help you pick the best selfies.

    After uploading your selfies, start a new photoshoot.

    With the Premium plan, you can choose up to 10 different looks.

    The turnaround time depends on your plan.

    With the Premium plan, it can be as fast as 15 minutes!

    You’ll get an email when your headshots are ready.

    Results, Quality & Accuracy of Headshots

    Here are my results!

    I got 200 headshots in total, with 10 different looks.

    At first glance, they look pretty accurate.

    There are a few misses, of course, but that’s normal with any AI tool.

    This one’s my favorite, even though the outfit is pretty casual.

    The earring on my right ear looks a little off, but it’s barely noticeable.

    Is this a real picture of me or AI generated?

    Here’s another one I really like, with a more professional outfit.

    The images will have a watermark until you decide to download them.

    I mentioned the misses earlier—here are some good examples.

    My face looks a bit too polished and obviously AI-generated.

    The AI didn’t capture my smile with teeth very well.

    To be fair, I only gave it one selfie with my teeth showing.

    Edits

    InstaHeadShots also has an editing feature for your images, using credits you can buy separately.

    You can change the outfit, background, or do touch-ups on your pictures.

    I tested it by changing my outfit in this one.

    And here’s the result.

    It looks a bit unnatural to me, so I prefer the original image.

    InstaHeadShots also lets you upscale your images to higher quality for an extra fee.

    Pricing & Value for Money

    Even though it’s cheaper than hiring a professional photographer, InstaHeadShots is still a bit pricey in my opinion.

    The Premium plan gives the best value since the other plans only offer 2 to 5 looks, and the editing options are limited.

    Payment is one-time only—no subscription needed.

    You can also buy extra credits if you want to do more edits.

    If you’re not happy with your results, InstaHeadShots offers a 100% money-back guarantee.

    Pros

    • One of the fastest turnaround times
    • Easy to use
    • I got some good and accurate headshots

    Cons

    • Most headshots looked a bit too artificial
    • Editing options aren’t great (I only tried one edit though)
    • A bit expensive

    Is It Worth It?

    InstaHeadShots is a fast and easy-to-use AI headshot generator that turns your selfies into quality headshots in as little as 15 minutes.

    Depending on your plan, you get a set number of headshots and can pick your favorites.

    I got some images I’d actually use for social media, but many weren’t usable.

    A lot of the headshots also looked very AI-generated.

    With the limited editing options, I think the tool is a bit pricey.

    Rating: 3.8/5

  • Aragon AI Review (2025): The Best AI Headshots?

    Aragon AI Review (2025): The Best AI Headshots?

    I tried Aragon AI for creating headshots to save you time and money.

    In this post, I’ll share my results and let you know if it’s the best AI headshot generator out there.

    Let’s dive in.

    Disclaimer: This article has affiliate links at no cost to you.

    👉 Check the updated list of the best AI headshot generators here.

    My results

    Aragon AI takes your selfies and regular photos and turns them into professional headshots.

    Here are a few real images I uploaded to the service:

    Here are the headshots Aragon AI generated for me:

    I’ve got to be honest, these aren’t the best AI headshots I’ve seen. The poses look off, and they don’t quite look like me—kind of uncanny.

    That said, there are still a few that are pretty close.

    For example, this one turned out to be one of the best results:

    Unfortunately, it still looks a bit tired and bored. It does resemble me, but something feels a bit off.

    Here’s another one where I’ve done a side-by-side comparison of how I look in real life vs. what the AI made:

    Here’s another one:

    And here’s one more:

    We’re definitely close. These results would’ve been amazing back in 2022 or 2021, but now, they still feel a bit too AI for me. The images do look like me, but there’s this uncanny, artificial vibe that I can’t ignore.

    Maybe if I used these on LinkedIn, it wouldn’t matter much since people mostly see a tiny icon of the headshot.

    One of the biggest issues with Aragon headshots is the weird hand gestures I sometimes get. Take this one, for example—it’s so awkward, it looks like I’m flipping someone off:

    Also, if you look closely, the expression on my face is pretty intense. But again, this is a small detail—and it’s the main issue with tools like this.

    The AI just isn’t quite there yet to make an image that looks exactly like you. At least not with Aragon AI.


    Try BetterPic: The Best Aragon Alternative

    Since I’m not a fan of the headshots from Aragon, I’ve got to suggest something else.

    First, you can check out the official list of the best AI headshot generators here.

    I’ve spent over $2,700 testing all these AI headshot generators, so you don’t have to.

    My top pick for the best AI headshot generator is BetterPic.

    BetterPic creates crisp, super-realistic images with lifelike skin, teeth, and eyes.

    Here are some before-and-after AI headshots I got from BetterPic:

    The first one is my LinkedIn profile picture when I wrote this post.

    Also, BetterPic lets you make human edits to your images. You just pick an image, request changes, and a professional photo editor will handle the rest.

    This way, you’ll get at least one perfect image of yourself with all the edits done. I’ve used this feature to remove a necklace from one of my photos.

    Here’s the original headshot:

    And here’s the edited one:

    As you can see, the necklace is gone—perfectly!

    This is something Aragon AI just can’t do. Even though it offers some basic edits, BetterPic clearly beats it in this area.

    Speaking of edits, BetterPic also offers AI-powered edits, in addition to the human editing feature.

    For example, here I created a bunch of images of myself in the same spot but with different outfits.

    Pretty cool, right? The AI changed my clothes, but everything else stayed almost exactly the same.

    Here are the editing options in BetterPic:

    Pretty cool, right? You can let the AI fix bad images or even improve the ones you already have.

    👉 Try BetterPic


    How to Use Aragon AI

    If you still want to give Aragon AI a try, let me show you how to use it.

    First, go to this page. Click on “Create your headshots now” and sign up for the service.

    Next, choose your age, gender, eye color, hair color, and ethnicity:

    Then, choose a style you want your images to have.

    Next comes the trickiest part—you’ll need to upload your images so the AI knows what you look like. Be sure to read the instructions carefully.

    Make sure your photos are clear and that you’re keeping a neutral expression—no funny faces. Avoid using a bunch of similar shots taken all at once. Once you’re ready, just drag and drop your images into the box.

    Confirm your details one last time and hit “Submit.” Then, just sit back and wait for the AI to process your photos.

    This usually takes about 20–40 minutes.

    Once the images are ready, you’ll get an email like this:

    Click the link to view your pictures and enjoy.

    Keep in mind, you can make some basic edits to your photos in Aragon. If something’s off, you can try adjusting it with those editing options. You can change the background, remove artifacts, upload a new background, and more.

    However, after testing it, nothing happens when I click the “Edit” button…

    But honestly, BetterPic is way better than Aragon AI.

    Aragon might’ve been one of the first to enter the market, but it’s far from being one of the top tools now. Not even close, to be honest!

    Pricing

    • Starter: $35 for 20 headshots
    • Basic: $45 for 60 headshots
    • Premium: $75 for 100 headshots

    👉 Try Aragon AI— get 10% off with code ARTTURI


    Pros

    • Fast turnaround: It took only about 30 minutes to get my AI headshots, while most other tools take 1–3 hours. If you need photos quickly, this is a big plus.
    • Impressive realism: Most of the headshots looked surprisingly real and professional. A few weren’t perfect, but most were lifelike and polished.
    • Built-in AI editing: You can make quick adjustments, like fixing stray hairs or lighting issues, without starting over. It’s an easy way to fine-tune your headshots.
    • More affordable than hiring a photographer: Compared to booking a professional session, this is much cheaper. You get edited photos in under an hour at a fraction of the cost.

    Cons

    • Slightly artificial feel: Some images have a bit of an artificial look, like overly smooth skin or vacant expressions, which might be distracting if you want totally natural photos.
    • Pricey: At $30 or more for a set of headshots, it’s not the cheapest option. If you’re on a budget or only need one photo, it might feel a bit expensive.
    • Other tools may be better: While Aragon is one of the better AI tools, there are other services that offer similar or better results for the same price. It’s worth comparing.

    To take home

    Aragon AI is a solid AI headshot generator.

    It’s quick, easy to use, and offers a good range of polished styles without the need for a studio or makeup artist.

    I wouldn’t have thought this kind of tech would be available so soon back in 2020 or 2021.

    That said, Aragon AI isn’t perfect. It’s definitely not the top AI headshot tool out there.

    While it’s fast and simple, Aragon sometimes misses on facial details — like odd smiles, mismatched hair, or small artifacts. Plus, their refund policy hasn’t gotten great reviews based on what I’ve seen.

    In comparison, BetterPic gives sharper results with a more accurate likeness and clearer features. They also offer a human editor to finalize your images!

    That personal touch really makes a difference when you want perfect results.

    So, while Aragon is great for fast, decent headshots, BetterPic is the better choice for top-quality images, and it’s not that much more expensive!


  • The Best AI Video Enhancer of 2025

    The Best AI Video Enhancer of 2025

    I’ve tested a lot of AI video enhancers to save you time and money.

    In this post, I’ll share my favorite: Aiarty Video Enhancer.

    It’s a downloadable software with an affordable pricing model, but it delivers great results.

    Let me show you my results and explain how it works.

    👉 Try Aiarty AI Video Enhancer Free

    Disclaimer: This article has affiliate links at no cost to you.

    My Results & Experience

    Aiarty Video Enhancer is perfect for adding sharpness and removing noise from your videos.

    Here’s a video I shot at midnight during a thunderstorm:

    Please, pay attention to the sky.

    In the first clip, it’s really grainy.

    In the second one, it’s way less grainy.

    Isn’t that handy? The AI did all this for me with just a couple of clicks.

    Before I show you more results, let me quickly show you how to use Aiarty Video Enhancer to improve your videos.

    How to Use Aiarty Video Enhancer

    To start, download the Aiarty video enhancer software here. You can try it for free!

    👉 Try Aiarty AI Video Enhancer Free

    Once you’ve downloaded the software, open it up.

    You’ll see a screen like this:

    This is where all the magic happens.

    Just drag and drop your videos into the view, then start enhancing them using the different models on the right.

    For example, I dropped a video where I’m throwing a disc golf disc.

    At this stage, the video enhancement hasn’t started yet!

    Instead, it creates a preview of the current frame with the selected model, showing what the video will look like once you apply this setup.

    This is really helpful because video enhancement takes a while. You don’t want to wait 30 minutes only to realize you used the wrong settings.

    Speaking of enhancements, be sure to adjust the settings on the right-hand side.

    For example, the default upscaling factor is set to 2X. This means it will double the size of the video while keeping the quality intact.

    For example, with the settings above, the preview looks like this:

    That’s handy! Now I can adjust the settings to see if it can improve even more.

    For example, I selected a 4X upscaling factor, which means it will make the video much sharper and higher in quality.

    But here’s what the preview looked like:

    That’s just a bit too much in this example, so I’ll stick with 2X for now.

    It really depends on the type of video you’re working with. For videos with people, the upscaling factor should probably stay low, like 1X or 2X. But for videos with scenery and no people, 4X might be just fine to get much sharper results.

    However, the upscaling factor isn’t the only thing you should adjust.

    Remember, there are three video enhancement models in this tool.

    You’ll find them on the right-hand side as well.

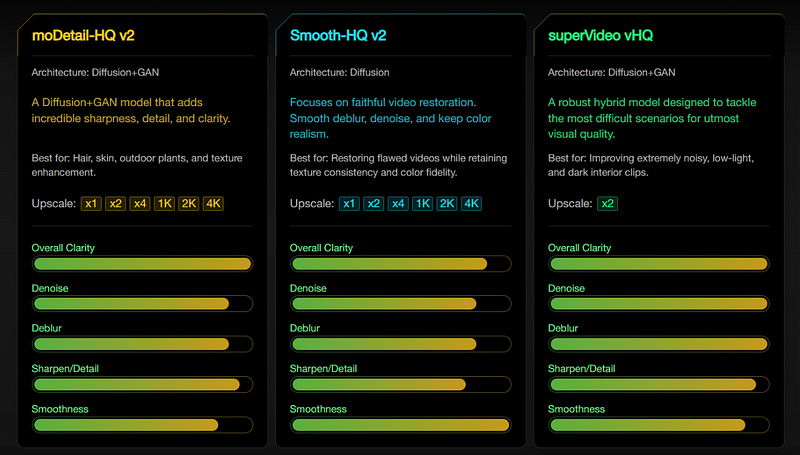
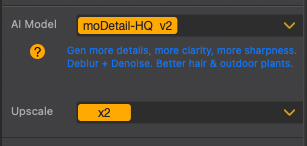
    Here are the explanations for these models:

    If you can’t see the image, here’s a table that summarizes the models:

    ModelArchitectureDescriptionBest ForUpscale Options
    moDetail-HQ v2Diffusion + GANAdds incredible sharpness, detail, and clarity.Hair, skin, outdoor plants, texture enhancement.x1, x2, x4, 1K, 2K, 4K
    Smooth-HQ v2DiffusionFocuses on faithful video restoration. Smooth deblur, denoise, and keep color realism.Restoring flawed videos while retaining texture consistency and color fidelity.x1, x2, x4, 1K, 2K, 4K
    superVideo vHQDiffusion + GANA robust hybrid model designed to tackle the most difficult scenarios for utmost visual quality.Extremely noisy, low-light, and dark interior clips.x2

    However, these are just words and numbers to me.

    Let me show you some before-and-after footage to demonstrate what they actually do.

    👉 Try Aiarty AI Video Enhancer Free

    Before vs. After Footage

    First, I adjusted my settings on the right to look like this:

    Here’s the moDetail-HQ v2 model:

    Here’s the Smooth HQ v2 model with 2x upscaling:

    And here’s the SuperVideo vHQ model with 2x upscaling:

    Pretty cool, right?

    (I’ll show you the video clips in just a second, don’t worry!)

    In each shot, you can clearly see the difference in video quality—especially when you zoom in closer.

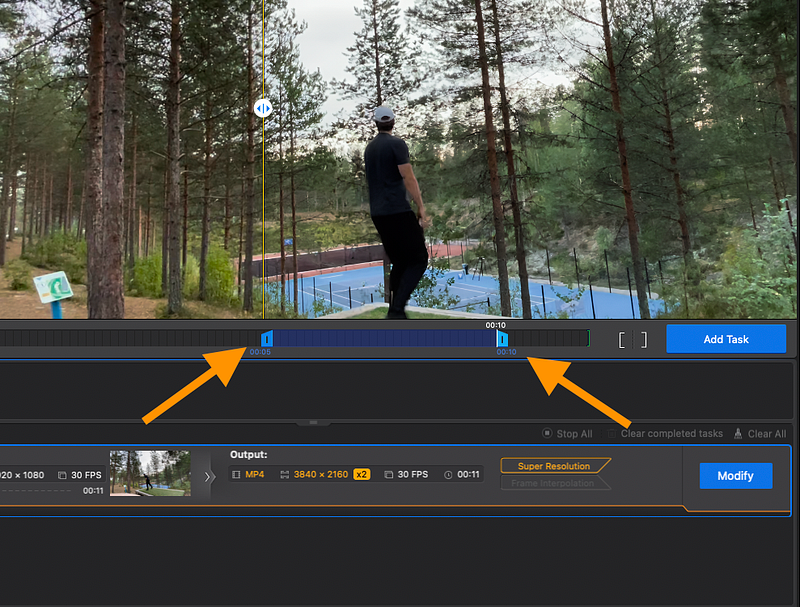
    Once you’re happy with the preview, select the time range (unless you want to enhance the whole video).

    Just drag the sliders to find the clip you want to enhance.

    If you set the range, don’t forget to click the “Add Task” button.

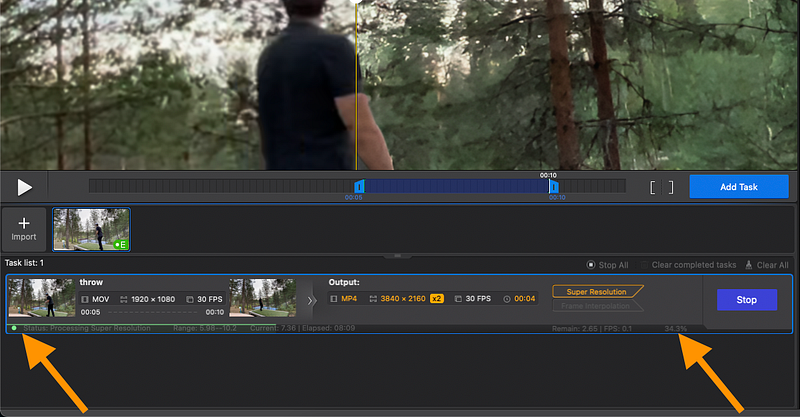
    Then click “Export Current.” This will start the actual video processing.

    At first, I was a bit confused since nothing seemed to happen, but then I noticed the status bar at the bottom of the view—it’s small but there.

    Keep in mind, this process takes some time. Even for my 4-second clip, I had to wait 10–15 minutes for the AI to create the enhanced version.

    If you’re short on time, you can use Turbo mode to speed things up, though it sacrifices some quality.

    So far, I’ve just shown you some screenshots. Let me now show you a quick clip of these different models in action on the actual video. This should give you a better idea of how it works:

    In this video, you’ll see all three AI enhancer models in action with different zoom levels.

    As you can tell, it’s not anything wild. But it definitely improves the video quality, especially when you zoom in.

    This screenshot sums it up perfectly:

    It’s better, but not perfect, as you’d expect.

    In addition to this one video, I enhanced a few stock videos to showcase the capabilities in different shots.

    For example, here’s a video of a fireworks display in its original format compared to the enhanced version using the Aiarty AI video enhancer models:

    Since it’s a nighttime video, you can spot some graininess and noise in the original clip. But the enhanced version clears up most of that.

    Here’s another clip where you can clearly see how much the AI improves the video quality:

    In this clip, the original quality is about 7/10. After enhancement, I’d rate it around 8.5/10, so it definitely improved. I used the superVideo vHQ model on a clip I found online.

    And just in case you missed it earlier, here’s the midnight thunderstorm clip too:

    It’s still not perfect, but the improvement after AI enhancement is noticeable.

    I really like it! The tool is easy to use, offers a variety of models for different video types, and the results are great.

    👉 Try Aiarty AI Video Enhancer Free


    Pros

    • Great results! The tool significantly improved my video quality and sharpness.
    • Different upscaling and enhancement models for various video types.
    • Easy to use, even for beginners—just download, activate your key, and add your videos for enhancement.
    • There’s a free trial version.

    Cons

    • After enhancing 3 videos, the tool crashed, and I had to reopen it to process more.
    • Too much upscaling can mess up the quality, especially with faces.
    • Slow! Enhancing a 10-second clip can take up to 15 minutes. This isn’t just an issue with Aiarty, but with the technology itself.

    Pricing

    This table summarizes the pricing for Aiarty AI Video Enhancer:

    FeatureStandard LicenseLifetime License
    Pricing$79/year (was $99)$165 one-time (was $235)
    BillingBilled yearlyOne-time fee
    Devices1 Mac3 Macs
    UpdatesFree unlimited updates for 1 yearFree unlimited updates for life
    Money-Back Guarantee30-day30-day
    Support24/7 dedicated email support24/7 dedicated email support
    AI Noise Reduction & Deblurring✔️✔️
    Restore & Enhance Details✔️✔️
    Batch Upscale to 4K & Boost to 120 fps✔️✔️
    Latest AI Models (Local Processing)✔️✔️
    Continuous AI Updates✔️✔️
    Built on Cutting-Edge AI Tech & Models✔️✔️
    Optimized for NVIDIA, Intel & AMD GPUs✔️✔️
    Free GiftAI Image Enhancer 1-Year License

    👉 Try Aiarty AI Video Enhancer Free


    To Take Home

    Aiarty AI Video Enhancer can really boost the quality and clarity of your videos.

    It’s my favorite tool because it’s easy to use, delivers solid results, and is reasonably priced.

    Just keep in mind, though, that this technology has its limits.

    If a video is bad from the start, no software can fully fix it.

    Think of tools like this as the icing on the cake: if your video is already a 7 out of 10, Aiarty might bring it up to an 8 or even 8.5. But you won’t turn a 3 into a 9.

    So, set your expectations accordingly!

    👉 Try Aiarty AI Video Enhancer Free