AI isn’t just about writing anymore; it has entered the music industry, too. You can now generate your own songs in seconds.
I tested Mubert AI Music Generator and will show you some key features, as well as pros and cons. I’ll also disclose the usage rights for your generated music.
Disclaimer: This post contains affiliate links at no extra cost to you.
How to Use It and My Experience
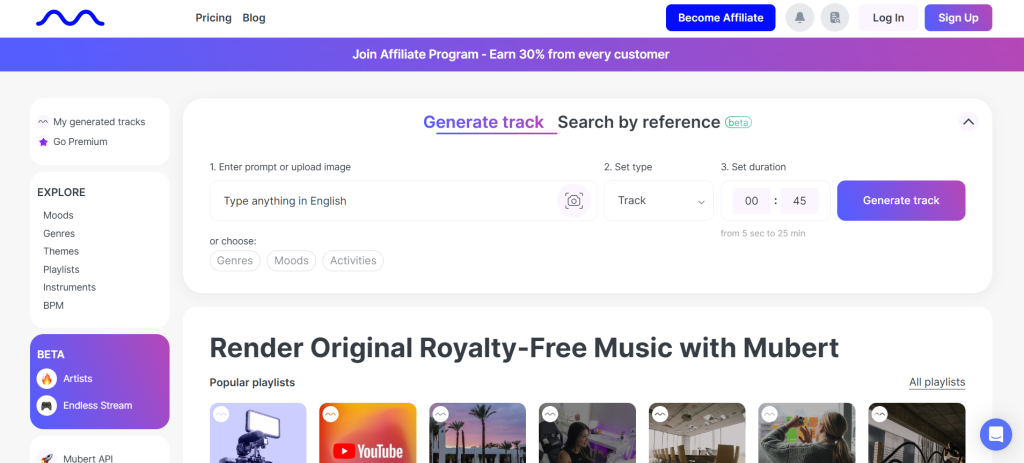
Here is how to get started with Mubert, it’s very easy. Go to their website and sign up using your email, Google, or Facebook account.
I went with the Free plan, and my review will be based on that.
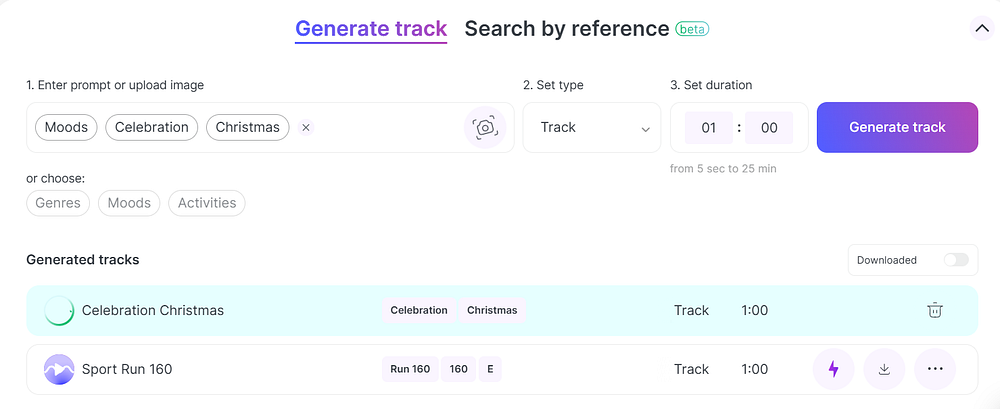
This is the dashboard for generating music. The tool works on a text-to-music prompt principle. You can also create tracks by choosing the genre, mood, or activity the track is meant for.
An interesting addition is the Image-to-Music feature, where you upload an image from your device. The tool analyzes the visual elements and turns them into musical parameters, for example, bright and bold colors might produce sharper sounds with a faster tempo.
Mubert has four different generation modes under “Set type”. Track mode is the most native and the best for generating full-length songs and tracks, jingle mode generates a short, up to 40 seconds long tracks. Loop mode creates tracks that are looped and work for short-form social media posts. Mix mode allows creating long-form content.
Here are snippets of the Moods and Genres available for selection.
The “Search by reference” feature allows you to insert a YouTube link of an existing song and find matching tracks from Mubert’s database. To me, this felt like copying at first, but what it actually does is analyze the musical elements of the linked song and then find AI-generated tracks with similar qualities from Mubert’s library.
Here are some example tracks I generated with Mubert.
The first track is generated by choosing a mood “Run 160”. I set the duration to 1 minute, but apparently, you can generate a song up to 25 minutes long.
The other one was created by picking an activity “Christmas”.
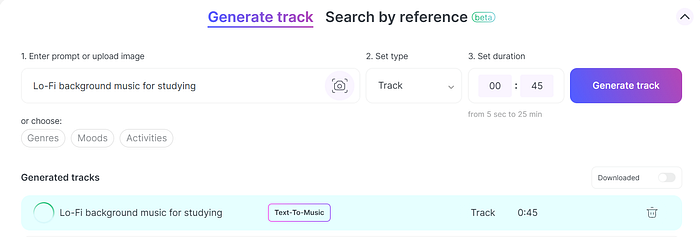
Then I tried the text-to-music prompt and prompted “Lo-Fi background music for studying”.
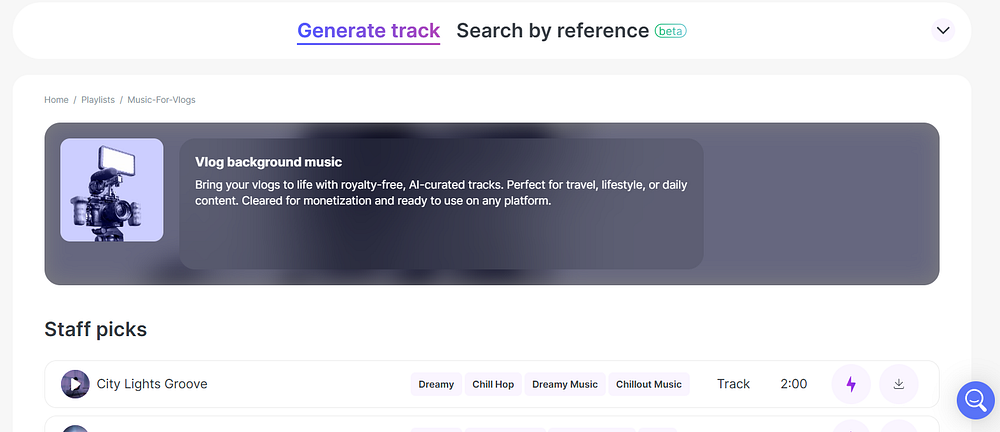
If you don’t feel like creating music yourself, you can find tracks from Mubert’s library. Under the “Explore” menu, you can search tracks with different moods, genres, and whatnot.
You can also explore different playlists, like “Music for vlogs” here.
With the Free plan, an audio watermark “Mubert” is added to the tracks. It’s quite distracting and makes the tracks created with the Free plan unusable for anything. The watermark should be removed upon downloading the track to your device.
You have virtually no control over the composition of the tracks generated, other than genre and duration. There are no vocals, but the tracks work well as background music.
Here is an example track I created, Lo-Fi background music for studying. It would be an okay track, but in the middle of it, there’s a very distracting noise.
Pros
Easy to use
Large selection of moods and genres
Image-to-music is a fun feature
Good for background music
Cons
Only instrumental, no vocals
Limited editing options
Audio watermark with the Free plan
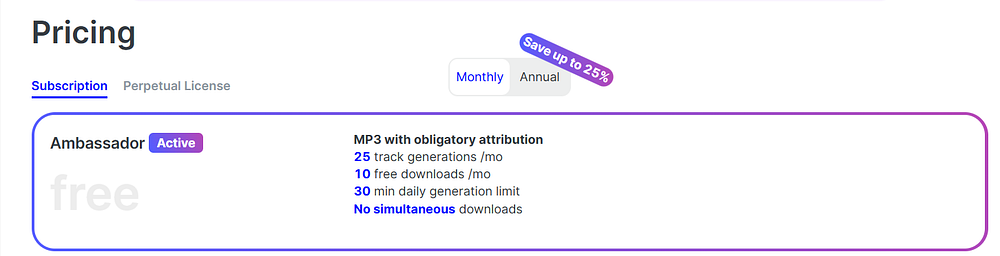
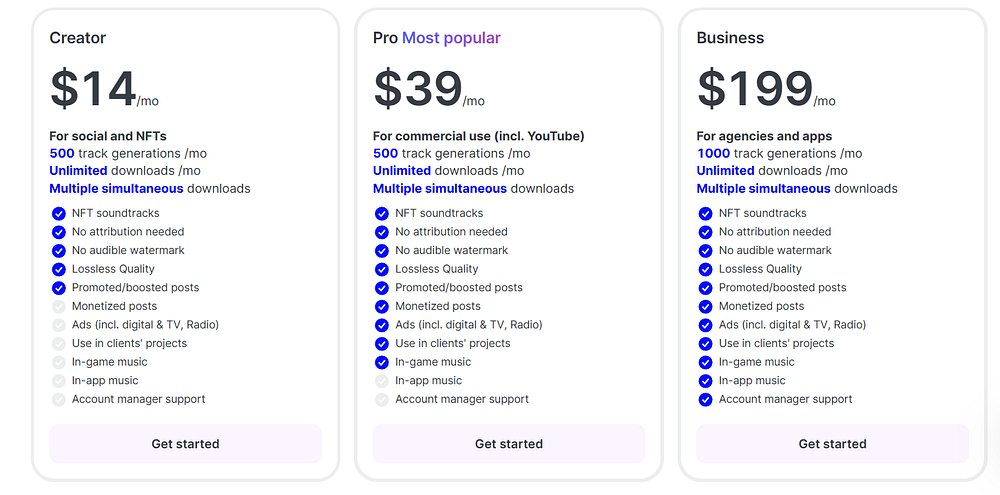
Pricing
Here are the current pricing plans of Mubert.
Ambassador: $0/month
Creator: $14/month
Pro: $39/month
Business: $199/month
Usage Rights
In short:
With the free Ambassador plan, you can use generated music to your own personal, non-commercial purposes. You need to credit copyright to Mubert with link and a hashtag. The Creator plan allows you to use music for boosted content.
For monetization and commercial use, you need to purchase the Pro plan. Content created with Mubert cannot be distributed to Spotify or other platforms.
To Take Home
Mubert is an AI-powered music generation platform. Mubert Render allows content creators to generate soundtracks that fit their content’s mood and audience. Mubert Studio and Mubert API are platforms for developers and artists and they come with more advanced settings and allow monetization of the generated products. My review is based on the free Ambassador plan of Mubert Render.
Generating tracks with Mubert was very easy and relatively fast. Creation of tracks is either text-prompt or other description-based, or you can choose from an extensive list of genres, moods, and activities. The generated tracks, on the other hand, were mediocre at best. I didn’t have a chance to test out the paid plans of Mubert; maybe the experience is better with them.
In my opinion, Mubert is an easy-to-use and basic tool for creating background music or just to play around with tracks.
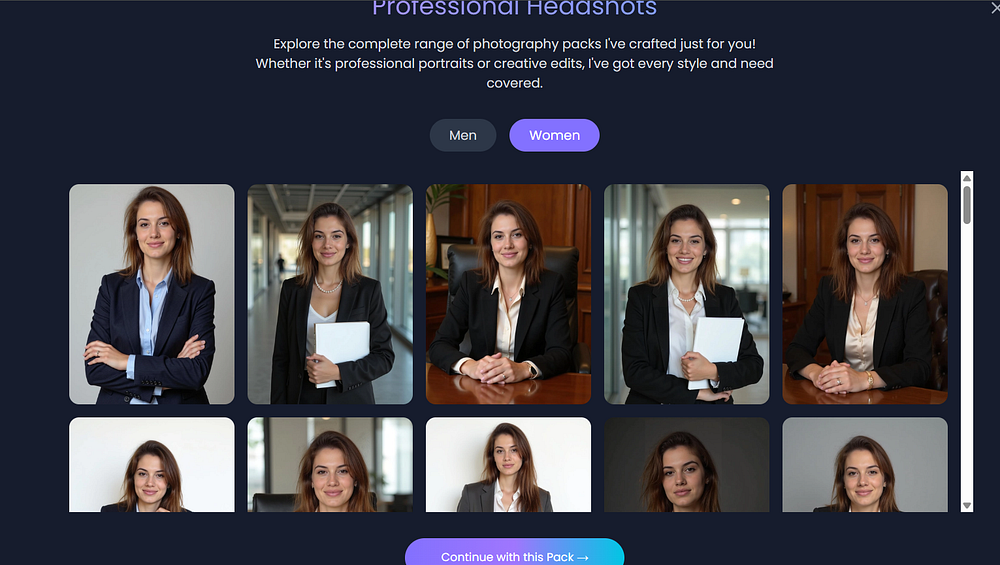
The first tool I tried for LinkedIn profile pictures is HeadShotPro.
The headshots I got were sharp and professional. They look natural, not stiff, and would work well in a business setting.
My Results & Experience
Making headshots with it is simple. Just go to their website and start.
You’ll need to upload at least 15 photos.
This part was tricky for me since I don’t usually keep a bunch of high-quality selfies on hand.
My package let me pick 10 different styles for the headshots.
I liked the “Choose for me” button since picking each background and outfit style one by one felt a bit slow.
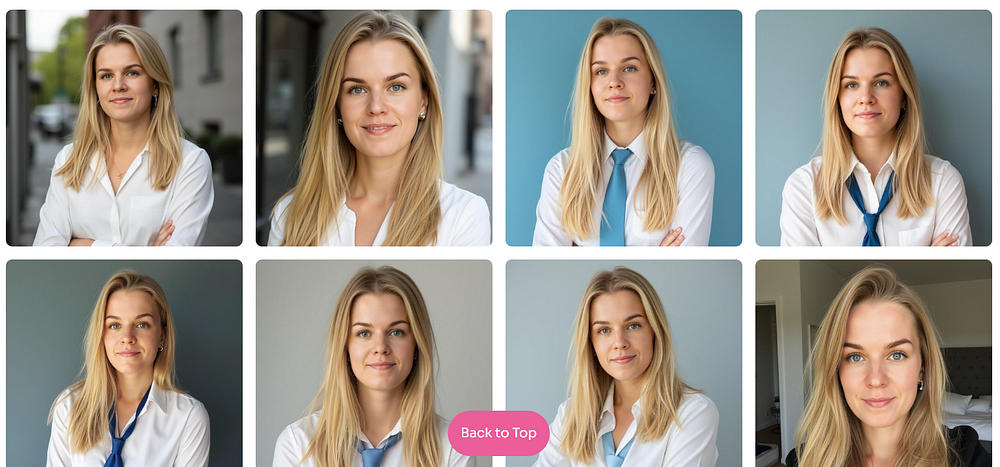
Now let’s look at some of my results.
I like these a lot. They look professional while still feeling natural.
One big reason I ranked this tool #1 is the preview feature.
It lets you see how your headshot would look on LinkedIn or in an email signature. Super handy.
They also offer an editing feature. You can swap outfits, adjust expressions, or change the background.
I tested the “Emotion” option to make my face look a bit more cheerful. The result is on the right. It’s not the most natural look, but I get it—expressions are tough to get right.
I also tried the background change. I asked it to swap a gloomy interior for a leather couch.
The result on the right looks more natural, and the edit didn’t hurt the image quality or my face.
Pros
Lots of backgrounds and clothing combos to pick from.
Helpful extras like the “Choose for me” button and the LinkedIn preview.
Headshots come out sharp and professional.
They also look great as small icons.
Cons
Uploading 15 selfies was harder than I expected.
The edit feature isn’t the best. Background change worked fine, but that’s about it.
For LinkedIn profile photos, HeadShotPro is my top pick. The results look realistic and professional. And if you want to tweak things, the edit feature is there.
I’d definitely recommend this tool. The LinkedIn preview is the nice extra that makes it even better.
This is the second best AI LinkedIn headshot generator on the list today.
This tool creates AI headshots from selfies that are perfect for LinkedIn. Those images are professional selfie-style photos that match perfectly what you need for LinkedIn.
My Results & Experience
Here’s how to make your own headshots. Just go to their website and click “Create your Headshots.”
Next comes the most important step—choosing your selfies.
Take your time here and pick the best ones that really show you. The quality of your headshots depends on it.
Once your selfies are uploaded, you can pick the looks for your headshots.
With the Premium plan, you get to choose up to 10 different styles.
Here are my results.
My first thought is that they look accurate.
I like these a lot. They look realistic and capture my features well.
They also don’t make me look older or distorted in any way.
The tool also has an edit feature. I tested it by swapping my hoodie for a more formal outfit.
You can pick from a list of different clothing styles.
Here are the results.
In my opinion, they don’t look very natural.
Pros
One of the fastest turnarounds — only 15 minutes with the Premium plan.
Very easy to use.
I got some solid and accurate headshots.
Cons
Some shots came out blurry or unfocused.
The editing feature isn’t great (though I only tried one edit).
Pricier than many other tools.
Pricing
Here are the pricing plans for InstaHeadshots.
If you don’t like your results, they give a full money-back guarantee.
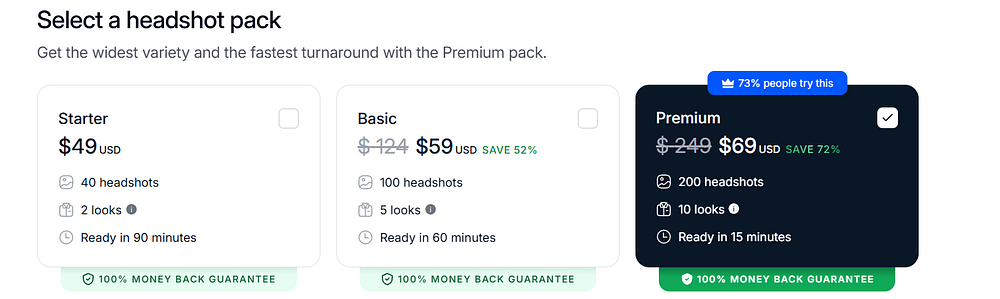
Basic – $59 USD (was $124, save 52%): 100 headshots, 5 looks, ready in 60 minutes.
Premium – $69 USD (was $249, save 72%): 200 headshots, 10 looks, ready in 15 minutes.
To Take Home
InstaHeadshots gave me a batch of realistic headshots that look professional enough for LinkedIn.
The quick turnaround is the main highlight, along with the edit option.
Of course, there are always some weak results, but you can just skip those. It is a bit pricier than other tools, but I’d still recommend it for LinkedIn profile photos.
After signing up, you upload the selfies. I really recommend taking the time to find suitable selfies that follow their guidelines, as these will determine the accuracy of your selfies.
You’ll be asked a few questions about your features.
You’ll get an email when your images are ready. This takes about 2 hours.
Here are my favorites. They look realistic and would work well in a professional setting. My hair even turned out nice, which isn’t always the case.
Pros
Headshots look accurate and professional.
Plenty of variety in poses and angles.
Images are high-quality and don’t look overly AI-generated.
Cons
No option for customization.
Not the best value since the price per headshot is higher.
I tried out the Dreamwave AI headshot generator so you don’t have to.
In this post, I’ll show you the results and share what I really think.
Disclaimer: This post has affiliate links at no cost to you.
What is Dreamwave AI
Dreamwave is a headshot generator that makes business-style photos from your selfies. It only takes a few hours and can save you both the cost and hassle of hiring a photographer.
If you don’t love the first results, you can use the AI edit tool. It lets you adjust clothing, switch backgrounds, or make changes with simple text prompts.
How to Use It
To use it, just go to their website and get started.
Make sure to follow their selfie guidelines, since that’s what decides how accurate your headshots turn out!
Once your headshots are processing, you’ll get a notification when they’re ready. For me, the wait was about an hour.
Review of the Results
Here are my results! They came in sets with different backgrounds, and overall I’d say they look pretty accurate. Usually, AI struggles with my real hair color or style. This time, it’s mostly right, though a few shots gave me brown hair or a much shorter cut.
I have to say, it’s kind of fun seeing myself with a pixie cut or as a brunette. Of course, those wouldn’t really work as professional headshots, at least not without edits. Maybe my hair color is just harder for the AI to get right.
I’d say the face looks accurate, even when shown from different angles!
With AI headshots, a few will always look off. Most tools even warn you about this, so just ignore the bad ones. Here are a couple of examples.
The hairstyle on the left doesn’t make sense, and the one on the right is just poor quality.
Edits
Dreamwave also has an AI editor that lets you make small touch-ups to your photos.
I tried the outfit change edit, and this was my prompt.
I’m happy with how it turned out! The edit feels natural and fits right into the picture. The quality of the image itself isn’t the best, though.
I tested if the AI could make my hair longer.
It did what I asked, but I was hoping for slightly longer hair. The edit also seems to lower the image quality a bit.
Pricing
Here are Dreamwave’s current pricing plans.
Starter — $35
75 photos
8 outfits, 8 backdrops
No redos
No human touchups
Standard — $59
150 photos
10 outfits, 10 backdrop
1 free redo
No human touchups
Best Value — $99
300 photos
15 outfits, 10 backdrops
2 free redos
Unlimited human touchups
I think the prices are on the higher side, especially for the Best Value plan. You do get unlimited human edits and up to 300 headshots, but it still feels expensive.
The Starter pack, on the other hand, is a solid deal. It comes with 75 headshots, which is plenty for the entry plan. If you don’t need a ton of variety or extra edits, this option should work well.
Pros
Headshots are pretty accurate, especially the face
Good variety of poses and backgrounds
AI edit tool gives some flexibility
Cons
Pricier than many other tools
Some shots came out low-quality
Editing feature wasn’t that strong
My take
Using Dreamwave AI was much quicker than booking a photographer. I ended up with some nice shots, and the face looked very accurate in many of them. The edit tool was handy for a quick clothing change.
Overall quality was decent, though a few images looked grainy. In some cases, editing even made the quality worse.
Follow their guidelines for good selfies, since these will decide how accurate your headshots turn out!
Now your headshots are being processed, and you’ll get a notification when they’re ready.
For me, it took about an hour.
Here are my results! They’re grouped by different background styles, and overall, they look very accurate.
AI usually struggles with my real hair color or style, but here it’s mostly right—though a few images show me with brown hair or a very short cut.
I have to admit, it’s fun to see myself with a pixie cut or as a brunette.
I wouldn’t use those for professional headshots without some editing first.
Maybe my hair color is a bit rare and harder for the AI to get exactly right.
I think my face looks accurate, even from different angles!
With AI tools, some headshots are going to look off or inaccurate.
Many tools even have a disclaimer about this—just ignore the bad ones.
Here are a couple of examples:
I don’t really get the hairstyle on the left, and the one on the right is just terrible quality.
DreamWave has an AI editor where you can make subtle improvements to your images.
I tried the outfit change edit, and this was the prompt I used.
I actually really like the result!
The edit blends in pretty well and doesn’t stand out.
The image quality isn’t perfect, though.
I tested if the AI could add some length to my hair.
It sort of did what I asked, but I was expecting a bit longer hair.
The edit also seems to lower the image quality a bit.
Pros
Headshots look pretty accurate, especially the face
Lots of variation in poses and backgrounds
The AI edit feature gives some flexibility
DreamWave gives you more headshots for the same price than many other tools
Cons
More expensive than a lot of other tools
Some images come out low-quality
The editing feature isn’t the best
Pricing
Here are the current pricing plans DreamWave offers!
Starter — $35
75 photos
8 outfits, 8 backdrops
No redos
No human touchups
Standard — $59
150 photos
10 outfits, 10 backdrop
1 free redo
No human touchups
Best Value — $99
300 photos
15 outfits, 10 backdrops
2 free redos
Unlimited human touchups
My Grade
Results: 4.2/5
Customizations: 3.7/5
Usability: 4.2/5
Total: 4/5
To Take Home
Getting my headshots done with DreamWave AI was definitely faster than booking a session with a real photographer.
I got some good-looking ones, especially the face, which was very accurate.
The editing feature let me do a quick outfit change.
The overall quality was decent, though some images were a bit grainy.
The edits even made the quality worse in some cases.
5. HeadshotPro
HeadshotPro is an AI tool that makes professional-looking selfies in around 2 hours, and you can customize them afterward.
Using HeadshotPro is pretty simple. First, go to their website and pick the plan that fits you best.
Now, let’s start generating!
The most important step is uploading your selfies, since they’ll decide how good your headshots turn out.
Take some time to pick the best selfies that really show what you look like.
The tool will also ask for some personal details, like your height, hair and eye colour, and ethnicity.
Uploading 15 photos of myself was a bit tricky, since I don’t really use social media and don’t have many good selfies ready to go.
Next, you pick the background and outfit combos for your headshots. How many you can choose depends on your plan. I had the Professional Plan, so I got to pick 10 different styles.
The “Choose for me” button in the corner is a nice bonus! It saved me some time since picking all the combos can be a bit slow.
For me, the whole process took about 2 hours to finish. Pretty fast, I’d say. With the Executive Plan, the expected turn-around is just 1 hour.
Now, let’s check out my results and what I think of them. The tool gives a heads-up about “duds” — headshots that look off or just weird. That’s pretty common with AI generators.
Here’s the real me, one of the selfies I uploaded. A very recent one.
Overall, they look pretty good. I used the “Choose for me” option for the background combos, which is why I got the patriotic US flag.
The full-body pictures have a bit of a weird proportion, but my hair looks great. The headshots are very polished — maybe even a little too much for my taste.
These are probably my favorites!
I have to say, these look like polished versions of me — like there’s some kind of beauty filter on.
I really like the preview feature. It lets you see what the image would look like as your LinkedIn icon or email signature.
It really captures me with a calm facial expression.
A bigger smile, like showing my teeth, looks a bit off though.
I guess that’s because I didn’t upload many selfies with my teeth showing.
With the Professional and Executive plans, you get credits that let you edit and remix your headshots.
Let’s try to edit my expression to a more happier one.
Probably would have been better if I had shared more selfies with my teeth showing.
Now let’s try making the background transparent!
I’m not sure. I feel like I could have done this myself and maybe gotten better results.
Still, it does look good as a small icon.
Pros
Plenty of backgrounds and clothing options to pick from.
Helpful features like “Choose for me” and the LinkedIn icon preview for headshots.
Quick turnaround (2 hours with the Professional plan).
Headshots come out sharp and professional.
They look especially nice as small icons.
Cons
Some pictures look a bit repetitive.
The editing feature isn’t very strong.
Headshots feel a little too polished, almost like there’s a beauty filter.
Pricing
Here are the plans HeadshotPro offers. I went with the Professional Plan.
They also have team plans available.
I think the Basic and Professional plans are priced fairly. Go with the Basic plan if you just want a few good shots for social media and don’t need to edit them.
The Professional plan works better if you want a bigger set of headshots and maybe want to polish them a bit.
My Grade
Results: 4.2/5
Customizations: 3/5
Usability: 4.1/5
Total: 4/5
To Take Home
HeadshotPro gave me high-quality headshots in just 2 hours. You can pick your own style and background, or just let the tool choose for you if you want to save time. The shots look professional, and most of them turned out very accurate.
It didn’t do well with different facial expressions, so the headshots came out a bit same-looking. My hair looked really good though. The editing feature also wasn’t that great for me.
Overall, it’s a solid and affordable option if you need professional-looking headshots for social media or a resume.
6. Secta AI
Next up is Secta AI. It’s a solid headshot generator that takes your selfies and turns them into headshots in different styles. You can also make small tweaks to the final shots if you want.
My Results & Experience
To try this tool, go to their website and sign up.
Pick a package to get started. They also have other generator tools available, but I didn’t try those for this review.
After you choose a package, you can pick setups for your headshots. There are lots of styles to choose from, and you can select up to 7 of them.
You can also set your preferences and even connect your LinkedIn profile.
The key step is uploading about 15 selfies. It’s worth taking time here because the headshot quality depends a lot on the photos you upload.
Secta AI gives you clear instructions and even checks your photos before you can move forward.
For example, it flagged these selfies as too blurry. Using them would have messed up the final headshots.
I picked this picture as my “Favorite Photo.”
Super simple. Now you just wait. For me it took about 2 hours, but it depends on the queue.
Alright, here are the results I got. These were my favorites.
It’s tough to tell if these are actual photos of me or AI-made.
In most of them, it changed me into a brunette. The cooler brown shades made me look a bit pale.
Press enter or click to view image in full size.
I tested out very different styles. The Viral pack looked interesting, but I don’t think I’d actually use any of those.
At first glance, the facial expressions came out pretty accurate. For example, I uploaded one selfie where I looked a little bored, and that same look showed up in a lot of the headshots.
Of course, some headshots were a bit off. In a few, I looked tired, and it even seemed like the tool added some blemishes. On the bright side, the skin didn’t look overly smoothed out.
One thing I liked is that these headshots didn’t make me look older. That’s a big win. A lot of other tools tend to age me by 10–15 years for some reason.
Edits
Secta AI also lets you edit your headshots if you have a subscription. You can change things like your facial expression, clothes, background, or even upscale the images.
I tested the Remix feature to switch my hair color back to blonde.
Here I swapped my clothing to a midnight blue shirt. The headshots turned out a bit blurry.
The tool creates 8 new headshots in about 5–8 minutes.
Maybe smaller edits would help keep the headshot quality higher.
Pros
Lets you edit your headshots
Headshots come out very accurate, with only a few misses
Plenty of styles to pick from
Fast processing and delivery
Doesn’t make me look older
Cons
Remix feature can make shots a bit blurry
Hair color changes too much, some edits end up not usable
Some headshots feel repetitive
Pricing
Secta AI isn’t free. It has a Professional plan, and a Custom plan made for companies and groups.
Delivery time depends on the queue. For me, it took about 2 hours. When I checked later, it was under 1 hour.
My Grade
Results: 4/5
Customizations: 4.1/5
Usability: 3.8/5
Total: 3.9/5
To Take Home
From my set of headshots, I found about 10 I could actually use for LinkedIn or other social media. The Remix feature didn’t work that well for me — maybe smaller edits would help keep the quality and avoid blur. I also noticed some headshots felt pretty repetitive in certain styles.
The price can feel high if you only need one strong headshot, since Secta AI only offers one package for individuals right now. But if you need a bigger set of good headshots, the price makes sense.
Overall, Secta AI is a solid tool for the right person.
7. InstaHeadShots
InstaheadShots is a tool that turns your selfies into professional-looking headshots. It saves you the time and cost of hiring a photographer or booking a studio.
My Results & Experience
First, head over to their website to use this tool.
Make an account (I just used my Google login) and set up your profile by answering a few quick questions.
Next comes the most important step — picking your selfies. Take time to choose the best ones that actually represent you. The quality of your headshots depends on these.
Here are the photo requirements to help you pick the right selfies.
Once your selfies are uploaded, you can start a new photoshoot. With the Premium plan, you can pick up to 10 different looks.
Turnaround time depends on the package. With the Premium plan, it can be as fast as 15 minutes. You’ll get an email when your headshots are ready.
Here are my results. I got 200 headshots in total, across 10 different looks.
First impression — they look very accurate. There are a few misses, of course, but that’s normal with any AI tool.
This one’s my favorite, even though the outfit is pretty casual. The earring on my right ear looks a little off, but it’s barely noticeable.
Hard to tell if this is a real photo of me or AI-made.
Here’s another one I really like, this time with more professional clothing.
The images come with a watermark until you decide to download them.
I mentioned the misses earlier, and here are some examples. My face looks way too polished and obviously AI-made. The tool also didn’t capture my smile with teeth very well. To be fair, I only uploaded one selfie with teeth showing.
InstaHeadshots also has an editing feature. You can buy credits separately to use it.
You can edit the outfit, background, or touch up the images. I tried changing my outfit in this one.
Here’s the result. It looks a little unnatural to me, so I prefer the original.
InstaHeadshots also lets you upscale your images to higher quality, but it costs extra.
Pros
One of the fastest turn-around times
Easy to use
I got some good and accurate headshots
Cons
The majority of headshots looked too artificial
Editing option is not great (I only tested for one edit, though)
Expensive
Pricing
It’s cheaper than hiring a professional photographer, but I still find InstaHeadshots a bit pricey. The Premium plan gives the best value, since the other two only include 2 to 5 looks and have limited editing options.
If you’re not happy with your results, InstaHeadshots does offer a 100% money-back guarantee.
My Grade
Results: 3.7/5
Customizations: 4/5
Usability: 4/5
Total: 3.9/5
To Take Home
InstaHeadshots is a fast and simple headshot generator that can turn your selfies into headshots in as little as 15 minutes. How many photos you get depends on the package, and you can pick the ones you want to keep.
I did get a few shots I’d gladly use for my social media, but many weren’t usable. A lot looked clearly AI-made, and with the limited editing options, I think the tool feels a bit pricey for what it gives.
8. PhotoPacks
Photopacks AI says it can give you photoshoot-quality headshots without the big cost. Let’s give it a try.
My Results & Experience
PhotoPacks AI is simple to use. Let’s walk through the steps.
Next, pick the styles you want and set your preferences, like gender.
I went with the Headshot package.
Now comes the key step — uploading your selfies. Since these decide the quality and accuracy of your headshots, it’s worth taking time to pick the best ones.
The tool even gives your selfies a quality score.
You’ll get an email when your order is ready, so you can close the tab and come back later.
For me, the process took about 3 hours. In busy times, it might take longer depending on the queue.
Now let’s look at my results.
Overall, I like how natural they turned out. The AI made my hair look full and healthy, and the lighting in the shots looks great.
These are my favorites. I prefer the headshots that look the most realistic, not the ones that just make me look better or overly polished.
Like with any tool, a few headshots came out distorted with that uncanny valley vibe. Just skip those.
Pros
Headshots don’t look too fake
Lighting is flattering and has good variety
Got some really solid and accurate shots I’d actually use on social media
Simple to use
Cheaper than some other tools
Cons
No customization features
Can take up to 24 hours to get your headshots. Most times it’s faster, but other tools are still quicker
Pricing
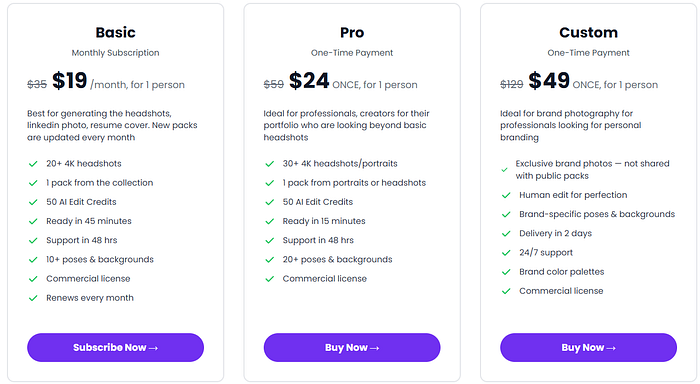
The Headshot package costs $24 and gives you over 100 headshots with 20 different backgrounds and outfits.
If you’re not happy with the results, the tool offers a money-back guarantee.
My Grade
Results: 4.2/5
Customizations: 0/5
Usability: 4.1/5
Total: 3.9/5
To Take Home
PhotoPacks AI gave me good-looking, accurate headshots in about 3 hours, and the price felt fair.
The downside is the lack of editing or customization. Being able to change the background or outfit would make it better.
Still, using AI for headshots saves you the time and hassle of booking a real photo shoot with a photographer.
8. Portrait Pal
Portrait Pal makes solid business headshots for a fair price. You get a variety of clothing and background styles. The only downside is the lack of customization options.
My Results & Experience
First, let’s walk through how to create your headshots.
After signing up, upload your selfies. I recommend taking time to pick ones that match the guidelines, since these will decide how accurate your headshots turn out.
Before finishing your order, you’ll need to add some details like eye color, hair color, and body type. This helps the AI create headshots that match your look more closely.
You’ll get an email from Portrait Pal once your headshots are ready. Turnaround time is about 2–3 hours, depending on your plan (I’ll cover pricing later).
Now, let’s look at my results.
First impression — there’s a lot of variety. Different poses and angles.
Some shots look a little too polished. And like with any AI tool, a few images came out distorted or had that uncanny look. Just skip those.
These are my favorites. They look accurate and feel like real photos of me. The hair color came out perfect too, which is rare — usually I end up shown as a brunette.
Another thing I’ve noticed with some AI headshot tools is they make me look 10–15 years older. Luckily, Portrait Pal didn’t do that.
Pros
Accurate and professional-looking headshots
Lots of variety in poses and angles
Images look high-quality and not overly AI-made
Cons
No customization options
Price per headshot is a bit high, not the best value
Pricing
Here are the pricing plans offered by Portrait Pal.
Starter — $35 (was $45)
20 high-quality headshots
3-hour processing time
Basic — $45 (was $75)
60 high-quality headshots
2.5-hour processing time
Premium — $75 (was $129)
100 high-quality headshots
2-hour processing time
The price is about average, but other tools give you more headshots, extra features, and faster turnaround for the same cost.
My Grade
Results: 4.2/5
Customizations: 0/5
Usability: 4/5
Total: 3.7/5
To Take Home
I was happy with the headshots I got from Portrait Pal — they looked good and accurate.
The downside is the lack of customization. And while the price is average, you get fewer headshots compared to other tools. Still, it saves time and money versus hiring a real photographer.
9. AI SuitUp
AI SuitUp is a headshot generator that makes professional business headshots for LinkedIn or resumes. You just upload some selfies and let it do the work. You can pick from different styles, and you’ll get a full package of headshots.
My Results & Experience
Here’s a step-by-step guide on how to create your own headshots with AI SuitUp.
Next, pick the plan that works best for you. I suggest the Professional or Ultimate plan since they give you HD resolution and more headshots to choose from.
Then, answer a few quick questions about your characteristics.
Now comes the most important step — upload several selfies following the instructions. The better the selfies, the better your headshots will be.
AI SuitUp checks your selfies and flags any that are too low quality or not usable.
Once you’ve confirmed your selfies, just hit send and you’re good to go.
AI SuitUp will email you when your headshots are ready. Just follow the link to view your results.
Then it’s time to check out your results. You can download the headshots one by one or as a full set.
There’s also an option to share them straight to LinkedIn.
Just remember to save the link to your album, since that’s the only way to access your headshots (there’s no sign-in option).
Now let’s take a look at my results and see how the quality turned out.
This is the picture I chose as my “base image.”
These are my results!
At first glance, the results look pretty good and accurate.
Here are my favorite headshots I got from this tool:
I think they look professional and capture me well, especially around the eyes. My hair shows up at different lengths since I uploaded selfies with different haircuts. A common issue I’ve had with AI headshot tools is that they make me look 10–15 years older. These didn’t age me too much, though I do look a little more mature than I actually am.
Of course, not every headshot is perfect. It’s pretty normal for some to come out odd. Here are a couple of misses I got.
Pros
Affordable
Simple to use
Gives you different styles and backgrounds, so you get a versatile set of headshots
Most headshots are very accurate — I’d definitely use them
Clear instructions and selfie checks before submission to improve results
Cons
No customization option
Some headshots made me look older than I am (a problem I’ve seen with other tools too)
A few headshots didn’t look like me at all
Pricing
Basic: $27 (Originally $59)
Professional: $37 (Originally $69)
Ultimate: $57 (Originally $99)
My Grade
Results: 3.8/5
Customizations: 0/5
Usability: 4/5
Total: 3.7/5
To Take Home
AI SuitUp is a relatively cheap headshot generator that creates professional headshots. Unfortunately, it doesn’t offer a customization feature, which lowers the score.
10. Aragon AI
Aragon AI is one of the first AI headshot generators, launched in 2022. It creates realistic headshots for professional use and also includes solid editing and customization features.
My Results & Experience
To use it, first, head over to their website and sign up for the service.
Set up your preferred characteristics, such as gender, eye and hair colour, and ethnicity.
The key step is uploading your selfies. Since the headshots are based on these, it’s worth taking time to pick the best ones that really represent you.
Upload at least six selfies. The tool checks them to make sure they meet the requirements. I used the same selfies I usually upload to other AI headshot tools, and this time none were rejected.
Now you just wait. Aragon AI will send you an email when your headshots are ready.
Simple as that. Now let’s check my results and what I thought of them.
The tool does warn that some images may look a little off, which is normal with AI headshot generators. Just stick with the best ones.
My first impression is that they look very polished and a bit AI-made. Honestly, some don’t look that great. Let’s take a closer look.
I really like these ones. They look accurate and realistic — they actually look like me.
This one came out surprisingly well for a side profile shot. The only downside is the skin looks a bit too polished for my taste.
I like this feature a lot. When you view your images, you can preview how they’d look as your LinkedIn profile photo or in your email signature.
Some of the weaker images actually looked better when I previewed them in this mode.
Aragon AI also comes with a built-in editor. You can change outfits, adjust hairstyles, remove blemishes, and more.
Here, I tried the “Unblur image” edit.
The results on the right made me look about 10 years older for some reason. It also added a crossed-hands pose that I didn’t ask for.
Pros
Very fast — only 15 minutes with the Executive plan, making it one of the quickest tools
Plenty of backgrounds and clothing styles to pick from
Lets you edit the headshots after they’re created
Cons
Honestly, I wouldn’t use most of the headshots I got
Editing sometimes made the image worse
Shots looked a bit too polished for my taste (though some might like that)
Pricing
These are the individual pricing plans Aragon AI has right now. They also offer packages for teams and companies.
Basic — $35
40 headshots
45-minute generation time
1 attire
1 background
Standard resolution
Standard — $45
60 headshots
30-minute generation time
2 attires
2 backgrounds
Standard resolution
Executive — $75
100 headshots
15-minute generation time
All attires
All backgrounds
Enhanced resolution
My Grade
Results: 3.7/5
Customizations: 4/5
Usability: 3.8/5
Total: 3.7/5
To Take Home
I think there are better tools out there since the quality here wasn’t the best. If you don’t already have a set of good selfies and need to upload older or grainy ones, the results may not turn out great.
But if speed is your priority, Aragon AI could be a good pick. The editing feature is also a nice bonus, letting you change backgrounds, outfits, and even hairstyles after.
11. Profile Bakery
Profile Bakery creates headshots with a pretty quick turnaround and even lets you make small adjustments, which is a nice bonus.
My Results & Experience
To use it, just sign up and click “Start Now”.
Upload your selfies and make sure to follow the photo guidelines they provide. I recommend taking time to pick your best shots since they’ll decide how accurate your headshots will be.
Pick the style you want for your headshots. I chose the business style since I wanted shots good enough for LinkedIn and my resume.
Select your package based on whether you want a bigger set of headshots with more variety or just a smaller batch.
You’ll also have the option to make extra purchases at this step.
Once that’s done, your headshots start “baking,” and you’ll get an email when they’re ready. The process only takes about 30 minutes.
Here are some of the headshots I got. Overall, a few turned out really good. I also liked the variety in poses and lighting.
Press enter or click to view image in full size.
Some shots came out inaccurate or unflattering, with my face looking distorted. But that happens with all AI tools — just skip those.
This one was my favorite. It’s accurate and professional-looking, perfect for LinkedIn or other business use. The only downside is my hair looks a bit fried.
Edits
Profile Bakery also has an AI editing feature that lets you tweak your images. You can make prompt-based changes, switch backgrounds or outfits, or boost the image quality. I tested a few of these options.
Here I tried changing my outfit into something more professional.
Next, I tried the “Face Improve” feature by uploading one of my real selfies as a reference. I wasn’t sure what to expect — but definitely not this.
I also tried a couple of text-prompt edits, though my prompts were probably too vague. The tool does have a “Quick Suggestions” option with ready-made prompts you can use.
I tested the background edit feature on one of my real selfies. Here’s the result:
Pros
Fast turnaround, even with the Mini plan
Plenty of editing options
Mini and Regular plans are affordable
Cons
Editing feature can lower the image quality
Edits didn’t come out that great
Getting back into your gallery after signing out was a bit tricky
Pricing
Here are the current pricing plans they offer.
AI Mini — $24
30 pictures, 4 styles
Delivery in 30 mins
Includes CV & cover letter tools, resume check, LinkedIn analysis, change clothes, career prompts
AI Regular — $29
60 pictures, 8 styles
Delivery in 30 mins
Same extras as Mini
AI Pro — $49
96 pictures, 12 styles
Delivery in 30 mins
Same extras as Mini & Regular
My Grade
Results: 3.5/5
Customizations: 3.8/5
Usability: 3/5
Total: 3.1/5
To Take Home
Profile Bakery gave me some nice headshots, but most had a bit of an artificial look. It does offer customization, but the results weren’t great and editing hurt the quality. I also had trouble getting back to my headshots after signing out. The UI could definitely be better.
12. The Multiverse AI
Multiverse AI stands out because of its wide range of customization options, all driven by your text prompts.
My Results & Experience
First, let me show you how it works. Getting started with Multiverse AI is simple. Just go to their website and pick a headshot package.
After buying a package, you can upload your selfies.
This step is key, since your selfies decide how good and accurate the headshots will be. I recommend following their guidelines and taking time to pick the best photos that represent you.
You’ll get an email when your headshots are ready. It usually takes less than two hours.
Now let’s look at my results. Overall, there was a lot of variety. At times, it even felt like the AI was guessing what I look like. For some reason, it also turned my hair dark brown.
This one’s my favorite. It looks accurate and professional, and it’s hard to tell if it’s AI-made or a real photo of me.
I could definitely use this one for LinkedIn or another professional setting.
Multiverse AI also has an edit feature, which makes sense given the name. You can use text prompts to ask the AI to change your headshots.
For example, I asked it to make my hair blonde and shorter. The edited shot looked even more natural than the original!
Original headshot is on the left, and the edit is on the right.
Next, I tested changing the background from plain grey to an outdoor setting.
Finally, I tried a text prompt edit to make my expression look a bit more cheerful. My prompt was probably too vague for this one, though.
Multiverse AI also lets you generate 20 brand-new headshots just from text prompts. You start with 20 credits by default, and you can buy more if you want extra.
One thing to note — always include “me” in your prompt. If you’re short on ideas, you can check the “Ideas” tab for inspiration.
These new headshots were generated in under three minutes. It took me a few tries to get the hair color right (my vague prompts didn’t help), but I really like how they turned out.
Pros
100 headshots in under 2 hours
Can generate up to 20 headshots with text prompts
Editing feature included
Fast and easy to use
Affordable
Cons
Could use more variety in camera angles
Some shots looked more like a random person than me
Pricing
Multiverse AI has two plans: one for individuals and one for teams. I used the individual plan, which costs $29 (or €25) and is paid through Stripe.
I think the price is very reasonable. With all the customization options, you’re almost guaranteed to get at least a few solid headshots.
My Grade
Results: 3/5
Customizations: 4.5/5
Usability: 3.5/5
Total: 3.5/5
To Take Home
Even with all the customization options, some headshots looked like they were of a completely different person. The editing feature also didn’t impress me much.
That said, I still got some solid headshots, and the price is affordable compared to many other tools.
13. Vheer.com (Free)
Vheer.com is another free AI headshot generator I tried. It lets you pick from different styles for your headshots.
My Results & Experience
Vheer.com is simple to use — just start generating.
Upload or paste a selfie — you only need one. Then pick a style from the panel on the right.
This is the selfie I used. You can also tweak the prompts on the right or adjust the aspect ratio if you want.
Here are my results. The tool makes one headshot at a time, but you can redo it as many times as you want.
The result looked like my face was copy-pasted onto different outfits and backgrounds.
I tried changing the Expression Prompt to see if it worked. The results actually surprised me.
It’s actually not bad — the smile looks pretty natural. But up close, it’s a bit blurry and the eyebrows look odd.
Pros
Free
Fast — only takes a few minutes to generate
Just one photo needed to create the headshot
You can even do some text prompt edits
Cons
Quality is lower than with paid tools.
Since it only uses one selfie, the headshots end up looking very repetitive.
Pricing
100 % free.
My Grade
Results: 3/5
Customizations: 3/5
Usability: 3/5
Total: 3/5
To Take Home
I was actually surprised by the results. This tool is worth a try if you don’t want to pay for headshots. The quality isn’t great, but they can work for small profile icons, like on LinkedIn.
14. HeadShotMaster
Besides the tools above, there are also completely free options.
I tried HeadShotMaster to see how the headshots would turn out and whether it could match the paid tools.
My Results & Experience
HeadShotMaster is quick and simple to use. Just go to their website — no sign-up needed — and click “Generate now.”
You’ll be asked to fill in a few details, like gender, age, and style for the headshot.
You can upload up to 4 photos, but even 1 is enough to generate headshots.
I tested the Professional and Sepia styles.
You can tell the images are meant to look like me, but they came out very artificial — almost cartoon-like.
Pros
Free
Very fast — turnaround is only a few minutes
Just one photo needed to make a headshot
Cons
Lower quality compared to paid tools
Don’t look realistic
I wouldn’t actually use these
Pricing
100 % free.
My Grade
Results: 1/5
Customizations: 0/5
Usability: 1/5
Total: 1/5
To Take Home
If you’re on a budget and need headshots right away, HeadShotMaster might be worth a try. You can generate new shots as many times as you want, so you might end up with one you like. Still, it’s no match for the paid tools.